Difference between revisions of "Camera Setup"
| (29 intermediate revisions by the same user not shown) | |||
| Line 17: | Line 17: | ||
[[File:Setup-camera-216c.jpg]] | [[File:Setup-camera-216c.jpg]] | ||
| − | |||
| − | |||
| − | |||
*ASCOM Camera | *ASCOM Camera | ||
| + | *ASI Camera (with ASI SDK frozen to 1.16.0 version) | ||
| + | *ASI Camera V2 <u>[starting from Voyager Daily Build 2.2.16h]</u> (for cameras need SDK equal or greater than 1.16.3 and/or using FPGA binning mode like ASI294MM Pro) | ||
*CAM8S Camera | *CAM8S Camera | ||
| + | *FLI CCD Camera | ||
| + | *Maxim DL | ||
| + | *QHY CMOS Camera | ||
| + | *QHY CMOS Camera BETA [<u>starting from Voyager 2.3.0</u>] (for using your QHY camera whit the last Beta SDK released from QHY, Beta version embedded in Voyager depend on relase or daily build creation) | ||
| + | *QSI Camera | ||
*SX ASCOM Camera | *SX ASCOM Camera | ||
| − | * | + | *TheSkyX Camera Add On |
| − | |||
Visit the [[Installation#Prerequisites|Installation Prerequisites]] section to see which versions of these third party applications are supported by Voyager. | Visit the [[Installation#Prerequisites|Installation Prerequisites]] section to see which versions of these third party applications are supported by Voyager. | ||
| Line 33: | Line 36: | ||
==TheSkyX Camera Add On== | ==TheSkyX Camera Add On== | ||
| − | If you choose TheSkyX Camera Add On from the Camera drop-down list, Voyager will connect directly to TSX configured Camera and Filter Wheel.<br />{{Note|Please remove the AutoSave flag in TheSkyX Camera Add On to prevents CFITSIO error during Voyager FIT data management. Voyager will save for you all the data needed.}}< | + | If you choose TheSkyX Camera Add On from the Camera drop-down list, Voyager will connect directly to TSX configured Camera and Filter Wheel.<br />{{Note|Please remove the AutoSave flag in TheSkyX Camera Add On to prevents CFITSIO error during Voyager FIT data management. Voyager will save for you all the data needed.}} |
| + | |||
| + | ==Info about Camera Driver / SDK / ASCOM Driver == | ||
| + | Some clarification about level of drivers, especially for CMOS cameras: | ||
| + | |||
| + | * Camera Driver (low level file needed by Camera to work with your OS, usually contains also the firmware will be loaded on camera for some brand/models) this must be installed in anycase and usually are not included in SDK and ASCOM driver | ||
| + | * SDK (mid level file for allow application to talk with the camera driver, can be used to direct access to camera) this not include camera driver usually depends on camera brands | ||
| + | * ASCOM Driver (ASCOM platform file allow all application compatible with ASCOM to work with camera, use SDK to access to camera driver) not include camera driver but usually include SDK, location of the SDK usually is not the right one for the application use only SDK … this is the reason if you install newer ASCOM driver not mean automatically you will have your application with updated SDK. | ||
| + | |||
| + | SDK with direct access is the most performant usually especially for CMOS with big size sensor. | ||
| + | |||
| + | Voyager have direct driver using SDK for some CMOS / CCD cameras, brands usually have a Beta Release of driver for the new cameras or just released on market. So if you want to use beta driver and upate ones used in Voyager in the wiki is described how to do or in the page of each single brand. (basically download SDK file and copy on Voyager SDK Platform folder). See [https://wiki.starkeeper.it/index.php/Installation#SDK_Platform_Folder Voyager SDK Platform folder]. Some brand like ASI and QHY have double camera control in voyager to use stable or beta version of SDK. | ||
| + | |||
| + | In any case, we will not be responsible for any malfunctions or strange behaviors. | ||
| + | |||
| + | If you have problems with these drivers, first open a support ticket at your CMOS support service. | ||
| + | |||
| + | '''A last thing, like wrote in wiki, if you will update Voyager installation with a new daily build or release we will install back the choosed driver by Voyager.''' | ||
| + | |||
| + | ==QSI Native Driver== | ||
| + | If you choose QSI Camera from the Camera drop-down list, Voyager will connect directly to your QSI camera using the COM object released with the their SDK (not via ASCOM). | ||
| + | |||
| + | Usually until 6.x version of the CD installation software of QSI this will be included in the main installation of CD, now ATIK (owner of QSI) seems to have removed it and trust only on ASCOM driver. | ||
| + | |||
| + | |||
| + | <u>How to allow Voyager work with QSI SDK driver ?</u> | ||
| + | |||
| + | |||
| + | '''You can use the legacy driver installation (instead of the last version):''' | ||
| + | |||
| + | https://qsimaging.com/drivers-software/#cd-and-drivers | ||
| + | |||
| + | ''<code>"Our legacy installer includes our old ASCOM driver '''QSI Installer''' (.zip) 30.9MB v1.0.0.3"</code>'' | ||
| + | |||
| + | |||
| + | '''You can download from here the SDK:''' | ||
| + | |||
| + | https://qsimaging.com/drivers-software/#custom | ||
| + | |||
| + | Open the QSI folder inside and install it like for instructions in the readme.txt: | ||
| + | |||
| + | ''<code>"Installation of QSICamera.dll requires the use of regsvr32 to register the dll in the Windows Registry.</code>'' | ||
| + | |||
| + | ''<code>We recommend placing QSICamera.dll in C:\Windows\System32 and then calling regsvr32 from powershell run as an administrator.</code>'' | ||
| + | |||
| + | ''<code> PS C:\WINDOWS\system32> regsvr32 .\QSICamera.dll</code>'' | ||
| + | |||
| + | ''<code>Note: On a 64 bit machine</code>'' | ||
| + | |||
| + | ''<code> QSICamera.dll from the x64 folder should be placed in C:\Windows\System32</code>'' | ||
| + | |||
| + | ''<code> QSICamera.dll from the x32 folder should be placed in C:\Windows\SysWOW64</code>'' | ||
| + | |||
| + | ''<code>To unregister you will need to call regsvr32 with the /u argument.</code>'' | ||
| + | |||
| + | ''<code> PS C:\WINDOWS\system32> regsvr32 /u .\QSICamera.dll"</code>'' | ||
| + | |||
| + | |||
| + | We do not put this on Voyager installation to avoid retro compatibility problem with camera having 5.x and 6.x version of firmware, we are not sure all working fine with the 7.x SDK. | ||
| + | |||
| + | '''If you have a 5.x or 6.x installation CD the SDK will be installed automatically with the main installation menù.''' | ||
| + | |||
| + | If you want direct support please contact us for remote checking. | ||
| + | |||
| + | ==ASI Native Driver / ASI Native Driver V2== | ||
| + | If you choose ASI Camera or ASI Camera V2 from the Camera drop-down list, Voyager will connect directly to your ZWO ASI camera (not via ASCOM). | ||
| + | |||
| + | |||
| + | {{Note|Difference between the two ASI Native driver: | ||
| + | |||
| + | - ASI Camera (with ASI SDK frozen to 1.16.0 version) | ||
| + | |||
| + | - ASI Camera V2 [starting from Voyager Daily Build 2.2.16h] (for camera need SDK equal or greater than 1.16.3 and/or using FPGA binning mode like ASI294MM Pro)}} | ||
| + | |||
| − | |||
| − | |||
Click the Camera Advanced Config button to bring up the ASI Camera Setup dialog: | Click the Camera Advanced Config button to bring up the ASI Camera Setup dialog: | ||
| Line 69: | Line 143: | ||
*'''Offset:''' Move the slider to set the offset value. See your camera's manual for an explanation of how your choice here affects your image | *'''Offset:''' Move the slider to set the offset value. See your camera's manual for an explanation of how your choice here affects your image | ||
*'''USB Limit:''' Move the slider to set the USB limit value. This controls how fast the camera sends data to the USB port. If your download does not finish, try a lower setting. | *'''USB Limit:''' Move the slider to set the USB limit value. This controls how fast the camera sends data to the USB port. If your download does not finish, try a lower setting. | ||
| − | *'''Remove Gain Limit Management:''' (Starting from Voyager 2.2.14b version) ASI Camera driver (like for ASI specific) limit the maximum gain for DSO use, calculus is | + | *'''Remove Gain Limit Management:''' (Starting from Voyager 2.2.14b version) ASI Camera driver (like for ASI specific) limit the maximum gain for DSO use, calculus is automatically done. If you want to use gain up to raw max gain, check this flag and reopen the form. If you use high gain level for this cameras you can shrink in a bad way the full well capacity and increase drammatically the noise. '''<u>Use at your risk !</u>''' |
*'''Cancel:''' Discard changes and exit this dialog | *'''Cancel:''' Discard changes and exit this dialog | ||
*'''OK:''' Save changes and exit this dialog<br /> | *'''OK:''' Save changes and exit this dialog<br /> | ||
{{Note|The ASI Camera native driver is the only way to control the Gain and Offset values of a ZWO ASI camera from Voyager. You cannot control them from Voyager if you use the ASCOM driver to connect to your ASI camera}} | {{Note|The ASI Camera native driver is the only way to control the Gain and Offset values of a ZWO ASI camera from Voyager. You cannot control them from Voyager if you use the ASCOM driver to connect to your ASI camera}} | ||
| + | |||
==ASI Camera Name Match== | ==ASI Camera Name Match== | ||
| Line 82: | Line 157: | ||
<br /> | <br /> | ||
| + | |||
| + | ==FLI CCD Native Driver== | ||
| + | If you choose FLI CCD Camera from the Camera drop-down list, Voyager will connect directly to your FLI CCD camera (not via ASCOM) and if you want directly also to your FLI Filter Wheel. | ||
| + | |||
| + | Click the Camera Advanced Config button to bring up the FLI CCD Camera Setup dialog: | ||
| + | |||
| + | [[File:FLICameraChoose.png]] | ||
| + | |||
| + | |||
| + | |||
| + | The FLI CCD Camera Setup dialog is this one: | ||
| + | |||
| + | [[File:FLISettingForm.png]] | ||
| + | |||
| + | * '''Camera Chooser:''' Choose the camera from the drop-down list, the camera must be connected to open the settings form | ||
| + | * '''Rescan:''' to read again the list of FLI CCD Camera connected to the PC | ||
| + | * '''RBI Preflood:''' to avoid ghost issue on the KAF CCD Sensor RBI can be use to remove and mitigate the effect. More info on website of vendor. This will add extra time to the shot | ||
| + | ** '''Flood Time:''' time of exposure in milliseconds with flooding of sensor with IR internal leds | ||
| + | ** '''Flushes:''' number of cleaning cicle after flooding (dark mode an background flush will used if avalaible from firmware) | ||
| + | ** '''RBI Bin Factor:''' factor to use in binning for the flooding | ||
| + | ** '''RBI Enabled:''' switch to off you you dont want to use the RBI and dont want to retrieve the Reaadout Mode dedicated to RBI (advice is to leave ON and just not use RBI mode in various shot configuration) | ||
| + | * '''Advanced:''' advanced features if avalaible | ||
| + | ** '''Do One Cleaning Image After Raw Readoutmode Change:''' used to remove with/black block of data in the image after a readoutmode switch, this will ad extra time to the shot | ||
| + | * '''Camera Info:''' general info about the camera read directly from it | ||
| + | ** '''Device Model:''' Name and Sigla of model | ||
| + | ** '''Serial Number:''' serial number attribuited to camera from vendor | ||
| + | ** '''Firmware Vesion:''' firmware version | ||
| + | ** '''HW Revision:''' hardware version | ||
| + | ** '''SDK Version:''' version of SDK DLL library used by Voyager to manage the Camera and the Filter Wheel | ||
| + | * '''Default:''' press this button to restore setting to the default | ||
| + | * '''Cancel:''' to exit form without saving changes | ||
| + | * '''OK:''' to save the changes to settings | ||
| + | |||
| + | |||
| + | |||
| + | The FLI Filter Wheel configuration form: | ||
| + | |||
| + | [[File:97831a541208ddbdcd01187517132e49bee4f8b0.png]] | ||
| + | |||
| + | * '''Filter Wheel Chooser:''' Choose the filter wheel from the drop-down list, the filter wheel must be connected to open the settings form | ||
| + | * '''Rescan:''' to read again the list of FLI filter wheel connected to the PC | ||
| + | * '''Cancel:''' to exit form without saving changes | ||
| + | *'''OK:''' to save the changes to settings | ||
| + | |||
| + | |||
| + | {{Note|If you use different camera control or software for your FLI data collect, please verify your previous calibration files work fine. We suggest to redo a set of calibration files dedicated in Voyager.}} | ||
| + | |||
| + | |||
| + | |||
==QHY CMOS Native Driver== | ==QHY CMOS Native Driver== | ||
| − | If you choose QHY CMOS Camera from the Camera drop-down list, Voyager will connect directly to your QHY CMOS camera (not via ASCOM). | + | If you choose QHY CMOS Camera or QHY CMOS Camera BETA from the Camera drop-down list, Voyager will connect directly to your QHY CMOS camera (not via ASCOM). |
| + | |||
| + | {{Note|Difference between the two QHY Native driver: | ||
| + | |||
| + | - QHY CMOS Camera (SDK frozen to the last recommended and stable as for producer report) | ||
| + | |||
| + | - QHY CMOS Camera BETA [starting from Voyager Release 2.3.0] (for camera need SDK equal or greater than the recommended or Beta SDK, you can update manually this driver if needed)}} | ||
| + | |||
| + | |||
Click the Camera Advanced Config button to bring up the QHY CMOS Camera Setup dialog: | Click the Camera Advanced Config button to bring up the QHY CMOS Camera Setup dialog: | ||
| Line 100: | Line 232: | ||
| − | {{Note| | + | {{Note|Changing manually driver in the platform folder of Voyager is an operation to your entire risk and can introduce misconfiguration or issues. To go back simply reinstall Voyager. If you install a new version of Voyager or a Daily Build the SDK will be restored by installation in any case.}} |
<br /> | <br /> | ||
| Line 217: | Line 349: | ||
*'''No CoolDown for Delta''': The maximum difference in °C below which the camera's native firmware cooling system is used instead of the Cool Down parameters specified here. In other words, if the camera's sensor is currently at -25 °C and you request a change to -30 °C, if the "No CoolDown for Delta" value is 10 °C, Voyager will just command the camera to cool to -30 °C without any management of cool down ramp time. | *'''No CoolDown for Delta''': The maximum difference in °C below which the camera's native firmware cooling system is used instead of the Cool Down parameters specified here. In other words, if the camera's sensor is currently at -25 °C and you request a change to -30 °C, if the "No CoolDown for Delta" value is 10 °C, Voyager will just command the camera to cool to -30 °C without any management of cool down ramp time. | ||
*'''Default Temp. WarmUp''': The desired temperature in °C for a WarmUp operation. Note that if this is set too high, the WarmUp operation may fail. However, in most cases this does not cause any problems. | *'''Default Temp. WarmUp''': The desired temperature in °C for a WarmUp operation. Note that if this is set too high, the WarmUp operation may fail. However, in most cases this does not cause any problems. | ||
| + | *'''Temperature Control Allowed by Camera:''' remove flag if camera doesn't allow temperature control or not have it | ||
| Line 275: | Line 408: | ||
*'''Use Canopus FIT fix''': [http://www.minorplanetobserver.com/MPOSoftware/MPOCanopus.htm MPO Canopus] is an astrometry and photometry application usually used in Astronomical Research . This flag fix a ''OBJCTDEC'' key in saved FIT Header adding a + for a positive value. Without this flag Canopus cannot handle correctly the FIT made by Voyager (or others FIT generator) | *'''Use Canopus FIT fix''': [http://www.minorplanetobserver.com/MPOSoftware/MPOCanopus.htm MPO Canopus] is an astrometry and photometry application usually used in Astronomical Research . This flag fix a ''OBJCTDEC'' key in saved FIT Header adding a + for a positive value. Without this flag Canopus cannot handle correctly the FIT made by Voyager (or others FIT generator) | ||
*'''Not Manage AIRMASS in FIT''': Voyager will not write AIRMASS calculated value in the FIT Header, if camera control in Voyager is an external application, this application will be delegated to write the AIRMASS header (like Maxim or TSX Camera add on) | *'''Not Manage AIRMASS in FIT''': Voyager will not write AIRMASS calculated value in the FIT Header, if camera control in Voyager is an external application, this application will be delegated to write the AIRMASS header (like Maxim or TSX Camera add on) | ||
| − | *'''Additional Safe Time after Filter Wheel filter change:''' add an extra time wait of x seconds after the driver of the filter wheel report changing of filter is finished. This to avoid that filter wheel that report wheel have finished to move but is not true might affect the next image in shot<br /> | + | *'''Additional Safe Time after Filter Wheel filter change:''' add an extra time wait of x seconds after the driver of the filter wheel report changing of filter is finished. This to avoid that filter wheel that report wheel have finished to move but is not true might affect the next image in shot |
| + | *'''Hide Personal Info in FITS Header''': remove personal data from FIT Headers (SITELAT, SITELONG, OWNER, SWOWNER, OBSERVER)<br /> | ||
==Other Setup Pages== | ==Other Setup Pages== | ||
Revision as of 23:24, 10 April 2021
Camera Setup Workspace
Click the Camera button in the Setup workspace to display the Camera setup window:

Color Coding
Throughout the Setup workspace, Voyager uses color to indicate the following:
- Black: A normal setting
- Gold or Yellow: Use caution when changing as things may not work well or as expected
- Red: Use extreme care when changing this setting - the wrong value can damage your equipment or the imaging session may fail
Camera Choice
Voyager supports the following ways to connect to a camera:

- ASCOM Camera
- ASI Camera (with ASI SDK frozen to 1.16.0 version)
- ASI Camera V2 [starting from Voyager Daily Build 2.2.16h] (for cameras need SDK equal or greater than 1.16.3 and/or using FPGA binning mode like ASI294MM Pro)
- CAM8S Camera
- FLI CCD Camera
- Maxim DL
- QHY CMOS Camera
- QHY CMOS Camera BETA [starting from Voyager 2.3.0] (for using your QHY camera whit the last Beta SDK released from QHY, Beta version embedded in Voyager depend on relase or daily build creation)
- QSI Camera
- SX ASCOM Camera
- TheSkyX Camera Add On
Visit the Installation Prerequisites section to see which versions of these third party applications are supported by Voyager.
Depending on the Camera selection, different configuration options are available, so make this selection first.
For ASCOM connected cameras, the Camera Advanced Config button brings up the ASCOM Properties dialog. The ASCOM button brings up the ASCOM chooser dialog - use this to select the specific ASCOM camera for this configuration.
TheSkyX Camera Add On
If you choose TheSkyX Camera Add On from the Camera drop-down list, Voyager will connect directly to TSX configured Camera and Filter Wheel.
Info about Camera Driver / SDK / ASCOM Driver
Some clarification about level of drivers, especially for CMOS cameras:
- Camera Driver (low level file needed by Camera to work with your OS, usually contains also the firmware will be loaded on camera for some brand/models) this must be installed in anycase and usually are not included in SDK and ASCOM driver
- SDK (mid level file for allow application to talk with the camera driver, can be used to direct access to camera) this not include camera driver usually depends on camera brands
- ASCOM Driver (ASCOM platform file allow all application compatible with ASCOM to work with camera, use SDK to access to camera driver) not include camera driver but usually include SDK, location of the SDK usually is not the right one for the application use only SDK … this is the reason if you install newer ASCOM driver not mean automatically you will have your application with updated SDK.
SDK with direct access is the most performant usually especially for CMOS with big size sensor.
Voyager have direct driver using SDK for some CMOS / CCD cameras, brands usually have a Beta Release of driver for the new cameras or just released on market. So if you want to use beta driver and upate ones used in Voyager in the wiki is described how to do or in the page of each single brand. (basically download SDK file and copy on Voyager SDK Platform folder). See Voyager SDK Platform folder. Some brand like ASI and QHY have double camera control in voyager to use stable or beta version of SDK.
In any case, we will not be responsible for any malfunctions or strange behaviors.
If you have problems with these drivers, first open a support ticket at your CMOS support service.
A last thing, like wrote in wiki, if you will update Voyager installation with a new daily build or release we will install back the choosed driver by Voyager.
QSI Native Driver
If you choose QSI Camera from the Camera drop-down list, Voyager will connect directly to your QSI camera using the COM object released with the their SDK (not via ASCOM).
Usually until 6.x version of the CD installation software of QSI this will be included in the main installation of CD, now ATIK (owner of QSI) seems to have removed it and trust only on ASCOM driver.
How to allow Voyager work with QSI SDK driver ?
You can use the legacy driver installation (instead of the last version):
https://qsimaging.com/drivers-software/#cd-and-drivers
"Our legacy installer includes our old ASCOM driver QSI Installer (.zip) 30.9MB v1.0.0.3"
You can download from here the SDK:
https://qsimaging.com/drivers-software/#custom
Open the QSI folder inside and install it like for instructions in the readme.txt:
"Installation of QSICamera.dll requires the use of regsvr32 to register the dll in the Windows Registry.
We recommend placing QSICamera.dll in C:\Windows\System32 and then calling regsvr32 from powershell run as an administrator.
PS C:\WINDOWS\system32> regsvr32 .\QSICamera.dll
Note: On a 64 bit machine
QSICamera.dll from the x64 folder should be placed in C:\Windows\System32
QSICamera.dll from the x32 folder should be placed in C:\Windows\SysWOW64
To unregister you will need to call regsvr32 with the /u argument.
PS C:\WINDOWS\system32> regsvr32 /u .\QSICamera.dll"
We do not put this on Voyager installation to avoid retro compatibility problem with camera having 5.x and 6.x version of firmware, we are not sure all working fine with the 7.x SDK.
If you have a 5.x or 6.x installation CD the SDK will be installed automatically with the main installation menù.
If you want direct support please contact us for remote checking.
ASI Native Driver / ASI Native Driver V2
If you choose ASI Camera or ASI Camera V2 from the Camera drop-down list, Voyager will connect directly to your ZWO ASI camera (not via ASCOM).
- ASI Camera (with ASI SDK frozen to 1.16.0 version)
- ASI Camera V2 [starting from Voyager Daily Build 2.2.16h] (for camera need SDK equal or greater than 1.16.3 and/or using FPGA binning mode like ASI294MM Pro)
Click the Camera Advanced Config button to bring up the ASI Camera Setup dialog:

The ASI Camera Setup dialog is very similar to the ZWO ASI ASCOM dialog:

- Connected Cameras: Choose the camera from the drop-down list
- Edit: Click the Edit button if you would like to use a different name for the camera selected from the drop-down list
- USB Type: Displays the type of USB connection, USB3 or USB2
- Bayer Pattern: Displays the Bayer Matrix pattern If the Connected Camera has a color sensor
- Temperature: Displays the sensor temperature returned by the camera
- MonoBin: If checked and If the connected camera has a color sensor, the pixels from the color sensor are binned by the camera and a monochrome image is returned
- Preset: Choose a preset from the drop-down list and the preset's values will be applied to the settings for Gain, Offset and USB Limit
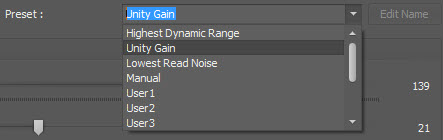
- Choose one of the User presets (User 1, User 2, etc.) to create a custom preset for Gain, Offset and USB Limit
- Click the Edit Name button to change the preset name from User X to a name of your choosing:

- ASI Reset Voyager Preset Setting: Click to reset any custom (User 1, User 2, etc) presets you created in this profile. This button appears in the top-level Camera Setup dialog if you choose ASI Camera
- Gain, Offset and USB Limit Sliders: Click and drag these sliders with your mouse, or click on the slider and use the up and down or left and right arrows to change the values. If you change the values this way, the Preset drop-down list changes to Manual
- Gain: Move the slider to set the gain value. See your camera's manual for an explanation of how your choice here affects your image
- Offset: Move the slider to set the offset value. See your camera's manual for an explanation of how your choice here affects your image
- USB Limit: Move the slider to set the USB limit value. This controls how fast the camera sends data to the USB port. If your download does not finish, try a lower setting.
- Remove Gain Limit Management: (Starting from Voyager 2.2.14b version) ASI Camera driver (like for ASI specific) limit the maximum gain for DSO use, calculus is automatically done. If you want to use gain up to raw max gain, check this flag and reopen the form. If you use high gain level for this cameras you can shrink in a bad way the full well capacity and increase drammatically the noise. Use at your risk !
- Cancel: Discard changes and exit this dialog
- OK: Save changes and exit this dialog


ASI Camera Name Match
Tells Voyager to check the ASI Camera name on connection if you are using the ASI Camera (not ASCOM) driver.

- Raise Error On Camera Connect in Startup if Name Not Match: If checked and the ASI Camera camera type has been selected, Voyager will raise an error when connecting to the camera if the camera name specified in setup does not match the camera name returned by the driver.
FLI CCD Native Driver
If you choose FLI CCD Camera from the Camera drop-down list, Voyager will connect directly to your FLI CCD camera (not via ASCOM) and if you want directly also to your FLI Filter Wheel.
Click the Camera Advanced Config button to bring up the FLI CCD Camera Setup dialog:

The FLI CCD Camera Setup dialog is this one:

- Camera Chooser: Choose the camera from the drop-down list, the camera must be connected to open the settings form
- Rescan: to read again the list of FLI CCD Camera connected to the PC
- RBI Preflood: to avoid ghost issue on the KAF CCD Sensor RBI can be use to remove and mitigate the effect. More info on website of vendor. This will add extra time to the shot
- Flood Time: time of exposure in milliseconds with flooding of sensor with IR internal leds
- Flushes: number of cleaning cicle after flooding (dark mode an background flush will used if avalaible from firmware)
- RBI Bin Factor: factor to use in binning for the flooding
- RBI Enabled: switch to off you you dont want to use the RBI and dont want to retrieve the Reaadout Mode dedicated to RBI (advice is to leave ON and just not use RBI mode in various shot configuration)
- Advanced: advanced features if avalaible
- Do One Cleaning Image After Raw Readoutmode Change: used to remove with/black block of data in the image after a readoutmode switch, this will ad extra time to the shot
- Camera Info: general info about the camera read directly from it
- Device Model: Name and Sigla of model
- Serial Number: serial number attribuited to camera from vendor
- Firmware Vesion: firmware version
- HW Revision: hardware version
- SDK Version: version of SDK DLL library used by Voyager to manage the Camera and the Filter Wheel
- Default: press this button to restore setting to the default
- Cancel: to exit form without saving changes
- OK: to save the changes to settings
The FLI Filter Wheel configuration form:

- Filter Wheel Chooser: Choose the filter wheel from the drop-down list, the filter wheel must be connected to open the settings form
- Rescan: to read again the list of FLI filter wheel connected to the PC
- Cancel: to exit form without saving changes
- OK: to save the changes to settings
QHY CMOS Native Driver
If you choose QHY CMOS Camera or QHY CMOS Camera BETA from the Camera drop-down list, Voyager will connect directly to your QHY CMOS camera (not via ASCOM).
- QHY CMOS Camera (SDK frozen to the last recommended and stable as for producer report)
- QHY CMOS Camera BETA [starting from Voyager Release 2.3.0] (for camera need SDK equal or greater than the recommended or Beta SDK, you can update manually this driver if needed)
Click the Camera Advanced Config button to bring up the QHY CMOS Camera Setup dialog:

The QHY CMOS Camera Setup dialog is very similar to the QHY ASCOM dialog:

If you want to use the QHY filter wheel with USB please install and select the QHY ASCOM USB driver for serial.
In case of use of I2C mode or USB mode.. be sure the hardware switch in the filter wheel is positioned in the right mode, you must look at flashing and color when you start the filter wheel (default mode usually is in I2C mode). Refer to the QHY documentations.
- Camera Chooser: Choose the camera from the drop-down list
- Bin Mode: list of the allowed binning mode for the choosed camera (selection not made any change in camera settings)
- Preset: Choose a preset from the drop-down list and the preset's values will be applied to the settings for Gain, Offset and USB Limit
- Choose one of the User presets (User 1, User 2, etc.) to create a custom preset for Gain, Offset and USB Limit
- Click the Edit Name button to change the preset name from User X to a name of your choosing:
- CMOS Reset Voyager Preset Setting: Click to reset any custom (User 1, User 2, etc) presets you created in this profile. This button appears in the top-level Camera Setup dialog if you choose QHYCMOS Camera
- Gain, Offset and USB Limit Sliders: Click and drag these sliders with your mouse, or click on the slider and use the up and down or left and right arrows to change the values. If you change the values this way, the Preset drop-down list changes to Manal
- Gain: Move the slider to set the gain value. See your camera's manual for an explanation of how your choice here affects your image
- Offset: Move the slider to set the offset value. See your camera's manual for an explanation of how your choice here affects your image
- USB Limit: Move the slider to set the USB limit value. This controls how fast the camera sends data to the USB port. If your download does not finish, try a higher setting. 0 value is the fastest possible.
- Remove Overscan Area: remove overscan area from data download where sensor allow this
- Disable 12bit ADC to enable guiding port: Disable 12 bit ADC to enable guiding port where sensor allow this
- Row Noise Reduction: Row noise reduction where sensor allow this
- Speed: High speed or low speed in download where sensor allow this
- ReadMode: readoutmote dropdown list where to select the readout mode for the camera (cannot be changed if camera is connected). Special mode are available for QHY600 and similar cameras.
- Firmware Label: report the versione of the firmware inside the camera selected
- SDK Version Label: report the SDK version inside the Voyager Release / Daily Build you are using. You can update SDK copying the dll of a new SDK from QHY directly inside the Voyager installation directory. We suggest to you use the ones released with Voyager distributions
- Cancel: Discard changes and exit this dialog
- OK: Save changes and exit this dialog

Filters
If your camera is connected via MaximDL or TheSkyX Camera Add On, filters must be configured in those applications and imported to Voyager using the GET button, as described below. When you choose Maxim DL or TheSkyX Camera Add On, no filter wheel selection will be presented because the filter wheel is not connected to Voyager, it is connected to Maxim DL or TheSkyX.
For ASCOM and QSI camera, you must configure a Filter Wheel from the Filter Wheel drop-down list:

For an ASCOM filter wheel, click the ASCOM button to display the ASCOM chooser and select the filter wheel for this configuration.
Once a Camera and optionally a filter wheel have been selected, next populate the Filters window with the list of available filters.
With Voyager disconnected to external devices, click the GET button to retrieve a list of filters and label names from the filter device or third party application.

Filter Setup
Some filter wheel drivers or applications cannot return a list of filters. For those cases, click the EDIT button and manually enter the filter list:

RoboStar Configuration for Filters
Set the minimum (Mag End) and maximum (Mag Start) stellar magnitudes for Voyager's RoboStar autofocus routine on a per-filter basis.
Click the "Set Broadband" or "Set NarrowBand" buttons to use the default magnitudes for these respective filter types.
RoboStar LocalField Configuration for Filters
Set the Exposure Time in seconds and Binning for the RoboStar LocalField (multiple-star) autofocus routine on a per-filter basis.
Check the box "Not Use LocalField in Sequence" if you do not want to use LocalField autofocus while a sequence is executing.
Resolution Imager
This is where the image scale of your telescope and camera is defined.

- Telescope Focal Length: The focal length of the primary telescope in millimeters (mm)
- Pixel Size: The size of the main camera's pixels in microns
After entering these two values, Voyager will automatically calculate the image scale for binning 1x1. This value is computed in arc-seconds/pixel and appears in the Unbinned Image Scale field
- Camera P.A.: The position angle of Camera updated to the last valid solving PA retrieved by Voyager during overall operations. This value will be passed to the Virtual Field of View facility in Web Dashboard to drawing your FOV over the Aladin map. The update of this value will be done at Voyager application closing.
- Camera Pixel : The size in pixel in horizontal and vertical of your camera in bin1.This value will be passed to the Virtual Field of View facility in Web Dashboard to drawing your FOV over the Aladin map. This is a readonly field.
Sensor Type

In this panel, select the type of camera sensor:
- Monochrome: Mono cameras with or without a filter wheel
- Color: Color cameras with a Bayer Matrix (OSC or One Shot Color cameras)
- DSLR: Commercial cameras, modified or not
Cooling System
If the camera has a cooling system (usually a Peltier cooler), Voyager can manage it using these settings:

- On Connect Set Cooler: When Voyager connects to the camera, turn the cooling system Off, On, or leave it unchanged. If you connect to your system a long time before use, you may want to leave this "Off" or "Unchanged" and then turn the cooler on using the sequence settings or a DragScript command. If you are planning to disconnect and reconnect Camera so many thank during setting up Voyager use the "Unchanged" to avoid camera cooling to be stressed.
- Timeout Settling Temp: The time in minutes after which the cooling action is considered failed if the desired temperature is not reached
- Deviation Max under: The absolute temperature difference in °C allowed from the desired temperature before the cooling action is considered successful. This temperature must be maintained for the amount of time indicated in the next field, "... for time span of"
- ... for time span of: The amount of time that the temperature must be within the "Deviation Max under" described above for a cooling action to be considered successful
- Default WarmUp Time: The time in minutes after which the warmup action is considered failed if the desired temperature is not reached
- Default Temp. Cooling: The desired temperature in °C for a cooling operation
- Default Cool Down time: The desired time in minutes used to reach the desired cooled temperature, to avoid cooling too fast which in some cases can cause frost to form
- No CoolDown for Delta: The maximum difference in °C below which the camera's native firmware cooling system is used instead of the Cool Down parameters specified here. In other words, if the camera's sensor is currently at -25 °C and you request a change to -30 °C, if the "No CoolDown for Delta" value is 10 °C, Voyager will just command the camera to cool to -30 °C without any management of cool down ramp time.
- Default Temp. WarmUp: The desired temperature in °C for a WarmUp operation. Note that if this is set too high, the WarmUp operation may fail. However, in most cases this does not cause any problems.
- Temperature Control Allowed by Camera: remove flag if camera doesn't allow temperature control or not have it
These settings are used for all operations relating to setting the camera's sensor temperature. To find out how they work in detail read see the OnTheFly section.
Readout Mode
Some cameras have settings to control readout speed vs. readout noise. The Readout Mode section of the Setup workspace lets you configure these settings:

- GET: Click this button to retrieve the list of available modes, if any. Voyager must be disconnected from the control systems for this to work
- Light/Dark/Bias: Recommended setting is to have the highest quality - lowest noise, regardless of speed. But this is optional - you can choose any setting
- Focus: Recommended setting is fastest speed, regardless of noise, so autofocus operations happen quickly
- Plate Solve: Recommended setting is fastest speed that still results in successful plate solves. If you are not sure, set for highest quality.
Speed
Some cameras have settings to control gain in order to improve dynamic range. The Speed section of the Setup workspace lets you configure these settings in order to accelerate some Voyager features:

- GET: Click this button to retrieve the list of available modes, if any. Voyager must be disconnected from the control systems for this to work
- Binning 1x1: Choose the gain to be used when taking exposures with binning 1x1
- Binning 2x2: Choose the gain to be used when taking exposures with binning 2x2
- Other Binning: Choose the gain to be used when taking exposures with binning other than 1x1 and 2x2
TheSkyX Camera Add On Setting
Settings for TheSkyX Camera Add On can be configured in this panel of the Camera setup workspace:

Due to a lack of commands in TheSkyX's DCOM interface (the interface used by external applications to manage TheSkyX operations), Voyager is unable to determine the current filter selected in the filter wheel. To ensure the correct filter is used, Voyager takes a very short "dummy exposure" and sets the filter to the desired value. The "dummy image" is not saved. The default values here should be good for most setups. The goal is to make this a very short exposure with a fast download, so if you know of better settings for your camera, you can set them here.
- Dummy Exposure Bin: Binning level to be used when taking dummy exposures
- Dummy Exposure ROI: Region Of Interest size to be used when taking dummy exposures
- Dummy Exposure Time: Exposure time to be used when taking dummy exposures
Various
Miscellaneous settings are contained in the Various panel of the Camera setup workspace:

- Download Save Timeout: Time in seconds after which the download of an image from the camera times out (fails)
- ASCOM ImageReady Slow Polling: Delay before polling the ASCOM driver to see if the image is ready to download. This is used if the camera's firmware is slow and needs some time between ImageReady queries (see discussion in the Voyager forum)
- ASCOM Polling De-Throttle: Controls the amount of delay between requests to the ASCOM camera driver to avoid overflowing a slow camera's command buffer.
- Use Canopus FIT fix: MPO Canopus is an astrometry and photometry application usually used in Astronomical Research . This flag fix a OBJCTDEC key in saved FIT Header adding a + for a positive value. Without this flag Canopus cannot handle correctly the FIT made by Voyager (or others FIT generator)
- Not Manage AIRMASS in FIT: Voyager will not write AIRMASS calculated value in the FIT Header, if camera control in Voyager is an external application, this application will be delegated to write the AIRMASS header (like Maxim or TSX Camera add on)
- Additional Safe Time after Filter Wheel filter change: add an extra time wait of x seconds after the driver of the filter wheel report changing of filter is finished. This to avoid that filter wheel that report wheel have finished to move but is not true might affect the next image in shot
- Hide Personal Info in FITS Header: remove personal data from FIT Headers (SITELAT, SITELONG, OWNER, SWOWNER, OBSERVER)