Command Window
Choosing Status or Command Window Display
On the right side of the Main Window are two tabbed windows, the Status Window and Command Window.
Click on the tabs at the bottom of the window to select between them:

Command Widgets
Select the Commands tab tp display set of configurable command widgets. These widgets provide buttons that execute immediate commands on the mount, camera, guiding system, focuser, rotator, flat device, and roll-off roof or domed observatory. It also displays some status information about these components:
Controls at the top of the Command window are used to configure the window's contents:

- Lock / Unlock commands:. When locked, commands cannot be issued, protecting against unintentional commands being sent during an imaging session.
- Select Layout: Choose which command widgets are displayed in the Command window
- Auto Hide: Toggle whether the Command window slides out of view when not in use. If the Command window is hidden, tabs appear on the right side of the main window. Click the tab to restore the Command window into view.
Click the Select Layout icon to bring up the Widget Selector window, which controls whether a widget is shown and the order of the widgets:

- Click the name of a widget in the left column to select the widget
- Click the name of a selected widget to toggle the checkmark. The widget will be visible only if the checkmark is shown
The buttons in the right column control the ordering of the widgets:
- Reset to Default: Resets the widget display to the default configuration
- Data Relink: internal relink object in the list to the real box in the control if you loose control of list order
- First: Move the selected widget to the first position
- Up: Move the selected widget up one position
- Down: Move the selected widget down one position
- Last: Move the selected widget to the last position
- Cancel: Close the window without saving changes
- Save: Save the new widget configuration and close the window
Controls at the top of the command window

Mount
The yellow status text indicates the current state of the mount: Parked, Tracking, Stopped (not tracking), Slewing, or Homed
The Mount widget can send immediate commands to the mount:

The buttons in the Mount widget send the following commands to the mount:
- Track: Begin sidereal tracking
- Not Track: Stop sidereal tracking
- Park: Park the mount
- Unpark: Unpark the mount
- Home: Home the mount (if supported)
- HALT: Abort the command sent from this widget and any other movement in progress
There are two ways to abort a command sent from this widget:
| Icon | Action |
|---|---|
| Aborts the command sent from this widget only | |

|
Abort the command sent from this widget AND any movement in progress for any reason |
Camera
The Camera command widget provides a way to send immediate commands to the camera's cooling system and filter wheel.

The camera's current sensor temperature is displayed along with a status message indicating the current cooling operation: OFF, COOLING, WARMUP RUN, COOLDOWN TIMEOUT.
Beneath the "Temp." display is a control to set the desired sensor temperature.
![]()
Double click the temperature and type in the desired camera sensor temperature, or use the up and down arrows to change the value to the desired setting.
Click the SetPoint (°C) button to apply the change.
The remaining buttons in the widget send the following commands to the camera's cooling system:
- Cool Down: Begin a cooling operation with the goal of reaching the specified set point temperature
- ON: Turn the cooling on
- OFF: Turn the cooling system off
- Warmup: Begin a warm up operation
To change the filter using a connected filter wheel, click the drop-down list next to the Filter: label, click the desired filter, and click the Set button.

To abort a command sent from this widget, click the red X:
| Icon | Action |
|---|---|
| Aborts the command sent from this widget only |
Guide
The Guide command widget contains buttons that send immediate commands to the connected guiding system.
All of these commands can be automated through Setup, Sequence and DragScript settings and commands, but this window lets you also send commands to the guider for immediate execution.

The yellow text indicates guiding system status: GUIDING, IDLE, PAUSED, DITHERING, CALIBRATING, CALIBRATION COMPLETE, CALIBRATION FAILED.
Click the buttons to send the following commands to the guiding system:
- Calibrate: Calibrate the guider
- Acquire: Acquire a guide star
- Guide: Begin guiding
- Dithering: Command the guider to perform a dithering operation
- Stop: Stop guiding
Click the gear icon on the left to bring up the guiding configuration window:

From this window, you can select whether to use Voyager RoboGuide or your guiding system's Native Guide Control. You can also set:
- Calibration time: Exposure time in seconds used for a guider calibration run
- Calibration binning: Binning level used for a guider calibration run
- Guiding Time: Exposure time in seconds used while guiding
- Guiding Binning: Binning level used for guiding exposures
- Dithering Max Pixel: The maximum distance, in pixels, that the guiding system should move the mount when dithering
There are three buttons at the bottom of this window:
- DEFAULT: Sets the values in this window to their defaults
- CANCEL: Closes this window without making any changes
- OK: Saves the changes and closes this window
To abort a command sent from this widget, click the red X:
| Icon | Action |
|---|---|
| Aborts the command sent from this widget only |
Focuser
The Focuser command widget can send immediate commands to the connected focuser.

The yellow information text provides the following information:
- Temp: Current ambient temperature reported by the focuser if it has a temperature sensor
- Status: IDLE or MOVING if the focuser is stopped or moving, respectively
- Position: Current focuser position
This section of the focuser can be used to command the focuser to a specific position:

Click in the gray box and type in the desired focuser position, then click the Goto button to command the focuser to move to that position.
The bottom row of buttons command the focuser to move relative to its current position:
- <<IN: Make a large move inwards
- <: Make a small move inwards
- HALT: Stop moving
- >: Make a small move outwards
- OUT>>: Make a large move outwards
The number of steps for a small focuser move is configurable. The setting is in the SetupForm workspace, on the AutoFocus tab, in the RoboFire General Setting box. Click
RoboFire Configuration Center and select the Focuser tab. The Focuser Control Facility Step Size CMD is the number of steps that will be performed for a small focuser move. The large focuser move is the smaller number multiplied x5.

There are two ways to abort a command sent from this widget:
| Icon | Action |
|---|---|
| Aborts the command sent from this widget only | |
|
|
Abort the command sent from this widget AND any movement in progress for any reason |
Rotator
The Rotator command widget provides the capability to send commands directly to a connected rotator, which moves the camera to a specified PA (position angle).
If a rotator is connected, the widget appears like this:

The first line of the rotator widget displays the current PA in degrees, and the rotator status: IDLE if it is not moving, ROTATING if it is moving.
if the P.A reporte is the mechanical one the forecolor of field will be black, if the P.A is synched with an offset the forecolor will be gold ![]()
The second line of the widget has a control for setting a new PA:
![]()
- Set the desired PA in one of two ways: Click in the box with 000.00 in this example, and type in the desired PA; or, click the up and down arrow icons to set the desired PA
- Move To: Click the Move To button to command the rotator to move to the PA set in the box to the left of the button
- Zero: Click the Zero button to command the rotator to move to a PA of zero.
The last line of the rotator widget has buttons that perform the following commands:
- HALT: Stop the current command and any other movement in progress
- Flip: Command the rotator to move to a point 180 degrees away from the current PA. Do this after a meridian flip to keep all sub exposures oriented the same way.
- Manual Sync: This command synchronize the Position in Degree of the Rotator to the Position edited in the Manual Sync Form, this will create an offset between the mechanical position and the position reported to user and Voyager actions. When you press this button a new form "Rotator Sync" will be opened
- Voyager can manage Rotator Sync based on the driver capabilities: - (A) Driver without Sync (like ones with ASCOM Interface V2) - (B) Driver with Sync (like ones with ASCOM Interface V3) The value of offset for Sync can be managed using the Sync button in Rotator Command Widget in Voyager GUI column Command. You will input manually the angle to sync. If you have driver type (A) Voyager will calculate automatically for you the Offset and value will be stored in actual Voyager Profile. You might have more Voyager profiles with different offset if you sharing the same driver and rotator. If you have driver type (B) ASCOM Driver will calculate automatically for you the Offset and value will be stored in ASCOM driver settings permanently. Value stored will be equal for all Voyager setup profiles in case of driver and rotator sharing.
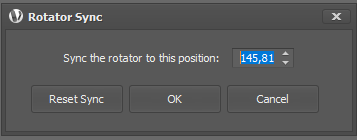
- Sync The rotator to this position: define the positon in Angle used to sync the rotator , when you open the form the last PA solved by a plate solving or blind solving or web solving will be showed
- Reset Sync: the offset for the sync will be removed and the position reported to the user and to Voyager actions will be the mechanical one
- OK: apply the sync and calculate the offset in Voyager on in ASCOM (depends on ASCOM Interface type)
- Cancel: exit form sync operation without doing anything

There are two ways to abort a command sent from this widget:
| Icon | Action |
|---|---|
| Aborts the command sent from this widget only | |
|
|
Abort the command sent from this widget AND any movement in progress for any reason |
Flat Device
A Flat Device is an evenly illuminated panel used to take flat calibration frames. There are several types of flat panel devices, and the commands supported by them vary depending on their capabilities. If supported by the device, Voyager can send commands to turn a panel on or off, open or close the panel (move it out of the way or put it into position for use), and adjust the panel's brightness.
As of Voyager 2.1.0a, two flat devices may be configured in Flat Device Setup. If you have the second Flat Device configured, there will be a second Flat Device command widget available, with the same buttons and fields as for the first Flat Device.
The Flat Device widget sends commands to a flat panel device for immediate execution:

The first line of the Flat Device widget shows the current brightness of the flat panel, if known, and the status of the device, either IDLE or MOVING if the device can be opened or closed.
The buttons perform the following actions, if supported by the flat panel device:
- Set: Click on the number to the left of this button or click the up and down arrows to set the desired panel brightness level. Click the Set button to execute the command.
- Open: Open the flat panel device - move the device out of the way so normal imaging can be done
- Close: Close the flat panel device - move the device into position so flats can be taken
- Light ON: Turn the flat panel device on
- Light OFF: Turn the flat panel device off
To abort a command sent from this widget, click the red X:
| Icon | Action |
|---|---|
| Aborts the command sent from this widget only |
Observatory
The Observatory widget shows the status of a connected observatory (typically a dome or roll-off roof building) and can send commands to the observatory for immediate execution.
The available commands will depend on the capability of the observatory and the software driver controlling it. For example, a roll-off roof observatory may only support the Open and Close commands. A domed observatory is usually rotatable and may also have a shutter that can be opened and closed. A rotating observatory dome may be "slaved" to the mount, meaning its position will change automatically as the mount moves so the telescope has an unobstructed view.

The status fields provide the following information:
- Azimuth: The azimuth position of the dome in degrees
- Shutter: OPEN if the dome's shutter is open, CLOSED if the shutter is closed
- Move: STOPPED if the dome is not rotating, MOVING if the dome is rotating
- DOME: Slaved or Not Slaved: If the DOME software is "slaved" to the mount, the dome will automatically move when the mount moves so the telescope has an unobstructed view
The command buttons of the Observatory widget immediately execute the following commands, if the Dome control doesn't allow the command, the command will be disabled:
- Open: Open the shutter for a domed observatory, open the roll-off roof for a roll-off roof observatory
- Close: Close the shutter for a domed observatory, close the roll-off roof for a roll-off roof observatory
- Home: Rotate the dome to its Home position. Disabled if is an rool-off roof observatory
- Park: Rotate the dome to its Park position. Disabled if is an rool-off roof observatory
- Unpark: Unpark the Dome if the dome driver software supports the unpark command
- Sync: Sync the observatory driver azimut to the value reporte in the numeric up and down field, if the driver allow this operation. Disabled if is an rool-off roof observatory
- Left Green Arrow: Rotate the dome counter-clockwise by the value in numeric up and down field. Disabled if is an rool-off roof observatory
- Right Green Arrow: Rotate the dome clockwise by the value in numeric up and down field. Disabled if is an rool-off roof observatory
- S0: Set Slaved off: Command the dome to not automatically rotate to follow the mount's current azimuth position. Disabled if is an rool-off roof observatory
- S1: Set Slaved on: Command the dome to rotate to follow the mount's current azimuth position. Disabled if is an rool-off roof observatory
- Goto: Set a desired azimuth position for the dome using the control to the left of the Goto button. Click the numbers and type in the desired position, or use the up and down arrow icons to set the desired position. Click the Goto button to command the dome to rotate to the desired position.. Disabled if is an rool-off roof observatory
There are two ways to abort a command sent from this widget:
| Icon | Action |
|---|---|
| Aborts the command sent from this widget only | |
|
|
Abort the command sent from this widget AND any movement in progress for any reason |