Difference between revisions of "DragScript"
m (1 revision imported) |
|||
| (5 intermediate revisions by the same user not shown) | |||
| Line 23: | Line 23: | ||
Once a script is loaded, it will fill the light gray area in the middle of this workspace. | Once a script is loaded, it will fill the light gray area in the middle of this workspace. | ||
| + | |||
| + | * '''DragScript File Running:''' report the actually loaded DrgScript file to execute or running | ||
| + | * '''Events Enable Status:''' show the actual enable status of the Emergency Events (Exit, Suspend, Light). The status are reported only if the DragScript is running | ||
*'''Clear All Startup Flag''': Resets all Sequence block flags set by running the script so you can run it again from the start. See [[DragScript#Setting Sequence Options from a DragScript|Setting Sequence Options from a DragScript]] below to see the optional flags you can set by right clicking on a sequence block in a DragScript . This button resets all those flags and starts the DragScript with sequences running in their normal default mode. [[File:Gear-icon.jpg]] Click the gear icon to select and load a DragScript from the files saved on your disk | *'''Clear All Startup Flag''': Resets all Sequence block flags set by running the script so you can run it again from the start. See [[DragScript#Setting Sequence Options from a DragScript|Setting Sequence Options from a DragScript]] below to see the optional flags you can set by right clicking on a sequence block in a DragScript . This button resets all those flags and starts the DragScript with sequences running in their normal default mode. [[File:Gear-icon.jpg]] Click the gear icon to select and load a DragScript from the files saved on your disk | ||
| Line 32: | Line 35: | ||
Once you load a script by clicking the gear icon, the script appears in the workspace like this: | Once you load a script by clicking the gear icon, the script appears in the workspace like this: | ||
| − | [[File: | + | [[File:Immaginereferferf.png]] |
| + | |||
| Line 58: | Line 62: | ||
[[File:Dragscript-right-menu.png]] | [[File:Dragscript-right-menu.png]] | ||
| − | *'''Start Script from Here''': Click to begin DragScript execution from the selected line | + | *'''Start Script from Here - Events ENABLED''': Click to begin DragScript execution from the selected line and force the Emergency Suspend, Resume and Exit events ENABLED |
| − | *'''Start Script from Here - | + | *'''Start Script from Here - Events DISABLED''': Click to begin DragScript execution from the selected line and force the Emergency Suspend, Resume and Exit events DISABLED |
| + | |||
| + | When Emergency Events are disabled they will not be managed also if execution blocks provided in your DragScript. | ||
| + | |||
| + | Use the Disable.... Enable... events to change enabled status ([https://wiki.starkeeper.it/index.php/DragScript_Flow_of_Control#Various Events Control Block]) | ||
| Line 87: | Line 95: | ||
*'''Initial Guide Calibration''': If checked, instruct the guiding software to perform a calibration run before starting the sequence | *'''Initial Guide Calibration''': If checked, instruct the guiding software to perform a calibration run before starting the sequence | ||
*'''Precise Pointing Before First Shot''': If checked, perform a [[Plate Solve Setup#Precision%20Pointing|precision pointing]] action before taking the first exposure. Done to avoid that Guide Calibration or focus goto introduce a significant pointing error | *'''Precise Pointing Before First Shot''': If checked, perform a [[Plate Solve Setup#Precision%20Pointing|precision pointing]] action before taking the first exposure. Done to avoid that Guide Calibration or focus goto introduce a significant pointing error | ||
| + | *'''DONUTS Calibration:''' if Checked, perform a Donuts Calibration when necessary if requested on Sequence Configuration | ||
Revision as of 17:12, 7 June 2021
Voyager has three ways to perform actions and take images:
- Using the buttons in the OnTheFly workspace and the Commands window to perform immediate actions such as an autofocus, plate solve, or camera shot
- Running a sequence from either the OnTheFly or Research & Survey workspaces. An OnTheFly Sequence performs a set of actions and takes a series of images of a single target; a Research & Survey Sequence takes a given set of exposures of one or more targets, optionally in a loop
- Using a DragScript to automate a complete imaging session from startup to shutdown, including one or more sequences. The DragScript offers the most flexibility and automation, and is the method of choice to run unattended, all-night automated imaging sessions
DragScript Workspace
The DragScript workspace can be entered two different ways:
Click the icon pointed at by the red arrow in the Command Bar at the top of the Voyager window
Or, click the Section menu and then click the DragScript icon from the Section ribbon
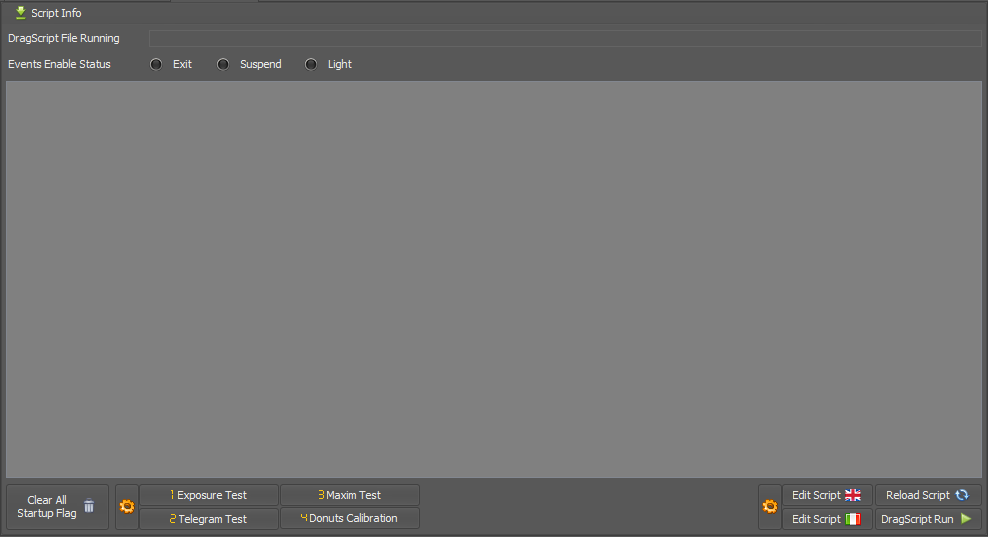
When you first enter the DragScript workspace, if there is no script loaded, it will look like this:
Once a script is loaded, it will fill the light gray area in the middle of this workspace.
- DragScript File Running: report the actually loaded DrgScript file to execute or running
- Events Enable Status: show the actual enable status of the Emergency Events (Exit, Suspend, Light). The status are reported only if the DragScript is running
- Clear All Startup Flag: Resets all Sequence block flags set by running the script so you can run it again from the start. See Setting Sequence Options from a DragScript below to see the optional flags you can set by right clicking on a sequence block in a DragScript . This button resets all those flags and starts the DragScript with sequences running in their normal default mode.
 Click the gear icon to select and load a DragScript from the files saved on your disk
 - Edit Script: Bring up the script editor. The button with a British flag brings up the English language editor. The button with an Italian flag brings up the Italian language version of the editor. If a script has been opened in this workspace using the gear icon, it will be loaded in the editor for use.
- Reload Script: Loads the script you selected with the gear icon fresh from disk. Click this button after making changes and saving them to disk with the DragScript editor.
- DragScript Run: Run the DragScript loaded in this workspace with the gear icon
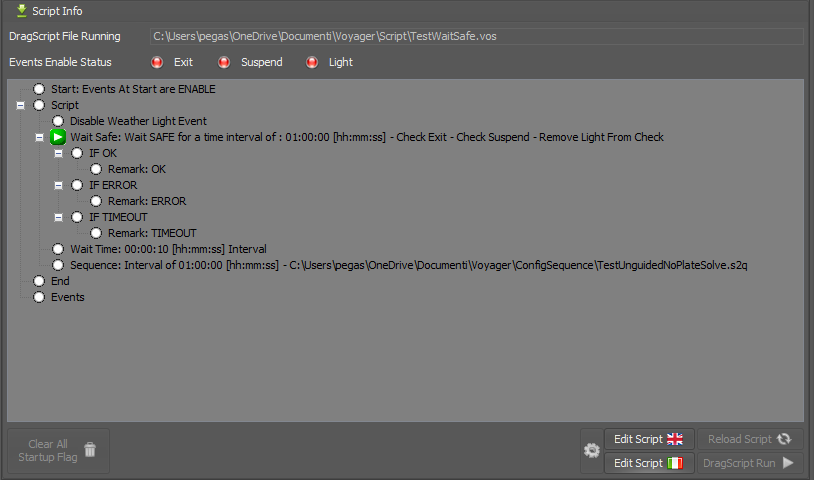
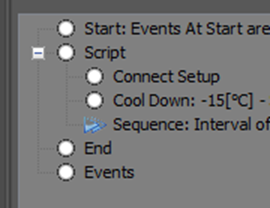
Once you load a script by clicking the gear icon, the script appears in the workspace like this:
After you click DragScript Run to run the script, an arrow will appear next to the currently executing action:
Messages related to the running DragScript will appear in the Monitor window so you can follow the progress of the script in detail:
 Click the Abort button to stop the running script. There may be a brief delay until the currently running action can be interrupted
DragScript: Starting from an Arbitrary Line
Clicking the DragScript Run button ![]() starts execution from the beginning of the DragScript.
starts execution from the beginning of the DragScript.
You can also start the script from an arbitrary line.
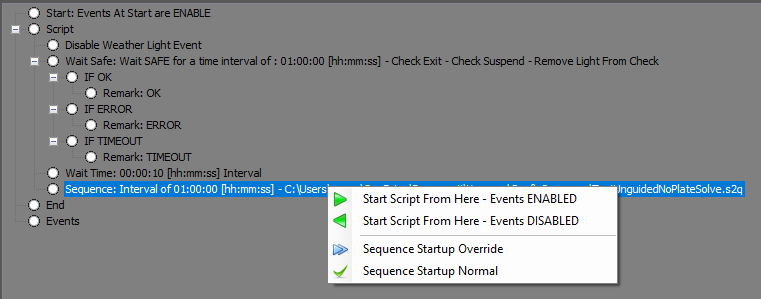
Right-click on the line where you'd like to start execution. A menu appears:
- Start Script from Here - Events ENABLED: Click to begin DragScript execution from the selected line and force the Emergency Suspend, Resume and Exit events ENABLED
- Start Script from Here - Events DISABLED: Click to begin DragScript execution from the selected line and force the Emergency Suspend, Resume and Exit events DISABLED
When Emergency Events are disabled they will not be managed also if execution blocks provided in your DragScript.
Use the Disable.... Enable... events to change enabled status (Events Control Block)
These two choices are available for any line in the DragScript.
Setting Sequence Options from a DragScript
If you right-click on a Sequence or Research & Survey line in the DragScript. two more choices are available, Sequence Startup Override and Sequence Startup Normal. These can be used to override the options configured in the Sequence Start tab, or to clear the override. This override is only applied temporarily to the DragScript. They will be cleared when you shutdown Voyager.
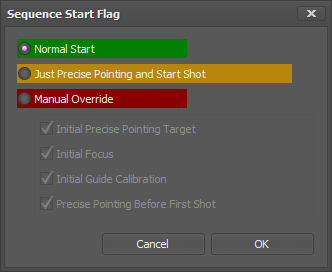
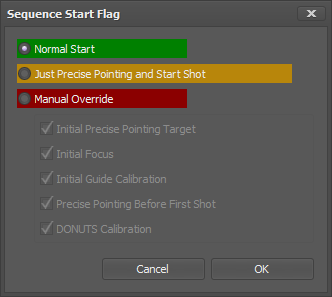
- Sequence Startup Override: Click to start the DragScript from the Sequence (or Research & Survey) line with options:
- Normal Start: Start the sequence using the options configured in the Sequence Start tab
- Just Precise Pointing and Start Shot: Use Precise Pointing to center the target and then begin taking exposures
- Manual Override: Gives you fine control over specific actions to perform or not when running the sequence:
- Initial Precise Pointing Target: If checked, before doing anything else, perform precision pointing to the target coordinates
- Initial Focus: If checked, perform an initial autofocus before starting the sequence
- Initial Guide Calibration: If checked, instruct the guiding software to perform a calibration run before starting the sequence
- Precise Pointing Before First Shot: If checked, perform a precision pointing action before taking the first exposure. Done to avoid that Guide Calibration or focus goto introduce a significant pointing error
- DONUTS Calibration: if Checked, perform a Donuts Calibration when necessary if requested on Sequence Configuration
If an override is in effect, two blue triangles appear before the Sequence line:
To clear the Override, right click the line and choose the Sequence Startup Normal menu option:
Starting a DragScript from the Command Line
You can automatically launch a DragScript when you start Voyager from the command line with the syntax:
- Voyager2.exe /run:"fully qualified script filename"
Example:
- Voyager2.exe /run:"C:\documents\pippo\voyager\script\script.vos"
DragScript Editor
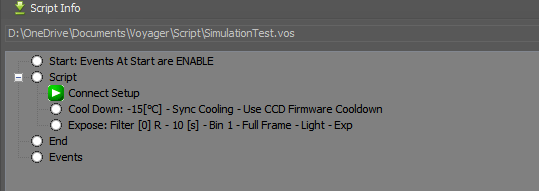
Clicking the Edit Script button will bring up the DragScript editor in its own window. In this screen capture, the script loaded in the DragScript workspace above is automatically loaded in the editor for you:
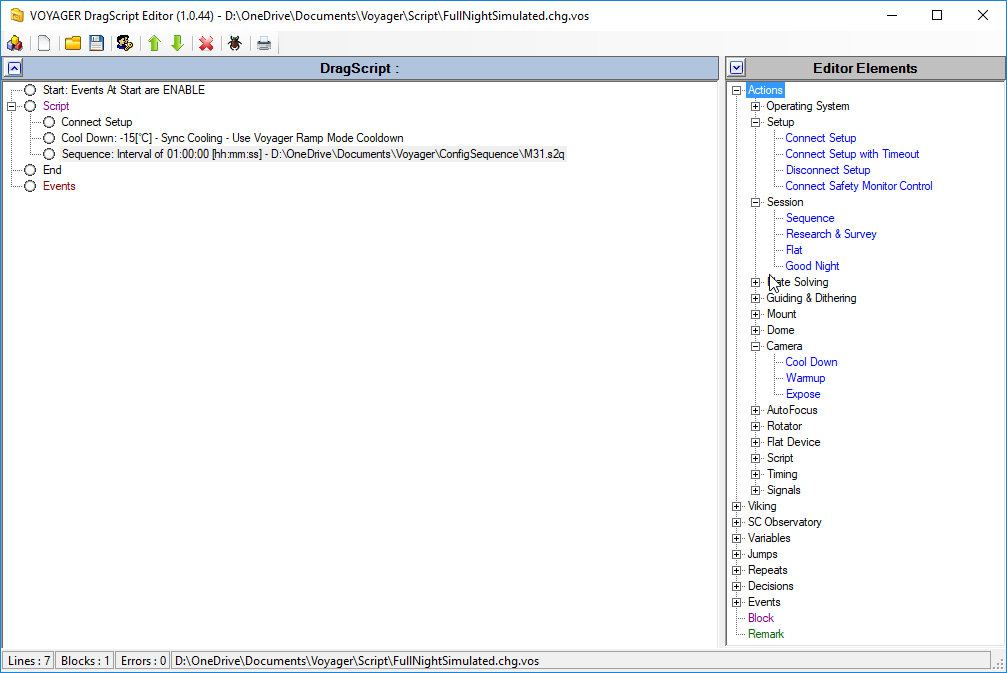 At the top of the DragScript Editor window are icons to perform the following actions:
- Select one of the pre-loaded scripts that are installed automatically with Voyager. These can be a good starting point to help you understand how scripts are structured and used
- Reset the editor to have a blank (empty) script. Even an "empty" script has several sections:
- Start: Specifies whether Events are enabled or disabled when the script starts. Double click this script element to bring up a dialog box and choose the setting
- Script: The bulk of your script actions are contained between the Script and End labels
- End: The End label marks the end of your DragScript
- Events: This optional section holds your actions to take when an Emergency Suspend, Exit or Resume event is raised during script execution
- Load a DragScript from disk
- Save a DragScript to disk
- Save a DragScript to disk but remove all private data - example: email login information stored in a Send Email action. Use this setting to save a copy of your DragScript before sharing it with other people or posting on a forum (new as of Voyager 2.1.4a)
- Click a script element to select it, then click the green up arrow to move it upwards in your script
- Click a script element to select it, then click the green down arrow to move it downwards in your script
- Click a script element to select it, then click the red X to delete it
- Click to debug the script by running it under the DragScript Simulator
- Click to save the script to a plain text format file, suitable for printing
DragScript Elements
The DragScript window contains the script you are currently editing. Drag items from the Editor Elements window on the right and drop them on the section where you want them to go, and they will be added to your script.
You can drag a block onto the Script, an existing block, or any of the IF decision actions.
You can drag any element to a block IF or a block DO action.
The easiest way to see where you can drop a new element is to watch the cursor shape while you are dragging the new element onto the DragScript. It will be the international "Not" sign - a circle with a slash through it - if you cannot drop the new element at that spot. It will be an arrow with a little rectangle attached if that is a legal spot to drop the new element.
If the cursor doesn't change, you are probably using the DragScript editor on a remote PC and your remote viewer, such as TeamViewer, has been set to not change the local mouse pointer to match the remote machine's mouse pointer.
OR -- on Windows 10, if your remote machine does not have a mouse enabled, the mouse pointer won't change shape. To fix this:
1) Right click the Windows button on the remote PC's desktop (not on your local PC)
2) Click Settings
3) Type "Mouse Keys" in the search box and select "Turn Mouse Keys On or Off"
4) Turn Mouse Keys on
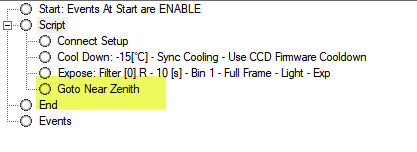
Here's a brief example. Let's say we want to add the action Goto Near Zenith before the Expose: action in the above script.
- Click the plus sign next to the Mount label in the Editor Elements box to show all available mount actions. Click Goto Near Zenith and drag it to the Script label in the DragScript window:
- After you drop it on the Script label in the DragScript window, it will be added as the last action in that section:
- Click Goto Near Zenith and then click the green up arrow icon in the toolbar at the top of the window to move the selected action up to where you want it to run
- Some DragScript actions require additional configuration before they will run. In that case, the element will be highlighted in red. Double-click it to bring up the dialog box, fill it out, and click OK to complete configuration of the element.
- When you are finished making your changes, save your script using the Save icon
 .
. - Return to the DragScript workspace in Voyager and click Reload Script to load the updated script with your changes
Editing a DragScript
Once you have created your initial DragScript by dragging elements from the right window to the script window, you can modify your script in several ways:
- Click an element to highlight it, then use the green Up/Dn arrows in the command bar to move it up or down, or the red X to delete it
- Double click a configurable element to open its configuration window. Make your changes and click the OK button to save them or Cancel to discard them
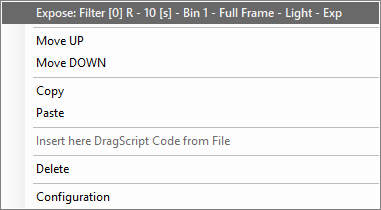
- Right click an element to bring up this menu:
- Move UP/Move Down: Click to move the selected element up or down in the script
- Copy: Copy the selected element to the clipboard
- Paste: Paste the clipboard contents at the mouse cursor
- Delete: Delete the selected element
- Configuration: Open the element's configuration window if it has one
Inserting a DragScript from a File
If you have a fragment of DragScript code that you would like to use in several places in your script, or one that you frequently use in different scripts, you can create the DragScript fragment, save it to a file, and then insert it and modify it as many times as necessary into your final script.
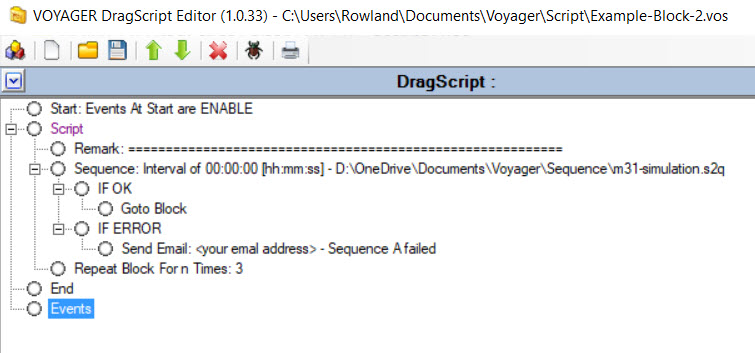
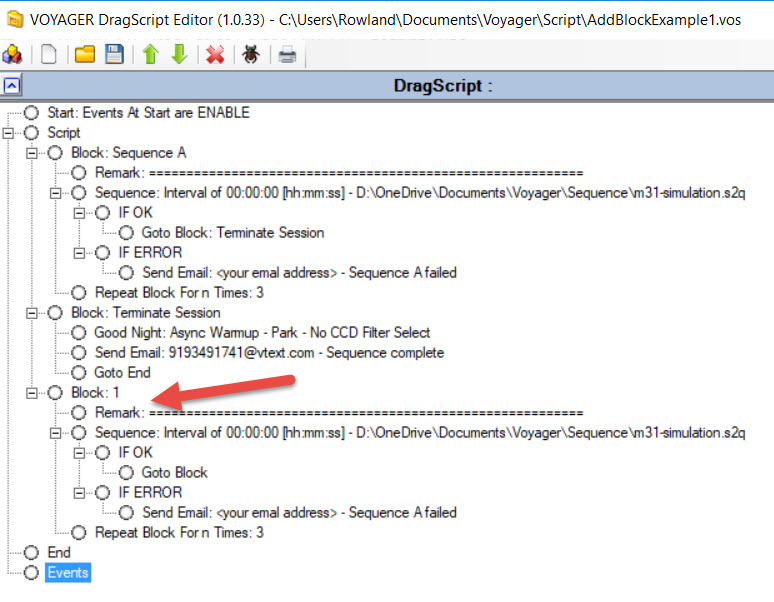
For example, we created this script to run a sequence, check for success, and go to the next block if OK, else send an email notifying us of the problem and try again, three times.
Note that we created this DragScript code directly in the main Script block. When we insert this later into another DragScript, a block is automatically created to hold the new fragment, so we don't need to put this in a block now:
We saved this script to a file called Example-Block-2.
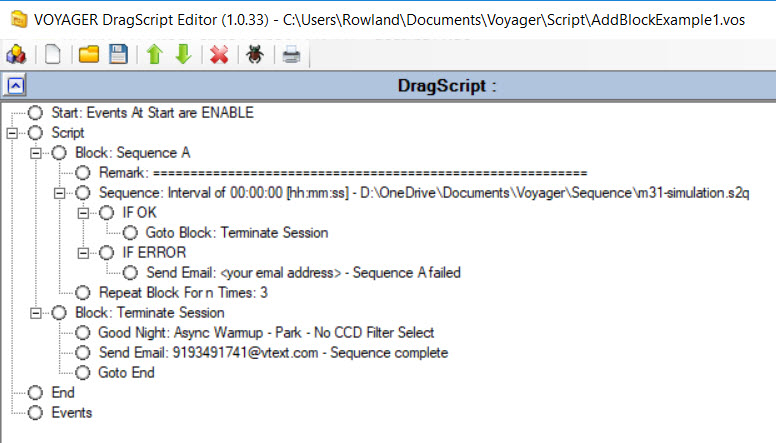
Now we open the script to which we want to add this fragment:
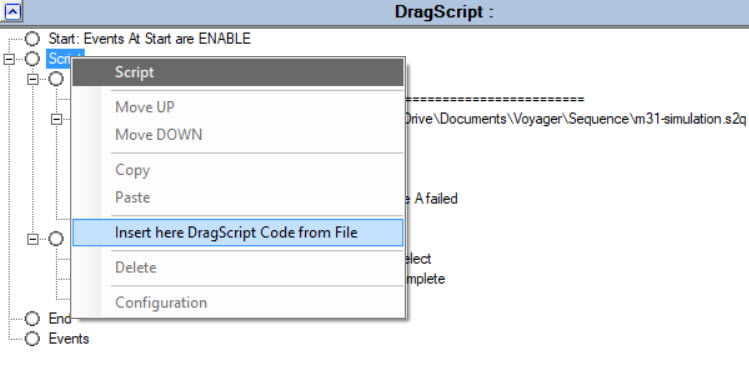
Right click on the Script block tag and select Insert DragScript from File. Choose the file containing the DragScript fragment we saved above and click Open:
The DragScript fragment is added in a new block at the end of the Script block. Highlight the new Block tag (Block 1 in this example), use the up/down arrow toolbar icons to move the block to your desired location. Edit the block as required and don't forget to save your changed script.
DragScript Simulator
Click the ![]() icon in the toolbar to debug the loaded script in the DragScript simulator.
icon in the toolbar to debug the loaded script in the DragScript simulator.
The Simulator lets you understand how control will flow in your script after each action is completed, whether with an OK outcome (success), an error, or a timeout.
It also shows you the control flow when an Emergency Exit, Emergency Suspend or Emergency Resume event are raised.
No actions are executed during the simulator session. This is just to understand the flow of control of your script under different conditions.
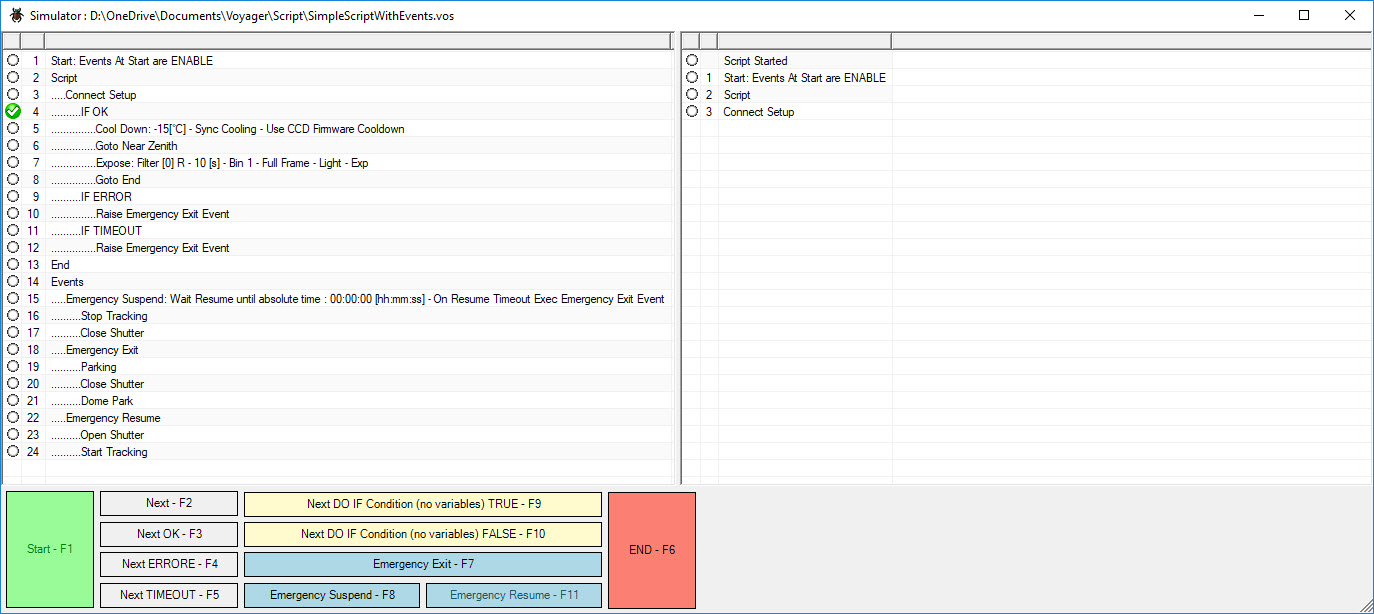
- The panel on the left contains the script to simulate. It contains the currently loaded script in the editor.
- For this example we have added very simple event handling to the script shown above in the DragScript Editor section. For example, if a Weather Event is configured to raise an Emergency Suspend on cloudy weather, and an Emergency Exit if it starts raining:
- Emergency Suspend: Voyager will command the mount to stop tracking and close the observatory shutter (or roll-off roof if that's the type of observatory)
- Emergency Exit: Voyager will command the mount to park, close the shutter or roll-off roof, and park the dome
- Emergency Resume: Voyager will open the shutter and command the mount to resume tracking
- Important Note! In a production DragScript, you should check if operations in an Emergency Suspend and Emergency Exit block succeed, and if not, send a notification (SMS or Email) so you can take manual action to prevent equipment damage
- The script also demonstrates how the OK, ERROR and TIMEOUT results of an action are handled. In this example, Voyager would attempt to Connect to your setup.
- If the Connect is successful (IF OK), the script will cool the CCD, slew to near the zenith, and take an exposure.
- If the Connect Setup returns an error (IF ERROR) or times out (IF TIMEOUT), the script will raise an Emergency Exit event and the steps outlined above for Emergency Exit will be done
- Start - F1: Click this button or press the F1 key to start the simulation. When you start the simulation, the Next buttons are activated and messages start to appear in the window on the right. In the next screenshot, we can see the results after pressing Start - F1 and then Next - F2 (or Next OK - F3) three times:
- Next - F2: Click this button or press the F2 key to move to the next line of the script without raising any events
- Next OK - F3: Click this button or press the F3 key to simulate successful completion of the current line of the script and move to the next line that will be executed
- Next ERROR - F4: Click this button or press the F4 key to signal an ERROR has occurred while executing the current line of the script. Then press Next and the trace window on the right will show the path of execution after the ERROR was raised
- Next TIMEOUT - F5: Click this button or press the F5 key to signal a TIMEOUT has occurred while executing the current line of the script. Then press Next and the trace window on the right will show the path of execution after the TIMEOUT was raised
- Next DO IF Condition (no variables) TRUE - F9: Press this button or the F9 key to simulate execution of a DO IF conditional statement that evaluates to TRUE. The DO IF Condition should not contain variables.
- Next DO IF Condition (no variables) FALSE - F10: Press this button or the F10 key to simulate execution of a DO IF conditional statement that evaluates to FALSE. The DO IF Condition should not contain variables.
- Emergency Exit - F7: Click this button or press F7 to simulate an Emergency Exit event. Then press Next and the trace window on the right will show the path of execution after the Emergency Exit event was raised
- Emergency Suspend - F8: Click this button or press F8 to simulate an Emergency Suspend event. Then press Next and the trace window on the right will show the path of execution after the Emergency Suspend event was raised
- Emergency Resume - F11: Click this button or press F11 to simulate an Emergency Resume event. Then press Next and the trace window on the right will show the path of execution after the Emergency Resume event was raised
- END - F6: Click this button or press the F6 key to end the simulation
Checking COUNTER values in the DragScript Simulator
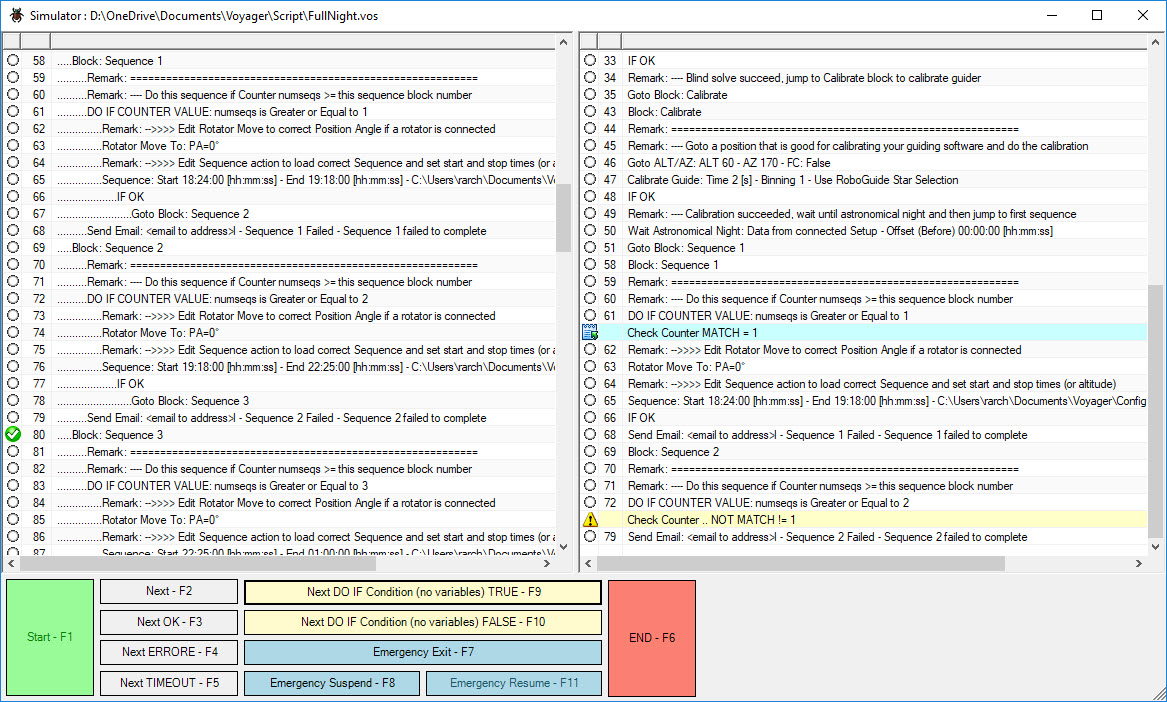
As of Voyager 2.1.1c, the DragScript simulator will display the results of testing counter variables in a DO IF COUNTER VALUE statement.
In this example, the variable numseqs was set equal to 1 at the start of the DragScript.
- The Next OK button was pressed repeatedly to step through the DragScript
- After line 61, since numseqs = 1, the DO IF COUNTER VALUE is Greater or Equal to 1 test succeeds
- The next line is highlighted blue and the phrase Counter MATCH tells you that the test succeeded and the actions in the DO IF block will be executed
- After line 72, since numseqs = 1, the DO IF COUNTER VALUE is Greater or Equal to 2 test fails
- The next line is highlighted yellow and the phrase NOT MATCH != 1 tells you that the test failed and the actions in the DO IF block will not be executed
To learn about the individual DragScript elements, visit the DragScript Elements page.


