Difference between revisions of "DragScript Elements"
| (7 intermediate revisions by the same user not shown) | |||
| Line 18: | Line 18: | ||
For the remainder of this page, we will describe the available DragScript elements. New elements are added periodically and will be documented in the release notes and here. | For the remainder of this page, we will describe the available DragScript elements. New elements are added periodically and will be documented in the release notes and here. | ||
| + | |||
| + | Press Sort button to listing all the categories and blocks in alphabetical order. | ||
==DragScript Actions== | ==DragScript Actions== | ||
| Line 57: | Line 59: | ||
**'''Text to Send''': input the text to send to the UDP Port | **'''Text to Send''': input the text to send to the UDP Port | ||
**'''Use Terminator''': indicate if you want to use a terminator or not. CR = carriage return, LF=Line feed | **'''Use Terminator''': indicate if you want to use a terminator or not. CR = carriage return, LF=Line feed | ||
| + | *'''UDP IP/Port BINARY Transmit''': Send Binary data string to an RS232 Serial Port | ||
| + | *[[File:UDPIPBinaryTX.png]] | ||
| + | * '''Configuration''' | ||
| + | ** '''IP/Hostname''': IP or hostname of PC where to send data | ||
| + | **'''Port:''' UDP port number to use for transmission | ||
| + | ** '''Binary Data To Send(*):''' input the binary data to send to the serial port. Binary Data must be entered ad a string in hexadecimal format separated (Example 0A 0B 0C A1 A2 A3) | ||
==Setup== | ==Setup== | ||
| Line 458: | Line 466: | ||
*'''FIT Object Name''': The name to use to populate the OBJECT field in the FITS header | *'''FIT Object Name''': The name to use to populate the OBJECT field in the FITS header | ||
*'''FIT Airmass calculation''': Compute the current airmass value and add to the FITS file header. Airmass is the amount of atmosphere you are imaging through. It is one when imaging directly overhead, and increases as you image closer to the horizon. | *'''FIT Airmass calculation''': Compute the current airmass value and add to the FITS file header. Airmass is the amount of atmosphere you are imaging through. It is one when imaging directly overhead, and increases as you image closer to the horizon. | ||
| + | *'''Focuser Position Add to FIT Name:''' add the focuser position to the FIT name, only if you are using RoboFire like Autofocus control in Voyager | ||
*'''Default''': Use the default settings | *'''Default''': Use the default settings | ||
*'''OK''': Save changes and close the window | *'''OK''': Save changes and close the window | ||
*'''Cancel''': Discard changes and close the window | *'''Cancel''': Discard changes and close the window | ||
| + | |||
| + | * '''TheSkyX/64 Camera FW Reconnect''': Reconnect camera and filterwheel if the control used for camera in Voyager is TheSkyX or TheSky64 | ||
| Line 676: | Line 687: | ||
*'''Exit Wait if Actual Altitude LOWER than or EQUAL (>=) to reference''': Wait until the target sets below the reference altitude | *'''Exit Wait if Actual Altitude LOWER than or EQUAL (>=) to reference''': Wait until the target sets below the reference altitude | ||
*'''Wait Altitude until absolute time''': The Wait Altitude operation will terminate when this time is reached, whether or not the target has reached the reference altitude. This is usually done to end the wait with morning light | *'''Wait Altitude until absolute time''': The Wait Altitude operation will terminate when this time is reached, whether or not the target has reached the reference altitude. This is usually done to end the wait with morning light | ||
| + | * '''RoboClip:''' load RA and DEC from RoboClip catalog | ||
| + | * '''Coords From Sequence:''' load RA and DEC from a sequence file | ||
*'''Default''': Use the default settings | *'''Default''': Use the default settings | ||
*'''OK''': Save changes and close the window | *'''OK''': Save changes and close the window | ||
| Line 812: | Line 825: | ||
**'''External IP''': ##EXTERNAL-IP## write a list of external IP assigned to your PC(router) if you have internet connection up | **'''External IP''': ##EXTERNAL-IP## write a list of external IP assigned to your PC(router) if you have internet connection up | ||
**'''NOW''': ##NOW## write the actual date and time | **'''NOW''': ##NOW## write the actual date and time | ||
| + | **'''Mount Altitude''': ##MOUNT-ALT## write the actual altitude of Telescope Mount if connected | ||
| + | **'''Mount Azimuth''': ##MOUNT-AZ## write the actual azimuth of Telescope Mount if connected | ||
**'''Variable''': ##VAR-name## where you must replace the ''name'' with the real name of your variable (case sensitive) , write the actual value of you variable (decimal, string or counter) | **'''Variable''': ##VAR-name## where you must replace the ''name'' with the real name of your variable (case sensitive) , write the actual value of you variable (decimal, string or counter) | ||
| Line 838: | Line 853: | ||
**'''External IP''': ##EXTERNAL-IP## write a list of external IP assigned to your PC(router) if you have internet connection up | **'''External IP''': ##EXTERNAL-IP## write a list of external IP assigned to your PC(router) if you have internet connection up | ||
**'''NOW''': ##NOW## write the actual date and time | **'''NOW''': ##NOW## write the actual date and time | ||
| + | **'''Mount Altitude''': ##MOUNT-ALT## write the actual altitude of Telescope Mount if connected | ||
| + | **'''Mount Azimuth''': ##MOUNT-AZ## write the actual azimuth of Telescope Mount if connected | ||
**'''Variable''': ##VAR-name## where you must replace the ''name'' with the real name of your variable (case sensitive) , write the actual value of you variable (decimal, string or counter) | **'''Variable''': ##VAR-name## where you must replace the ''name'' with the real name of your variable (case sensitive) , write the actual value of you variable (decimal, string or counter) | ||
| Line 874: | Line 891: | ||
**'''External IP''': ##EXTERNAL-IP## write a list of external IP assigned to your PC(router) if you have internet connection up | **'''External IP''': ##EXTERNAL-IP## write a list of external IP assigned to your PC(router) if you have internet connection up | ||
**'''NOW''': ##NOW## write the actual date and time | **'''NOW''': ##NOW## write the actual date and time | ||
| + | **'''Mount Altitude''': ##MOUNT-ALT## write the actual altitude of Telescope Mount if connected | ||
| + | **'''Mount Azimuth''': ##MOUNT-AZ## write the actual azimuth of Telescope Mount if connected | ||
**'''Variable''': ##VAR-name## where you must replace the ''name'' with the real name of your variable (case sensitive) , write the actual value of you variable (decimal, string or counter) | **'''Variable''': ##VAR-name## where you must replace the ''name'' with the real name of your variable (case sensitive) , write the actual value of you variable (decimal, string or counter) | ||
| Line 892: | Line 911: | ||
* '''JOLLY Strings''':there are some special strings called jolly that can be used in mail text and will be replaced with some data from Voyager environment or DragScript variables | * '''JOLLY Strings''':there are some special strings called jolly that can be used in mail text and will be replaced with some data from Voyager environment or DragScript variables | ||
| − | ** '''Internal IPs:''' ##INTERNAL-IP## write a list of all internal IPs avalaible in the system | + | **'''Internal IPs:''' ##INTERNAL-IP## write a list of all internal IPs avalaible in the system |
** '''External IP''': ##EXTERNAL-IP## write a list of external IP assigned to your PC(router) if you have internet connection up | ** '''External IP''': ##EXTERNAL-IP## write a list of external IP assigned to your PC(router) if you have internet connection up | ||
** '''NOW''': ##NOW## write the actual date and time | ** '''NOW''': ##NOW## write the actual date and time | ||
| − | ** '''Variable''': ##VAR-name## where you must replace the ''name'' with the real name of your variable (case sensitive) , write the actual value of you variable (decimal, string or counter) | + | ** '''Mount Altitude''': ##MOUNT-ALT## write the actual altitude of Telescope Mount if connected |
| + | **'''Mount Azimuth''': ##MOUNT-AZ## write the actual azimuth of Telescope Mount if connected | ||
| + | **'''Variable''': ##VAR-name## where you must replace the ''name'' with the real name of your variable (case sensitive) , write the actual value of you variable (decimal, string or counter) | ||
'''Guide to obtain API ID and Chat ID''' : Download the Telegram APP on your mobile phone and register, start a chat with BotFather and ask for the creation of a new chatbot, write down the Token HTTP API (API ID). Open the link of your new chat bot, on the PC open the link <nowiki>https://api.telegram.org/botYOUR-TOKEN/getUpdates</nowiki> replacing YOUR-TOKEN with yours and recover the CHAT ID. Use them to configure sending in this DragScript block. More info in the Voyager Wiki. | '''Guide to obtain API ID and Chat ID''' : Download the Telegram APP on your mobile phone and register, start a chat with BotFather and ask for the creation of a new chatbot, write down the Token HTTP API (API ID). Open the link of your new chat bot, on the PC open the link <nowiki>https://api.telegram.org/botYOUR-TOKEN/getUpdates</nowiki> replacing YOUR-TOKEN with yours and recover the CHAT ID. Use them to configure sending in this DragScript block. More info in the Voyager Wiki. | ||
| Line 914: | Line 935: | ||
*'''No Timeout:''' with this option the wait will be for ever until physically user press the button on the screen | *'''No Timeout:''' with this option the wait will be for ever until physically user press the button on the screen | ||
*'''Message:''' show a text message inside window prompt to the user | *'''Message:''' show a text message inside window prompt to the user | ||
| − | *'''Show Variable Value:''' show a text rappresentation of the variable selected inside window prompt to the user<br /> | + | *'''Show Variable Value:''' show a text rappresentation of the variable selected inside window prompt to the user |
| + | *'''Wait User DATA''': Ask to the user with a windows prompt to input data (DECIMAL,STRING, COUNTER depends on type of variable used for storage) to continue or to abort and also its possible to activate a timeout during waiting of the user interaction. The inpout data will be stored in the selected variable. | ||
| + | *[[File:Immaginewefwef.png]] | ||
| + | *'''Wait Mode''': how the wait will be work | ||
| + | *'''Use Timeout of:''' with this option the wait will finish in anycase after the seconds selected | ||
| + | *'''In case of timeout exit with:''' if the Use timeout of option will be used then exit can be selected between TIMEOUT or OK action result, this result will be usable in the DragScript using the IF condition related to actions | ||
| + | *'''No Timeout:''' with this option the wait will be for ever until physically user press the button on the screen | ||
| + | *'''Message:''' show a text message inside window prompt to the user | ||
| + | *'''Show Variable Value:''' show a text rappresentation of the variable selected inside window prompt to the user | ||
| + | *'''Insert Data in Variable:''' the data in input from the user will be stored in the selected DragScript variable (variable must be declared before use it in DragScript). Based on type of DragScript Variable the edit mask of input field will be adapted.<br /> | ||
{{Note|if you using No Timeout option you must be really to be present in front of your PC to continue}} | {{Note|if you using No Timeout option you must be really to be present in front of your PC to continue}} | ||
| Line 934: | Line 964: | ||
<br /> | <br /> | ||
{{Note|ASCOM Switch driver of Optec Perseus must be installed in order to allow working the DragScript Blocks}} | {{Note|ASCOM Switch driver of Optec Perseus must be installed in order to allow working the DragScript Blocks}} | ||
| + | |||
| + | == Donuts == | ||
| + | Donuts actions allow to interact with the software Donuts developed by Kames MacCormac, used for advanced research pointing, code here https://github.com/jmccormac01/Donuts : | ||
| + | |||
| + | |||
| + | [[File:DonutsSection.png]] | ||
| + | |||
| + | *'''Donuts Calibration''': ask to Donuts process to performe a Calibration using camera and mount | ||
[[Category:DragScript]] | [[Category:DragScript]] | ||
[[Category:All]] | [[Category:All]] | ||
[[Category:Manual|Lb]] | [[Category:Manual|Lb]] | ||
Revision as of 19:18, 17 November 2021
The DragScript "language" is composed of blocks that are dragged from the list on the right side of the DragScript editor to the script being created or edited on the left.
Each category of element is organized in list that can be expanded or contracted by clicking the "+" or "-" next to the element category name:

E.g., if you click the + in front of Actions, the list expands like this:

As you can see in the case of Actions, there are further subcategories of actions, and clicking the + in front of one of them expands it again:

Here, the list of Setup actions is fully expanded and we see three choices that we can drag to the active script: Connect Setup, Connect Setup with Timeout, and Disconnect Setup
For the remainder of this page, we will describe the available DragScript elements. New elements are added periodically and will be documented in the release notes and here.
Press Sort button to listing all the categories and blocks in alphabetical order.
DragScript Actions
Operating System
The Operating System actions control the PC running Voyager:

- Shutdown PC: Shutdown the PC running Voyager
- Restart PC: Restart (reboot) the PC running Voyager
- Hybernate PC: Hybernate the PC running Voyager (only in OS that support it)
- Suspend PC: Susend the PC running Voyager (only in OS that support it)
- Kill Process: Kill a process on the PC running Voyager. Either type in the Process name or click one of the buttons to use a preconfigured process name.

- Serial Port STRING Transmit: Send a text string with a terminator (if necessary) to an RS232 Serial Port

- Configuration
- Serial Port Config: insert the string used to configure and open the serial port (portname,portspeed,databit,parity,datastopbit) for parity use N=None O=Odd E=Even (Example COM1,9600,8,N,1)
- Text to Send: input the text to send to the serial port
- Use Terminator: indicate if you want to use a terminator or not. CR = carriage return, LF=Line feed
- Serial Port BINARY Transmit: Send Binary data string to an RS232 Serial Port

- Configuration
- Serial Port Config: insert the string used to configure and open the serial port (portname,portspeed,databit,parity,datastopbit) for parity use N=None O=Odd E=Even (Example COM1,9600,8,N,1)
- Binary Data To Send(*): input the binary data to send to the serial port. Binary Data must be entered ad a string in hexadecimal format separated (Example 0A 0B 0C A1 A2 A3)
- UDP IP/Port STRING Transmit: Send a text string with a terminator (if necessary) to an UDP Port

- Configuration
- IP/Hostname: IP or hostname of PC where to send data
- Port: UDP port number to use for transmission
- Text to Send: input the text to send to the UDP Port
- Use Terminator: indicate if you want to use a terminator or not. CR = carriage return, LF=Line feed
- UDP IP/Port BINARY Transmit: Send Binary data string to an RS232 Serial Port
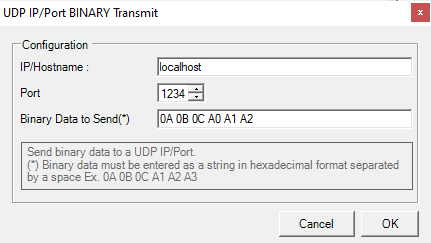
- Configuration
- IP/Hostname: IP or hostname of PC where to send data
- Port: UDP port number to use for transmission
- Binary Data To Send(*): input the binary data to send to the serial port. Binary Data must be entered ad a string in hexadecimal format separated (Example 0A 0B 0C A1 A2 A3)

Setup
Setup actions control connecting and disconnecting to your equipment and software:

- Connect Setup: Commands Voyager to connect to the equipment and software in the currently selected Profile
- Connect Setup with Timeout: Command Voyager to connect to the equipment in the currently selected Profile. Voyager will timeout if connection does not complete within the specified number of seconds:

- Disconnect Setup: Command Voyager to disconnect from the equipment and software in the currently selected Profile
- Connect Safety Monitor Control: Connect only the Safety Monitor control. This is useful for monitoring conditions prior to connecting all your equipment
- Disconnect Safety Monitor Control: Disconnect only the Safety Monitor control
- Connect Flat Device #1 / #2 Control: Connect only the Flat Device #1/#2. This is useful for switch on the flat device only when needed
- Disconnect Flat Device #1 / #2 Control: Disconnect only the Flat Device #1/#2 control
Voyager
Interaction with Voyager Application:

- Change Voyager Profile: will allow changing of profile from DragScript. Voyager must have the setup not connect or action will failed.
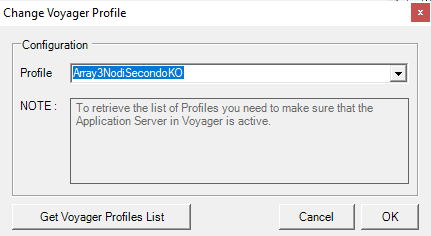
- Profile: Profile select, and list of all profile if retrieved from Voyager
- Get Voyager Profiles List: listg of profiles will be retrieved directly from Voyager using the Application Server. Male sure that the Application Server in Voyager is active
- OK: Click to save your changes and close the window
- Cancel: Click to discard your changes and close the window

Session
Session actions run sequences to acquire images, flat frames, and shutdown ("Good Night") your system:

- Sequence: Run a Sequence with options:

- Configuration Panel:
- Click the folder icon
 to select the Sequence file to run. Create your Sequence files in Voyager's OnTheFly workspace
 - Start/TimeSpan: Click one of the radio buttons to use that option to tell when to start and end the sequence. This is one way to have Voyager image this target until a specific time is reached, or an interval has elapsed. It is a good idea to specify an ending time here, or a minimum altitude in the Sequence definition or the Options field below, so Voyager will not continue trying to take images after the object has set
- Start and End from Sequence: Use the start and end times specified in the sequence definition file. The start time comes from the On Start tab and the end time comes from the On End tab
- Immediately Start and Finish After Interval: Start the sequence immediately and end it after the HH:MM:SS amount of time specified with the Time Span: counter fields
- Start and End at Absolute Time: Voyager should wait until the specified Start: time and end the sequence at the specified End: time.
- Immediately Start and End at Absolute Time: Start the sequence immediately and end it at the time specified in the counter fields
- Immediately Start and Finish With Astronomical Night: Start the sequence immediately and finish it at Astronomical Night's end, offset +/- by the number of minutes set in the Offset: counter field
- Click the folder icon
- Calculated Time Span: Voyager will show how much time this sequence will take with the chosen Start/TimeSpan option if you choose Start and End at Absolute time. It is not possible to calculate this if you choose one of the "Immediately Start" options
- Options: Check the boxes to select any of these options:
- Overrides Target Coords J2000: If checked, the RA and DEC coordinates are used instead of those in the sequence file. RA coordinates are in HH MM SS and DEC coordinates are HH MM SS.sss
- Overrides Target Name with this: If checked, the name entered in the field will be used as the target name, which is part of the file name
- Override Angle Rotation of Target with PA of°: if checked , if in the sequence the rotator is managed, this flag force the Rotation Angle to the value selected. The other rotator settings in sequence will not be changed.
- Finish Running Exposure in case of elapsed time for Sequence Execution: If checked, an exposure in progress will be allowed to finish if it starts before the sequence end time but finishes after the sequence end time
- Override Lower Altitude value under which Exit from Sequence: If checked, if the sequence target sets below the altitude given here, the sequence will end. This value will override the minimum altitude value chosen in the sequence file
- Override Higher Altitude value above which Exit from Sequence: If checked, if the sequence target rises above the altitude given here, the sequence will end. This value will override the maximum altitude value chosen in the sequence file
- Override Lower HourAngle value under which Exit from Sequence: If checked, if the sequence target HourAngle are lower the value given here, the sequence will end. This value will override the Lower HourAngle value chosen in the sequence file
- Override Higher HourAngle value over which Exit from Sequence: If checked, if the sequence target HourAngle are higher the value given here, the sequence will end. This value will override the Higher HourAngle value chosen in the sequence file
- Override Camera Cooling Temperature with Decimal Variable: if checked for colling temperature will be used the value inside the decimal variable selected in the drop-box combo box control
- Override Lower Azimuth value under which Exit from Sequence: If checked, if the sequence target Azimuth are lower the value given here, the sequence will end. This value will override the Lower Azimuth value chosen in the sequence file
- Override Higher Azimuth value over which Exit from Sequence: If checked, if the sequence target Azimuth are higher the value given here, the sequence will end. This value will override the Higher Azimuth value chosen in the sequence file
- Use External Interval Angle: if each the azimuth constraints will be cheched you can decide with this flag to use external angle instead of internal angle between before and after azimuth. Example if you choose 70° before and 150° after with out external flag this mean sequence run if angle is between 70 and 150°, if you chec it and invert to external sequence will be terminate if azimuth is between 70 and 150°
- Default: Click this button to populate this window with the default options
- OK: Click to save your changes and close the window
- Cancel: Click to discard your changes and close the window
- Options: Check the boxes to select any of these options:
- Research & Survey: Run a Research & Survey sequence with options

- Configuration Panel:
- Click the folder icon to select the Research & Survey sequence file to run. Create your sequence files in Voyager's Research & Survey workspace
- TYPO: Star/TimeSpan should be Start/TimeSpan
- Start/TimeSpan: Click one of the radio buttons to use that option to tell when to start and end the Research & Survey sequence. This is one way to have Voyager image this target until a specific time is reached, or an interval has elapsed. It is a good idea to specify an ending time here, or a minimum altitude in the Research & Survey sequence definition or the Options field below, so Voyager will not continue trying to take images after the object has set
- Immediately Start and Finish After Interval: Start the sequence immediately and end it after the HH:MM:SS amount of time specified with the Time Span: counter fields
- Start and End at Absolute Time: Voyager should wait until the specified Start: time and end the sequence at the specified End: time.
- Immediately Start and End at Absolute Time: Start the sequence immediately and end it at the time specified in the counter fields
- Immediately Start and Finish With Astronomical Night: Start the sequence immediately and finish it at Astronomical Night's end, offset +/- by the number of minutes set in the Offset: counter field
- Calculated Time Span: Voyager will show how much time this sequence will take with the chosen Start/TimeSpan option if you choose Start and End at Absolute time. It is not possible to calculate this if you choose one of the "Immediately Start" options
- Click the folder icon
- Options:
- Finish Running Exposure in case of elapsed time for Sequence Execution: If checked, an exposure in progress will be allowed to finish if it starts before the sequence end time but finishes after the sequence end time
- Default: Click this button to populate this window with the default options
- OK: Click to save your changes and close the window
- Cancel: Click to discard your changes and close the window
- Flat: Run an Auto Flat sequence. Configure the Auto Flat sequence files in the OnTheFly workspace

- Click the folder icon and choose the Auto Flat sequence file to run. Configure the Auto Flat sequence files in the OnTheFly workspace
- TYPO: Configuration dialog says "Good Night" but should be Auto Flat
- Default: Click this button to populate this window with the default options (blanks out the Flat Sequence File field)
- OK: Click to save your changes and close the window
- Cancel: Click to discard your changes and close the window
- Good Night: Run a series of one or more shutdown actions:

- CCD Filter Select: Moves the filter wheel to the filter chosen from the drop-down box on the right
- Sync Warmup: Send the CCD cooler a warmup command and wait until it finishes
- Async Warmup: Send the CCD cooler a warmup command and continue execution without waiting for it to finish
- Parking: Park the mount as specified in Mount Setup
Plate Solving
Plate Solving actions perform a plate solving action as defined in the Plate Solving setup of the active profile:

- Plate Solving : Perform a plate solve action at the current scope location using the Plate Solve software defined in the Plate Solving setup of the active profile. Mount will not be synched
- Plate Solving with Mount Sync: Perform a plate solve action at the current scope location using the Plate Solve software defined in the Plate Solving setup of the active profile. Send a Sync command to the mount unless you have chosen to not send a Sync command to your mount in Mount Setup. You may lost pointing model if you have one and your driver not allow additional and external sync
- Plate Solving with Rotator Sync: Perform a plate solve action at the current scope location using the Plate Solve software defined in the Plate Solving setup of the active profile. Mount will not be synched. Also perform a Sync of the rotator to the PA solved.
- Plate Solving with Mount & Rotator Sync: Perform a plate solve action at the current scope location using the Plate Solve software defined in the Plate Solving setup of the active profile. Send a Sync command to the mount unless you have chosen to not send a Sync command to your mount in Mount Setup. You may lost pointing model if you have one and your driver not allow additional and external sync. Also perform a Sync of the rotator to the PA solved.
Blind Solving
Blind Solving actions perform a plate solving action as defined in the Plate Solving setup of the active profile:
![]()
- Blind Solving with Mount Sync: Perform a blind solve action at the current scope location using the Plate Solve software defined in the Plate Solving setup of the active profile. Send a Sync command to the mount unless you have chosen to not send a Sync command to your mount in Mount Setup. You may lost pointing model if you have one and your driver not allow additional and external sync
- Blind Solving with Rotator Sync: Perform a blind solve action at the current scope location using the Plate Solve software defined in the Plate Solving setup of the active profile. Mount will not be synched. Also perform a Sync of the rotator to the PA solved.
- Blind Solving with Mount & Rotator Sync: Perform a blind solve action at the current scope location using the Plate Solve software defined in the Plate Solving setup of the active profile. Send a Sync command to the mount unless you have chosen to not send a Sync command to your mount in Mount Setup. You may lost pointing model if you have one and your driver not allow additional and external sync. Also perform a Sync of the rotator to the PA solved.
WEB Solving
Plate Solving actions perform a plate solving action as defined in the Plate Solving setup of the active profile:
![]()
- Web Solving with Sync: Perform a web blind solve action at the current scope location using the nova.astrometry.net site. An active Internet connection is required. Send a Sync command to the mount unless you have chosen to not send a Sync command to your mount in Mount Setup
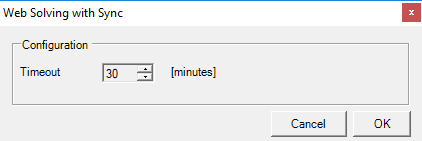
- Timeout: Specify the number of minutes Voyager should wait after initiating the Web Solve before timing out. Use an IF TIMEOUT decision action to define what to do if the web solve times out

- Web Solving with Rotator Sync: Perform a web blind solve action at the current scope location using the Plate Solve software defined in the Plate Solving setup of the active profile. Mount will not be synched. Also perform a Sync of the rotator to the PA solved.
- Web Solving with Mount & Rotator Sync: Perform a web blind solve action at the current scope location using the Plate Solve software defined in the Plate Solving setup of the active profile. Send a Sync command to the mount unless you have chosen to not send a Sync command to your mount in Mount Setup. You may lost pointing model if you have one and your driver not allow additional and external sync. Also perform a Sync of the rotator to the PA solved.
Guiding
Guiding actions send commands to the guide software:

- Calibrate Guide: Command the guide software to perform a calibration action. It is recommended to include a Calibrate Guide action at the start of your sequence unless you are sure that your guider is calibrated from a previous session. Double click to bring up the configuration window:

- Time: Exposure time for Calibration exposures by the guiding software
- Binning: Binning level for Calibration exposures by the guiding software
- Use RoboGuide Star Selection: If selected, use Voyager's RoboGuide process to choose a guide star for the Calibration action. This is mandatory at this time since some guiding software cannot select a guide star.
- Default: Use the default settings
- OK: Save changes and close the window
- Cancel: Discard changes and close the window
- Acquiring Guide Star: Commands the guiding software to select a guide star. Double click to bring up the configuration window:

- Time: Exposure time for guide star acquisition exposures by the guiding software
- Binning: Binning level for guide star acquisition exposures by the guiding software
- Use RoboGuide Star Selection: If selected, use Voyager's RoboGuide process to choose a guide star. This is mandatory at this time since some guiding software cannot select a guide star.
- Default: Use the default settings
- OK: Save changes and close the window
- Cancel: Discard changes and close the window
- Guide Start: Commands the guiding software to begin guiding. Double click to bring up the configuration window:

- Time: Exposure time for guiding exposures by the guiding software
- Binning: Binning level for guiding exposures by the guiding software
- Use RoboGuide Star Selection: If selected, use Voyager's RoboGuide process to choose a guide star. This is mandatory at this time since some guiding software cannot select a guide star.
- Default: Use the default settings
- OK: Save changes and close the window
- Cancel: Discard changes and close the window
- Guide Stop: Command the guiding software to stop guiding
- Guide Dithering: Command the guiding software to perform a dithering action. Dithering is used to move the mount a tiny random amount in a random direction - usually only a couple of pixels. This prevents hot or cold pixels in your sensor from showing up in the same position in all of your images, making it easier to remove hot or cold pixels when stacking your images. Double click to bring up the configuration window:

- Max Pixel: Specify the maximum number of pixels that a dithering operation can move the mount
- Default: Use the default settings
- OK: Save changes and close the window
- Cancel: Discard changes and close the window
- Unguided Dithering: Perform a dithering action directly, vs. Guide Dithering which sends a dithering command to the guide software. Dithering is used to move the mount a tiny random amount in a random direction - usually only a couple of pixels. This prevents hot or cold pixels in your sensor from showing up in the same position in all of your images, making it easier to remove hot or cold pixels when stacking your images.

- Max Pixel: Specify the maximum number of pixels that a dithering operation can move the mount
- From Actual Position: This is the safest and default choice - it sends a command to move the mount up to the specified number of pixels from the current position. This should be a small movement, as the recommended number of pixels to dither is 3
- From Last Goto Action Position: Send a command to move the mount a random number of pixels up to Max Pixel in a random direction relative to the position of the last Goto action. This should only be used following a successful Goto action in your DragScript. You can damage your mount if you use this without a successful Goto action preceding it.
- From Last Precision Pointing Action Position: Send a command to move the mount a random number of pixels up to Max Pixel in a random direction relative to the position of the last Precision Pointing action. This should only be used following a successful Precision Pointing action in your DragScript. You can damage your mount if you use this without a successful Precision Pointing action preceding it.
- Use Actual Position on Empty/Fail condition: If checked, if the position reported by the Last Goto Action or Last Precision Pointing Action is empty, or if the Last Goto Action or Last Precision Pointing Action ended with an error, use the Actual Position of the mount as the starting point for dithering. In other words, don't attempt to dither based on the Last Goto action position or the Last Precision Pointing action position if either of those positions is empty, as this would send a command to the mount that could cause a pier crash and/or damage to your equipment. Highly recommend leaving this checked.
- Default: Use the default settings
- OK: Save changes and close the window
- Cancel: Discard changes and close the window
Mount
Mount actions send commands to the mount defined in the Mount setup of the active profile:

- Stop Tracking: Command the mount to stop tracking
- Start Tracking: Command the mount to start tracking
- Parking: Command the mount to slew to the Park position
- Unparking: Command the mount to Unpark
- Sync on Park: Command the mount to save the current position as the Park position
- Homing: Command the mount to move to the Home position
- Goto RA/DEC: Command the mount to move to the specified RA and DEC coordinates (J2000)

- RA J2000: Enter the RA coordinates in HH MM SS or HH MM SS.sss
- DEC J2000: Enter the RA coordinates in DD MM SS or DD MM SS.sss
- Default: Use the default settings: clears the RA and DEC fields
- OK: Save changes and close the window
- Cancel: Discard changes and close the window
- Goto ALT/AZ: Command the mount to move to the specified Altitude and Azimuth coordinates

- ALT: Enter the Altitude coordinates in DD MM SS or DD MM SS.sss
- AZ: Enter the Azimuth coordinates in DD MM SS or DD MM SS.sss
- Force Use of Normal RA/DEC Slew With Conversion: If checked, convert the requested ALT and AZ values to RA and DEC values and send a goto RA/DEC command to the mount
- Default: Use the default settings: clears the AZ and ALT fields
- OK: Save changes and close the window
- Cancel: Discard changes and close the window
- Goto Near Zenith: Command the mount to move to a point close to the current Zenith (directly overhead).
- Goto By Name: Command the mount to move to an object by name with an optional RA and DEC offset. This action requires Voyager to be connected to the Planetarium software defined in the current profile. The Object Name must match a name that can be successfully searched in the connected Planetarium software.

- Object Name: Name of the object to goto. Must be a name that can be successfully searched in the connected Planetarium software
- Offset RA (optional): An optional +/- offset in HH MM SS or HH MM SS.sss to be added or subtracted from the RA coordinates returned by the Planetarium software
- Offset DEC (optional): An optional +/- offset in DD MM SS or DD MM SS.sss to be added or subtracted from the DEC coordinates returned by the Planetarium software
- Precise Pointing: Command the mount to perform a precise pointing operation to the specified RA/DEC coordinates - slew to the object, plate solve to get actual coordinates, re-slew to correct pointing error:

- RA J2000: Enter the RA coordinates in HH MM SS or HH MM SS.sss
- DEC J2000: Enter the DEC coordinates in DD MM SS or DD MM SS.sss
- Max Error using Multiple of Profile Error by: If selected, multiply the maximum allowed pointing error by the number specified in the counter field. E.g., if the Precision Pointing Max Allowed Error specified in Mount Setup is 50 arc-seconds, a value of 2 in the counter field here would change the maximum pointing error to 100 arc-seconds. Precise pointing returns an OK (success) result when the error is less than the Max Error.
- Max Error is: If selected, use the value specified in the counter field as the maximum pointing error in arc-seconds. Precise pointing returns an OK (success) result when the error is less than the Max Error.
- RoboClip: open RoboClip manager windowd and allow to select a target,
- Default: Use the default settings
- OK: Save changes and close the window
- Cancel: Discard changes and close the window
- Precise Pointing by Name: Command the mount to perform a precise pointing operation to the specified named object - slew to the object, plate solve to get actual coordinates, re-slew to correct pointing error. This action requires Voyager to be connected to the Planetarium software defined in the current profile. The Object Name must match a name that can be successfully searched in the connected Planetarium software.
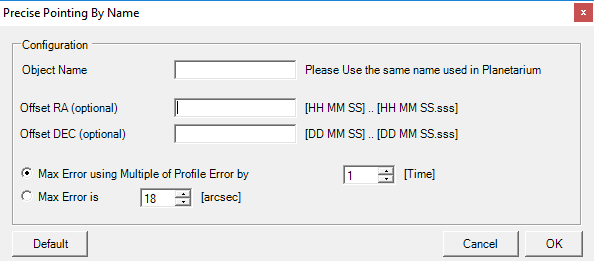
- Object Name: Name of the object to goto. Must be a name that can be successfully searched in the connected Planetarium software
- Offset RA (optional): An optional +/- offset in HH MM SS or HH MM SS.sss to be added or subtracted from the RA coordinates returned by the Planetarium software
- Offset DEC (optional): An optional +/- offset in DD MM SS or DD MM SS.sss to be added or subtracted from the DEC coordinates returned by the Planetarium software
- Max Error using Multiple of Profile Error by: If selected, multiply the maximum allowed pointing error by the number specified in the counter field. E.g., if the Precision Pointing Max Allowed Error specified in Mount Setup is 50 arc-seconds, a value of 2 in the counter field here would change the maximum pointing error to 100 arc-seconds. Precise pointing returns an OK (success) result when the error is less than the Max Error.
- Max Error is: If selected, use the value specified in the counter field as the maximum pointing error in arc-seconds. Precise pointing returns an OK (success) result when the error is less than the Max Error.
- Default: Use the default settings
- OK: Save changes and close the window
- Cancel: Discard changes and close the window

- Precise Pointing Mount & Rotator: Command the mount to perform a precise pointing operation to the specified named object - slew to the object, plate solve to get actual coordinates, re-slew to correct pointing error, rotating the rotator and align to the requested PA within the specified tollerance.
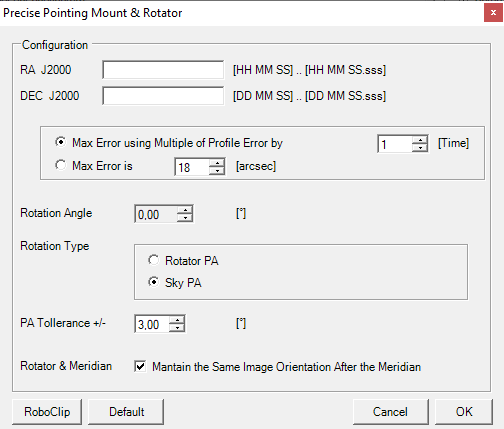
- RA J2000: Enter the RA coordinates in HH MM SS or HH MM SS.sss
- DEC J2000: Enter the DEC coordinates in DD MM SS or DD MM SS.sss
- Max Error using Multiple of Profile Error by: If selected, multiply the maximum allowed pointing error by the number specified in the counter field. E.g., if the Precision Pointing Max Allowed Error specified in Mount Setup is 50 arc-seconds, a value of 2 in the counter field here would change the maximum pointing error to 100 arc-seconds. Precise pointing returns an OK (success) result when the error is less than the Max Error.
- Max Error is: If selected, use the value specified in the counter field as the maximum pointing error in arc-seconds. Precise pointing returns an OK (success) result when the error is less than the Max Error.
- Rotation Angle: an arbitrary angle that can be a Rotator PA or Sky PA, depends on following setting.
- Rotation Type: define if the rotation angle is the rotator angle (rotator PA) reported from the driver (and with offset if asked to Voyager in Sync) or the Sky angle (Sky PA) chosen with web dashboard VirtualFOV or planetarium or another system. If you select Sky PA Voyager will use the Plate solve PA result to rotate the rotator to the right angle. If you select the Rotator PA Voyager will just rotating rotator using drive angle at desidered value, no correction using the plate solved PA will be done
- PA Tollerance +/-: if the PA of rotator is inside the interval given the position will be declared ok and rotator will not be rotate.
- Rotator & Meridian Flip: "Mantain the Same Image Orientation After the Meridian" if checked force Voyager to shot the target with same orientation in the images taken before anf after meridian. In this case if you have chosen Rotator PA like Rotation type the rotator will be flipped if the mount is after the meridian, if you chosen Sky PA the PA will retained also after the meridian triggering a rotator flip.Use this flag is useful also to use always the same guide star in case of use of OAG or system with high focal lenght.
- RoboClip: open RoboClip manager windowd and allow to select a target, with RA and DEC will be also acquired the PA
- Default: Use the default settings
- OK: Save changes and close the window
- Cancel: Discard changes and close the window

- Stop Tracking (Only FS2 Mount): Command an FS2 mount to stop tracking
- Start Tracking (Only FS2 Mount): Command an FS2 mount to start tracking
- FS2 Meridian Flip WEST: Command an FS2 mount to perform a meridian flip to the West
- FS2 Meridian Flip EAST: Command an FS2 mount to perform a meridian flip to the East Important Note! The FS2 Mount commands should only be used if your mount is controlled by the Astro Electronic FS2 motor control system. Using these commands with other mounts may fail and cause damage to the mount and other equipment
Dome
Dome actions send commands to the dome defined in the Dome Setup area of the active profile:

- Open Shutter: Command the dome's shutter or the observatory's roll-off roof to open
- Close Shutter: Command the dome's shutter or the observatory's roll-off roof to close
- Dome Slave ON: Send a command to the dome software to "Slave" to the mount. The dome's azimuth position will track with the mount's movements in azimuth
- Dome Slave OFF: Send a command to the dome software to turn off "Slave" to the mount. The dome's azimuth position will stop tracking the mount's azimuth movements
- Dome Goto Azimuth: Command the Dome to rotate to the specified Azimuth

- Azimuth: Azimuth position the mount should move to in degrees
- Cancel: Discard changes and close the window
- OK: Save changes and close the window
- Dome Find Home: Command the dome to find its Home position. If your dome supports the Find Home command, the dome moves to a known position
- Dome Park: Send a Park command to the dome.
- Dome Unpark: Send an Unpark command to the dome
Camera
Camera actions can control the camera's cooling system and take exposures

- Cool Down: Command the camera's cooling system to cool down to a desired temperature:

- Final Temperature: Desired sensor temperature in °C
- Use Variable: check this flag if you want to set the cooling temperature reading the value inside the variable selectable in the drop-down combo instead to use a fixed value
- Async Cooling: If checked, command the cooling system to go to the Final Temperature and do not wait for the cooling system to report that it has reached the desired temperature
- Use CCD Firmware Cooldown: If selected, let the CCD's cooling system manage the speed of the cooldown process
- Use Voyager Ramp Mode Cooldown: If selected, let Voyager's cooldown process manage the speed of the cooldown process. Voyager's process is defined in Camera Setup
- Default: Use the default settings
- OK: Save changes and close the window
- Cancel: Discard changes and close the window
- Warmup: Command the camera's cooling system to warmup

- Async Cooling: If checked, command the camera's cooling system to warmup and do not wait for the warmup operation to finish
- Default: Use the default settings
- OK: Save changes and close the window
- Cancel: Discard changes and close the window
- Expose: Take an exposure

- Exposure Type: Choose Light, Bias, Dark or Flat from the drop-down list
- Filter Index: Choose the filter for the exposure from the drop-down list
- Expose: Enter the exposure length in seconds in the counter field
- Use Variable: select if you want to get the exposure time from the decimal variable selected in the near list control
- Binning: Select the binning level for the exposure from the counter field
- SubFrame: Select the frame size from the drop-down list: Full Frame, 1/2, 1/4, 1/8, 1/16 or CUSTOM. If you select CUSTOM subframe size, enter the desired subframe size in percent in the counter field that appears
- Gain: Set the camera's Gain value to the number in the spinner control. Works only if you are using the ASI Camera native driver.
- Offset: Set the camera's Offset value to the number in the spinner control. Works only if you are using the ASI Camera native driver.
- File Directory: Click the folder icon to select the folder where Voyager should save the image resulting from this exposure
- File Name: Enter the file name to use when saving the image resulting from this exposure
- Make Unique File Name: If checked, add a suffix to the file name if needed to avoid overwriting an existing file
- FIT Object Name: The name to use to populate the OBJECT field in the FITS header
- FIT Airmass calculation: Compute the current airmass value and add to the FITS file header. Airmass is the amount of atmosphere you are imaging through. It is one when imaging directly overhead, and increases as you image closer to the horizon.
- Focuser Position Add to FIT Name: add the focuser position to the FIT name, only if you are using RoboFire like Autofocus control in Voyager
- Default: Use the default settings
- OK: Save changes and close the window
- Cancel: Discard changes and close the window
- TheSkyX/64 Camera FW Reconnect: Reconnect camera and filterwheel if the control used for camera in Voyager is TheSkyX or TheSky64
AutoFocus
These DragScript commands perform Voyager's autofocus operations:

- AutoFocus with RoboStar: perform an autofocus operation using Voyager's RoboStar method to choose the focus star:

- Monochromatic Camera: Select if a monochrome camera is connected. Select a filter to use for the autofocus operation from the drop-down list
- DSLR/Color Camera: Select if a DSLR or Color (OSC) camera is connected
- No Filter: Select if a monochrome camera is connected without filters
- Use Low Precision Pointing: If checked, Voyager's RoboStar operation will slew to the focus star with a more relaxed precision pointing operation. Specify the multiple for the maximum allowed precision pointing error in the counter field. E.g., if the precision pointing max allowed error configured in Mount Setup is 50 arc-seconds, a "Multiple Max Allowed Error by" setting of two would relax the maximum allowed pointing error to 100 arc-seconds
- AutoFocus OnPlace: Perform the autofocus operation at the current scope location. Do not use RoboStar to select a focus star
- Default: Use the default settings
- OK: Save changes and close the window
- Cancel: Discard changes and close the window
- Simple Goto RoboStar Star: Perform a simple goto operation to move the mount to the focus star selected by RoboStar:

- Monochromatic Camera: Select if a monochrome camera is connected. Select a filter to use for the precise pointing operation from the drop-down list
- DSLR/Color Camera: Select if a DSLR or Color (OSC) camera is connected
- No Filter: Select if a monochrome camera is connected without filters
- Default: Use the default settings
- OK: Save changes and close the window
- Cancel: Discard changes and close the window
- Precise Pointing RoboStar Star: Perform a precise pointing operation to move the mount to the focus star selected by RoboStar:

- Monochromatic Camera: Select if a monochrome camera is connected. Select a filter to use for the precise pointing operation from the drop-down list
- DSLR/Color Camera: Select if a DSLR or Color (OSC) camera is connected
- No Filter: Select if a monochrome camera is connected without filters
- Use Low Precision Pointing: If checked, Voyager will slew to the focus star with a more relaxed precision pointing operation. Specify the multiple for the maximum allowed precision pointing error in the counter field. E.g., if the precision pointing max allowed error configured in Mount Setup is 50 arc-seconds, a "Multiple Max Allowed Error by" setting of two would relax the maximum allowed pointing error to 100 arc-seconds
- Default: Use the default settings
- OK: Save changes and close the window
- Cancel: Discard changes and close the window
- RoboFire Focuser Move To: Move the focuser to a specified absolute or relative position:

- Position: Desired focuser position in steps
- Mode: Choose absolute or relative
- Absolute: Command the focuser to move to the specified position. Your focuser must support absolute positioning.
- Relative: Command the focuser to move in or out by the specified number of steps. Negative numbers move the focuser IN and positive move it out, unless you specify "Reverse Focuser Direction" in Autofocus Setup
- OK: Save changes and close the window
- Cancel: Discard changes and close the window
- RoboFire Focuser Move From Variable: Move the focuser to an absolute or relative position stored in a variable:

- Get Position From Variable: select the variable that contains the position
- Mode: Choose absolute or relative
- Absolute: Command the focuser to move to the specified position. Your focuser must support absolute positioning.
- Relative: Command the focuser to move in or out by the specified number of steps. Negative numbers move the focuser IN and positive move it out, unless you specify "Reverse Focuser Direction" in Autofocus Setup
- OK: Save changes and close the window
- Cancel: Discard changes and close the window
- AutoFocus with RoboFire LocalField: Perform Voyager's LocalField (multiple star) autofocus routine

- Monochromatic Camera: Select if a monochrome camera is connected. Select a filter to use for the precise pointing operation from the drop-down list
- DSLR/Color Camera: Select if a DSLR or Color (OSC) camera is connected
- No Filter: Select if a monochrome camera is connected without filters
- Default: Use the default settings
- OK: Save changes and close the window
- Cancel: Discard changes and close the window
Rotator
Rotator actions can move the rotator to a specified Position Angle or flip the rotator 180 degrees:

- Rotator Move To: Move the rotator to the specified position angle in degree

- PA: Move the rotator to this Position Angle in degrees
- OK: Save changes and close the window
- Cancel: Discard changes and close the window

- Rotator 180° Flip: Move the rotator to a position 180 degrees opposite its current position
- Rotator Sync: Synchronize the mechanical position to the submitted position (create an offset to the mechanical position)
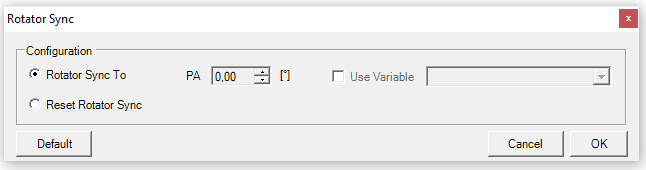
- Rotator Sync To: with this option Voyager will sync the rotator PA to the PA in the next field
- PA: Position Angle to use for sync
- Use Variable: get PA value from the selected variable
- Reset Rotator Sync: with this option Voyager will reset the Sync (remove the offset applied to the mechanical position of rotator)
- Default: reset all parameters in the form to the default values
- Cancel: exit from the configuration form without saving anything
- OK: accept the inserted value and store data

- Precise Rotate SkyPA: Move the rotator to the specified SkyPA position
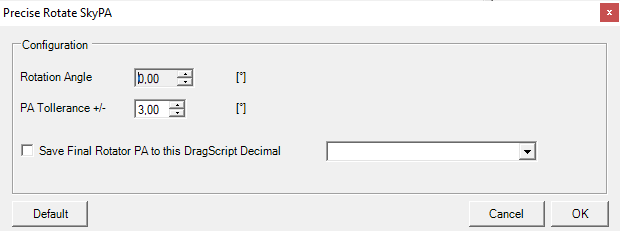
- Rotation Angle: SKY PA in degree to use for positioning the rotator
- PA Tollerance +/-: max allowed difference in degree between solved PA and requested PA
- Save Final Rotator PA to this DragScript Decimal: if flagged save the Rotator PA degree of pointing (if positioned ok) to the decimal variable selected in the combobox
- OK: Save changes and close the window
- Cancel: Discard changes and close the window

Flat Device
Flat Device commands can open and close the flat device cover:

- Open Flat Device Cover: Command the flat device to open
- Close Flat Device Cover: Command the flat device to close
- Switch On Light Flat Device: Turn the light on for the specified Flat Device

- Device ID: Choose the Flat Device number to control with this command. See Flat Device Setup for more information on flat devices.
- Switch Off Light Flat Device: Turn the light off for the specified Flat Device

- Device ID: Choose the Flat Device number to control with this command. See Flat Device Setup for more information on flat devices.
- Select Brightness Flat Device: Set the brightness level for the specified Flat Device.

- Device ID: Choose the Flat Device number to control with this command. See Flat Device Setup for more information on flat devices.
- Brightness: Brightness level for the specified Flat Device.
Script
The Script action can run an external script or program:
![]()

- File Program/Script: Click the folder icon to select the program or script to run
- Arguments: Command line arguments to be passed to the program or script when invoking it
- Wait For Program/Script: If checked, wait for the program or script to return before continuing (synchronous execution)
- On Timeout Kill Program/Script: If checked, and the "Wait for Program/Script" option is checked, and the "Wait / Timeout" time period has elapsed, terminate the external program or script
- Return OK to DragScript Engine only if Script return this: If checked, the script or program must return the value specified in the text field in order for this action to be considered a success and return OK
- Save External Script output to this DragScript String: If checked, store the value that the external script or program returns in STDOUT to the DragScript string variable chosen from the drop-down list
- Save External Script output to this DragScript Decimal: If checked, store the value that the external script or program returns in STDOUT to the DragScript decimal number variable chosen from the drop-down list
- Default: Use the default settings
- OK: Save changes and close the window
- Cancel: Discard changes and close the window
Example of Use
In this example, we call a Python script located in the directory d:\VScheduler\Scheduler.py, and wait up to 10 seconds for the script to complete.
The Python script writes a value to STDOUT with this code:
import sys
sys.stdout.write('RUN')
sys.stdout.flush()
We store that value in the SchedulerResult DragScript string variable. We can then make decisions in the DragScript using the DO IF STRING VALUE statement.

Timing
Timing actions inform DragScript to wait before performing an action. You can wait for a time interval, an absolute time to be reached, astronomical night with an offset, or for an object to reach a desired altitude:

- Wait Time: Wait for a specified time to arrive or to elapse

- Interval/Time: Enter a time in HH MM SS.
- Wait Type: Chose Absolute or Relative
- Absolute: Wait until this absolute time is reached. If the time specified is more than 12 hours in the future, Voyager will assume this time has passed and will not wait. For example, if the specified time is 20:00:00 and this action is executed at 20:15:00, Voyager will not wait because that would cause a wait until tomorrow night, which is probably not what you intended
- Relative: Wait for this amount of time to elapse
- OK: Save changes and close the window
- Cancel: Discard changes and close the window
- Wait Altitude: Wait until the object at the given RA and DEC coordinates reaches the specified altitude, either rising or setting:

- RA Target J2000: RA coordinates of the object you want to reach the Reference Altitude in HH MM SS or HH MM SS.sss
- DEC Target J2000: DEC coordinates of the object you want to reach the Reference Altitude in DD MM SS or DD MM SS.sss
- Reference Altitude: Altitude to reach in degrees
- Exit Wait if Actual Altitude GREATER than or EQUAL (>=) to reference: Wait until the target rises above the reference altitude
- Exit Wait if Actual Altitude LOWER than or EQUAL (>=) to reference: Wait until the target sets below the reference altitude
- Wait Altitude until absolute time: The Wait Altitude operation will terminate when this time is reached, whether or not the target has reached the reference altitude. This is usually done to end the wait with morning light
- RoboClip: load RA and DEC from RoboClip catalog
- Coords From Sequence: load RA and DEC from a sequence file
- Default: Use the default settings
- OK: Save changes and close the window
- Cancel: Discard changes and close the window
- Wait Astronomical/Nautical/Civil Night: Wait until astronomical/nautical/civil night, with an optional offset:

- Get Latitude and Longitude from Mount: Retrieve the current latitude and longitude from the connected mount, which must support this command. This location is used, along with the current date, to determine the time that night begins
- Use the Latitude and Longitude indicated below: Specify your current latitude and longitude in the fields below. This location is used, along with the current date, to determine the time that night begins
- Offset: Time in HH MM SS
- Offset Before: If selected, exit the wait this amount of time before night
- Offset After: If selected, exit the wait this amount of time after night
- Exit with ERROR if Wait Time is Greater than: if this option is flag the DragScript will exit with Error if the time wait for the begin of the next astronomical night is greater than the value in hour expressed in the numeric edit. Useful if you want to detect that the actual night is already finished and the dragscript can exit otherwise without this flag the next astrnomical night will be waited
- Default: Use the default settings
- OK: Save changes and close the window
- Cancel: Discard changes and close the window
- Wait Dusk
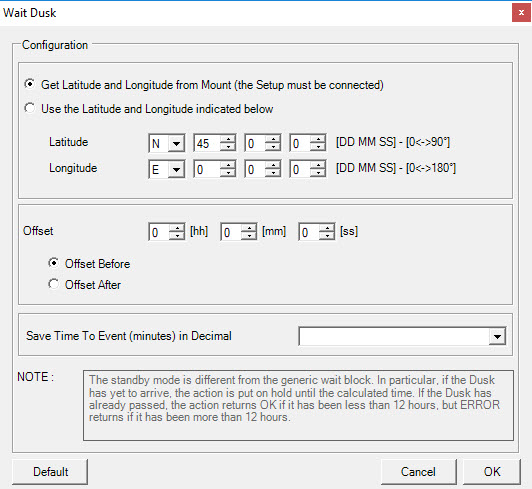

- Get Latitude and Longitude from Mount: Retrieve the current latitude and longitude from the connected mount, which must support this command. This location is used, along with the current date, to determine the time that dusk begins
- Use the Latitude and Longitude indicated below: Specify your current latitude and longitude in the fields below. This location is used, along with the current date, to determine the time that dusk begins
- Offset: Time in HH MM SS
- Offset Before: If selected, exit the wait this amount of time before dusk
- Offset After: If selected, exit the wait this amount of time after dusk
- Save Time to Event (minutes) in Decimal: Save the computed time until Dusk in a decimal variable. See the DragScript example below for one way to use this.
- Default: Use the default settings
- OK: Save changes and close the window
- Cancel: Discard changes and close the window
You can configure the time at which dusk begins in the SkyFlat section of Flat Device Setup.
- Wait Dawn

- Get Latitude and Longitude from Mount: Retrieve the current latitude and longitude from the connected mount, which must support this command. This location is used, along with the current date, to determine the time that dawn begins
- Use the Latitude and Longitude indicated below: Specify your current latitude and longitude in the fields below. This location is used, along with the current date, to determine the time that dawn begins
- Offset: Time in HH MM SS
- Offset Before: If selected, exit the wait this amount of time before dawn
- Offset After: If selected, exit the wait this amount of time after dawn
- Save Time to Event (minutes) in Decimal: Save the computed time until dawn in a decimal variable. See the DragScript example below for one way to use this.
- Default: Use the default settings
- OK: Save changes and close the window
- Cancel: Discard changes and close the window
You can configure the time at which dawn begins in the SkyFlat section of Flat Device Setup.
- Wait Safe: Wait Safe Condition wait the safe condition before allow dragscript to execute net instruction. During the wait the events like Emergency Exit and Emergency suspend will be disabled and not managed. Just to remember you emergency events can coming from Viking I/O, Safe Monitor control, Weather Condition control. Like said this action will forcing event disable until exit for timeout or for safe. So be sure to have the observatory on the right configuration to avoid weather damage (closed and all parked). This action allow Voyager to run forever DragScript in case of no emergency exit. Can wait a time or an interval or the presence of astronomical/nautical/civil night, with an optional offset. Usually this is the first action in a script, its a good thing to put the Start node in Event disabled mode when you are manage the events in your DragScript. Also remember that the event at exit of this action will be restored to the original status, if they are disabled they will be leave disable or viceversa. We suggest also generally in dragscript to disable events during an atomic tasks like the opening observatory and connect setup to avoid interruption not really needed with impredictable results. If the action finish for wait will produce a status of TIMEOUT to the DragScript, if the action finish for one of the exit options will produce a status of ERROR to the DragScript, if the action found a SAFE status inside the wait option will produce a status of OK to the DragScript. You can decide if repeat the the action in a never ending loop (if you use night this mean to wait for the next night if you not check the exit ERROR options) or simple end the DragScript if you start DragScript night by Night. Rember that an Emergency Exit in any case will exit the DragScript.

- Wait SAFE until finish Night: this option wait SAFE status until on eof specified kind of Nights is finished
- Get Latitude and Longitude from Mount: Retrieve the current latitude and longitude from the connected mount, which must support this command. This location is used, along with the current date, to determine the time that astronomical night begins and end
- Use the Latitude and Longitude indicated below: Specify your current latitude and longitude in the fields below. This location is used, along with the current date, to determine the time that astronomical night begins and end
- Night TYPE: the night to wait between Astronomical (Astrophotographers dark night -18° sun) , Nautical (-12° sun), Civil (-6° sun)
- Offset: Time in HH MM SS
- Offset Before: If selected, exit the wait this amount of time before astronomical night
- Offset After: If selected, exit the wait this amount of time after astronomical night
- Wait SAFE until absolute time: this option wait SAFE status until the absolute time you put inside the hh mm ss field
- Wait SAFE for a time interval of: this option wait SAFE status until the amount of time in the interval will be elapsed
- EXIT Options: with this options you can decide to exit with ERROR it the conditions inside is true
- Exit with ERROR if the Astronomical Night has ended less than: if this option is flag the DragScript will exit with Error if the astronomical night is ended by the time in hh field. This work and be active only if you use Wais SAFE with astronomical night. This flag enabled prevento to wait for the next night if the night is finished and you want to shutdown all without wait the next night.
- Exit with ERROR if Wait Time is greater than: if this option is flag the DragScript will exit with EORR if the time to wait is greater than the value in the hh field. This option is active only if you choose the Wait SAFE until absolute time. Useful if you dont wait over a certain time span.
- EVENT CHECK options: with this option you can decide to remove from processing status of SAFE some kind of events that will be ignored (event in any case are disable during the wait safe action)
- Check Emergency Exit Status in SAFE status calculation: if unchecked the condition that throw an Emergency Status will be ignored in calculation of SAFE Staus . ATTENTION !! this is a way really dangerous for your setup .. use only if you want to wait safe in particular condition , particular timing and for particular tasks
- Check Emergency SUSPEND Status in SAFE status calculation: if unchecked the condition that throw an Emergency Status will be ignored in calculation of SAFE Staus . ATTENTION !! this could be a way really dangerous for your setup .. use only if you want to wait safe in particular condition , particular timing and for particular tasks.
- LIGHT CONDITIONS options: with this option you can decide to remove from processing status of SAFE the LIGHT Conditions status
- Remove Weather LIGHT Conditions Status From Calculation of All Emergency Status: if unchecked the LIGHT conditions from Weather system will be not used to calculate the SAFE Status. Usefull if you want to open the dome with the light approaching the night time and do skyflat. For the Dawn flat you can decide to disable the LIGHT event using dedicated block
- Default: Use the default settings
- OK: Save changes and close the window
- Cancel: Discard changes and close the window
Using the Time to Event Value in a DragScript
Here's an example of using the Save Time to Event (minutes) value in a DragScript.
The basic idea is that you can decide whether or not to execute any actions based on how many minutes there are until or after dawn or dusk.

The decimal variable "Minutes Before Event" is initialized to 0.
The Wait Dawn: Data from connected Setup - Offset (Before) 00:15:00 [hh:mm:ss]>>Minutes Before Event action waits until 15 minutes before dawn, and then puts the value 15 into the variable Minutes Before Event
The DO IF DECIMAL VALUE block will execute if the Minutes Before Event variable is between 0 and 15. If not, control passes to the End block.
The Goto Block: DAWN FLAT statement sends control back to that block, and the minutes before or after dawn are computed again and stored in the Minutes Before Event variable.
If it is after dawn when the Wait Dawn action runs, the value stored in Minutes Before Event will be negative, and the DO IF DECIMAL VALUE statement will not run.
Signals
Signals actions let you send notifications via email, Skype or SMS:


Use button 5 to save your DragScript with the personal info deleted for any of the actions in this group (Signals).
- Send Email using Voyager Account: Send an email using Voyager's email account. You must have an active support and update Voyager license to use this option and an Internet connection

- Mail to: Email address to send to
- Object: Subject line of email TYPO: Should be Subject instead of Object
- Text: Body of email
- Cancel: Discard changes and close the window
- OK: Save changes and close the window
- JOLLY Strings:there are some special strings called jolly that can be used in mail text and will be replaced with some data from Voyager environment or DragScript variables
- Internal IPs: ##INTERNAL-IP## write a list of all internal IPs avalaible in the system
- External IP: ##EXTERNAL-IP## write a list of external IP assigned to your PC(router) if you have internet connection up
- NOW: ##NOW## write the actual date and time
- Mount Altitude: ##MOUNT-ALT## write the actual altitude of Telescope Mount if connected
- Mount Azimuth: ##MOUNT-AZ## write the actual azimuth of Telescope Mount if connected
- Variable: ##VAR-name## where you must replace the name with the real name of your variable (case sensitive) , write the actual value of you variable (decimal, string or counter)
- Send Email: Send an email notification using a specified email server and account. Requires an Internet connection

- Mail From: Email address this message is from
- Mail to: Email address to send to
- Object: Subject line of email TYPO: Should be Subject instead of Object
- Text: Body of email
- SMTP User: Username to login to SMTP (mail) server. Check with your local ISP or network administrator if you don't know how to login to your SMTP server to send email
- SMTP Password: Password to login to your SMTP (mail) server
- SMTP Server: Hostname or IP address of your SMTP (mail) server
- SMTP Port: Port number of your SMTP (mail) server
- Use SSL: If checked, use an SSL (secure) connection to your mail server
- GMAIL: Click this button to use the SMTP server and port information for Google Gmail
- HOTMAIL: Click this button to use the SMTP server and port information for Microsoft Hotmail
- Cancel: Discard changes and close the window
- OK: Save changes and close the window
- JOLLY Strings:there are some special strings called jolly that can be used in mail text and will be replaced with some data from Voyager environment or DragScript variables
- Internal IPs: ##INTERNAL-IP## write a list of all internal IPs avalaible in the system
- External IP: ##EXTERNAL-IP## write a list of external IP assigned to your PC(router) if you have internet connection up
- NOW: ##NOW## write the actual date and time
- Mount Altitude: ##MOUNT-ALT## write the actual altitude of Telescope Mount if connected
- Mount Azimuth: ##MOUNT-AZ## write the actual azimuth of Telescope Mount if connected
- Variable: ##VAR-name## where you must replace the name with the real name of your variable (case sensitive) , write the actual value of you variable (decimal, string or counter)
- Start Skype Call: Start a Skype call from the computer running Voyager. Requires an Internet connection

- Phone Number to Call: Phone number or Skype name to call using Skype
- After Command Wait: Time in seconds to wait after sending the command before timing out if no response from Skype
- After leave ringing for: Time in seconds to wait after Skype places the call and the remote phone starts to ring
- Skype Exe Directory: Location of Skype program on this computer
- Find Skype: Look for Skype program on this computer and fill out the Skype Exe Directory if found
- Test: Try to make a Skype call using the information in this dialog window
- Cancel: Discard changes and close the window
- OK: Save changes and close the window
- Send SMS with Nexmo
- Send an SMS (text message) using the Nexmo service: https://www.nexmo.com/ Requires an Internet connection.

- Source Number or Name: Phone number of sender, or name of sender. For country like USA this is a constraint to use (phone number) to avoid error in transmission (from Voyager version 2.2.1d)
- To Telephone Number: Phone number to send SMS message to
- Text: Body of SMS messages
- API Key: API Key for Nexmo service - you must sign up at https://www.nexmo.com/ to get an API key and secret
- API Secret: API Secret for Nexmo service
- Cancel: Discard changes and close the window
- OK: Save changes and close the window
- JOLLY Strings:there are some special strings called jolly that can be used in mail text and will be replaced with some data from Voyager environment or DragScript variables
- Internal IPs: ##INTERNAL-IP## write a list of all internal IPs avalaible in the system
- External IP: ##EXTERNAL-IP## write a list of external IP assigned to your PC(router) if you have internet connection up
- NOW: ##NOW## write the actual date and time
- Mount Altitude: ##MOUNT-ALT## write the actual altitude of Telescope Mount if connected
- Mount Azimuth: ##MOUNT-AZ## write the actual azimuth of Telescope Mount if connected
- Variable: ##VAR-name## where you must replace the name with the real name of your variable (case sensitive) , write the actual value of you variable (decimal, string or counter)
- Send Telegram
- Send an message using Telegram service chatbot: https://www.telgram.org/ Requires an Internet connection.
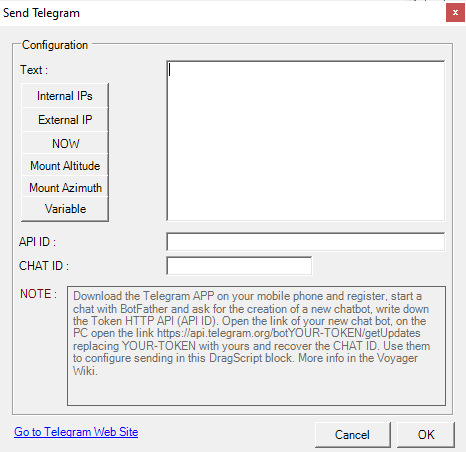

- Text: message
- API ID: API ID (token create during the chatbot) of your Telegram user
- Chat ID: ID number assigned to chatbot created, you can get opening the link https://api.telegram.org/bot<YOUR_TOKEN>/getUpdates
- Cancel: Discard changes and close the window
- OK: Save changes and close the window
- JOLLY Strings:there are some special strings called jolly that can be used in mail text and will be replaced with some data from Voyager environment or DragScript variables
- Internal IPs: ##INTERNAL-IP## write a list of all internal IPs avalaible in the system
- External IP: ##EXTERNAL-IP## write a list of external IP assigned to your PC(router) if you have internet connection up
- NOW: ##NOW## write the actual date and time
- Mount Altitude: ##MOUNT-ALT## write the actual altitude of Telescope Mount if connected
- Mount Azimuth: ##MOUNT-AZ## write the actual azimuth of Telescope Mount if connected
- Variable: ##VAR-name## where you must replace the name with the real name of your variable (case sensitive) , write the actual value of you variable (decimal, string or counter)
Guide to obtain API ID and Chat ID : Download the Telegram APP on your mobile phone and register, start a chat with BotFather and ask for the creation of a new chatbot, write down the Token HTTP API (API ID). Open the link of your new chat bot, on the PC open the link https://api.telegram.org/botYOUR-TOKEN/getUpdates replacing YOUR-TOKEN with yours and recover the CHAT ID. Use them to configure sending in this DragScript block. More info in the Voyager Wiki.
User Manual Input
User manual input actions allow interactions between Voyager and the user:
![]()
- Wait User OK: Ask to the user with a windows prompt to press a button on the screen to continue or to abort and also its possible to activate a timeout during waiting of the user interaction
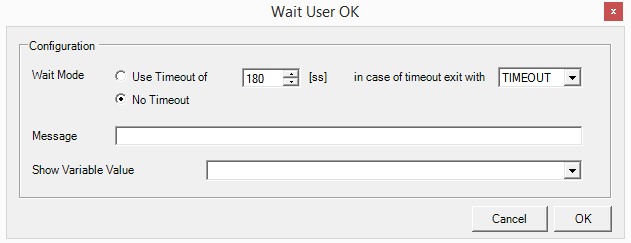
- Wait Mode: how the wait will be work
- Use Timeout of: with this option the wait will finish in anycase after the seconds selected
- In case of timeout exit with: if the Use timeout of option will be used then exit can be selected between TIMEOUT or OK action result, this result will be usable in the DragScript using the IF condition related to actions
- No Timeout: with this option the wait will be for ever until physically user press the button on the screen
- Message: show a text message inside window prompt to the user
- Show Variable Value: show a text rappresentation of the variable selected inside window prompt to the user
- Wait User DATA: Ask to the user with a windows prompt to input data (DECIMAL,STRING, COUNTER depends on type of variable used for storage) to continue or to abort and also its possible to activate a timeout during waiting of the user interaction. The inpout data will be stored in the selected variable.
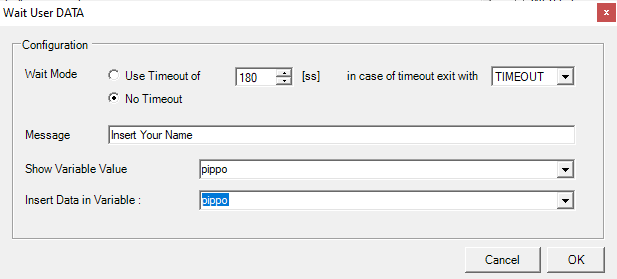
- Wait Mode: how the wait will be work
- Use Timeout of: with this option the wait will finish in anycase after the seconds selected
- In case of timeout exit with: if the Use timeout of option will be used then exit can be selected between TIMEOUT or OK action result, this result will be usable in the DragScript using the IF condition related to actions
- No Timeout: with this option the wait will be for ever until physically user press the button on the screen
- Message: show a text message inside window prompt to the user
- Show Variable Value: show a text rappresentation of the variable selected inside window prompt to the user
- Insert Data in Variable: the data in input from the user will be stored in the selected DragScript variable (variable must be declared before use it in DragScript). Based on type of DragScript Variable the edit mask of input field will be adapted.


Optec Perseus
Optec Perseus actions allow to interact with the hardware Port Instrument Selector from Optec :

- Optec Perseus Read Device Info: ask information about device and save it in environment variables of DragScript
- Optec Perseus Read Device Status: ask status of device and save it in environment variables of DragScript
- Optec Perseus Homing: command to device to Homing
- Optec Perseus Set Port: rotate device to select the port selected index
- Port: port index to select

Donuts
Donuts actions allow to interact with the software Donuts developed by Kames MacCormac, used for advanced research pointing, code here https://github.com/jmccormac01/Donuts :
![]()
- Donuts Calibration: ask to Donuts process to performe a Calibration using camera and mount