Difference between revisions of "DragScript Flow of Control"
(→Flow) |
|||
| (5 intermediate revisions by the same user not shown) | |||
| Line 74: | Line 74: | ||
*'''Cancel''': Discard changes and close the window | *'''Cancel''': Discard changes and close the window | ||
| − | <br /> | + | * '''Update Decimal Number from Camera Temperature:''' Set the value of a decimal number from the temperature reported from Camera Driver: |
| + | * [[File:UpdateCameraTemp.png]] | ||
| + | |||
| + | * '''Decimal Number''': Select the decimal number variable to update from the drop-down list | ||
| + | * '''OK''': Save changes and close the window | ||
| + | * '''Cancel''': Discard changes and close the window<br /> | ||
*'''Update Decimal Number from Observing Conditions:''' Set the value of a decimal number from the observing conditions returned from I/O cards via Viking or from an ASCOM Observing Conditions driver: | *'''Update Decimal Number from Observing Conditions:''' Set the value of a decimal number from the observing conditions returned from I/O cards via Viking or from an ASCOM Observing Conditions driver: | ||
| Line 120: | Line 125: | ||
[[File:UpdataFromPA.png]] | [[File:UpdataFromPA.png]] | ||
| + | |||
| + | *'''Decimal Number''': Select the decimal number variable to update from the drop-down list | ||
| + | *'''OK''': Save changes and close the window | ||
| + | *'''Cancel''': Discard changes and close the window | ||
| + | |||
| + | *'''Update Decimal from Rotator PA''': Set the value of a decimal number from the Rotator PA returned by Rotator driver | ||
| + | |||
| + | [[File:UpdateRotPA.png]] | ||
*'''Decimal Number''': Select the decimal number variable to update from the drop-down list | *'''Decimal Number''': Select the decimal number variable to update from the drop-down list | ||
| Line 226: | Line 239: | ||
*'''Do If Actual Altitude GREATER than or EQUAL (>=) to reference''': Do the actions if the target has reached or risen above the reference altitude | *'''Do If Actual Altitude GREATER than or EQUAL (>=) to reference''': Do the actions if the target has reached or risen above the reference altitude | ||
*'''Do If Actual Altitude LOWER than or EQUAL (>=) to reference''': Do the actions if the target has reached or set below the reference altitude | *'''Do If Actual Altitude LOWER than or EQUAL (>=) to reference''': Do the actions if the target has reached or set below the reference altitude | ||
| + | *'''RoboClip:''' load RA and DEC from RoboClip catalog | ||
| + | *'''Coords From Sequence:''' load RA and DEC from a sequence file | ||
*'''Default''': Use the default settings | *'''Default''': Use the default settings | ||
*'''OK''': Save changes and close the window | *'''OK''': Save changes and close the window | ||
| Line 238: | Line 253: | ||
*'''DEC Target J2000''': DEC coordinates of the object you want to reach the Reference Altitude in DD MM SS or DD MM SS.sss | *'''DEC Target J2000''': DEC coordinates of the object you want to reach the Reference Altitude in DD MM SS or DD MM SS.sss | ||
*'''Start and End:''' Do the actions if the specified target's altitude is greater than or equal to the '''Start''' value and less than or equal to the '''End''' value in decimal degrees | *'''Start and End:''' Do the actions if the specified target's altitude is greater than or equal to the '''Start''' value and less than or equal to the '''End''' value in decimal degrees | ||
| + | *'''RoboClip:''' load RA and DEC from RoboClip catalog | ||
| + | *'''Coords From Sequence:''' load RA and DEC from a sequence file | ||
*'''Default''': Use the default settings | *'''Default''': Use the default settings | ||
*'''OK''': Save changes and close the window | *'''OK''': Save changes and close the window | ||
| Line 250: | Line 267: | ||
*'''DEC Target J2000''': DEC coordinates of the object you want to reach the Reference Altitude in DD MM SS or DD MM SS.sss | *'''DEC Target J2000''': DEC coordinates of the object you want to reach the Reference Altitude in DD MM SS or DD MM SS.sss | ||
*'''Start and End:''' Do the actions if the specified target's azimuth is greater than or equal to the '''Start''' value and less than or equal to the '''End''' value in decimal degrees. Also the Altitude of the target must be above the minimum for a slew like set tup in Voyager Mount setting (default is 0°) | *'''Start and End:''' Do the actions if the specified target's azimuth is greater than or equal to the '''Start''' value and less than or equal to the '''End''' value in decimal degrees. Also the Altitude of the target must be above the minimum for a slew like set tup in Voyager Mount setting (default is 0°) | ||
| + | *'''RoboClip:''' load RA and DEC from RoboClip catalog | ||
| + | *'''Coords From Sequence:''' load RA and DEC from a sequence file | ||
*'''Default''': Use the default settings | *'''Default''': Use the default settings | ||
*'''OK''': Save changes and close the window | *'''OK''': Save changes and close the window | ||
| Line 263: | Line 282: | ||
*'''DEC Target J2000''': DEC coordinates of the object whose hour angle we are testing, in DD MM SS or DD MM SS.sss | *'''DEC Target J2000''': DEC coordinates of the object whose hour angle we are testing, in DD MM SS or DD MM SS.sss | ||
*'''Start and End:''' Do the actions if the specified target's HA (hour angle) is greater than or equal to the '''Start''' value and less than or equal to the '''End''' value in decimal hours. Note the values can be positive (after the meridian) or negative (before the meridian). The start to end can be both negative, both positive, or the start can be negative and the end can be positive. '''In all cases, the value must increase from start to end.''' | *'''Start and End:''' Do the actions if the specified target's HA (hour angle) is greater than or equal to the '''Start''' value and less than or equal to the '''End''' value in decimal hours. Note the values can be positive (after the meridian) or negative (before the meridian). The start to end can be both negative, both positive, or the start can be negative and the end can be positive. '''In all cases, the value must increase from start to end.''' | ||
| + | *'''RoboClip:''' load RA and DEC from RoboClip catalog | ||
| + | *'''Coords From Sequence:''' load RA and DEC from a sequence file | ||
*'''Default''': Use the default settings | *'''Default''': Use the default settings | ||
*'''OK''': Save changes and close the window | *'''OK''': Save changes and close the window | ||
| Line 421: | Line 442: | ||
*'''Raise Emergency Resume Event''': Raise the Emergency Resume event. Execution of the DragScript will go immediately to the Emergency Resume block in the Events block | *'''Raise Emergency Resume Event''': Raise the Emergency Resume event. Execution of the DragScript will go immediately to the Emergency Resume block in the Events block | ||
| − | + | ==='''Remote'''=== | |
| + | Block for management of Distributed [https://wiki.starkeeper.it/index.php/Distributed_Emergency Distributed Emergency] | ||
| + | |||
| + | *'''Set Distributed Emergency Status''': Update overriding the internal Distributed Emergency Status for the Voyager Client connected to the selected value | ||
| + | **[[File:Des1.png]] | ||
| + | *'''Distributed Safe''': Distributed Safe wait the night like configured and in the night wait to have a Safe condition from the Emergency Event System (in Voyager is Weather, Safety Monitor, Viking I/O). If night is recognized and safe condition is true DragScript will exit from this block with OK result. If timeout is reached waiting DragScript will exit from this block with a TIMEOUT result. In case of error during waiting DragScript will exit with ERROR result. Checking the exit of block user can decide if inform all the client of a SAFE condition using the SET DISTRIBUTED EMERGENCY STATUS or restart the Master DragScript to wait for better conditions (same night or next night is automatically decided from DragScript). This block is usually associated and work only if you using the [https://wiki.starkeeper.it/index.php/Distributed_Emergency Distributed Emergency] plugin. Right and only place where to use is the Voyager MASTER of plugin where information is processed and emergency events checked. | ||
| + | **'''Important Note!''' Distributed Safe Cannot be used inside the Event Manager (Exit, Suspend, Resume) | ||
| + | ***[[File:DES2.png]] | ||
| + | ***'''NIGHT Configuration:''' data necessary to calculate the start and end interval of the actual night | ||
| + | ****'''Night DATA:''' data about location of observatory | ||
| + | *****Latitude: Latitude of the Mount | ||
| + | *****Longitude: Longitude of the Mount | ||
| + | ****'''Night TYPE:''' type of night to calculate. Astronomical, Nautical or Civil | ||
| + | ****'''Night START OFFSET:''' apply an offset to the time start of the night | ||
| + | *****Offset Before: offset before the start in hours, minutes and seconds | ||
| + | *****Offset After: offset after the start in hours, minutes and seconds | ||
| + | ****'''Night END OFFSET:''' apply an offset to the time end of the night | ||
| + | *****Offset Before: offset before the end in hours, minutes and seconds | ||
| + | *****Offset After: offset after the end in hours, minutes and seconds | ||
| + | ****'''EVENT CHECK options:''' with this option you can decide to remove from processing status of SAFE some kind of events that will be ignored (event in any case are disable during the wait safe action) | ||
| + | *****'''Check Emergency Exit Status in SAFE status calculation:''' if unchecked the condition that throw an Emergency Status will be ignored in calculation of SAFE Staus . ATTENTION !! this is a way really dangerous for your setup .. use only if you want to wait safe in particular condition , particular timing and for particular tasks | ||
| + | *****'''Check Emergency SUSPEND Status in SAFE status calculation:''' if unchecked the condition that throw an Emergency Status will be ignored in calculation of SAFE Staus . ATTENTION !! this could be a way really dangerous for your setup .. use only if you want to wait safe in particular condition , particular timing and for particular tasks. | ||
| + | ****'''LIGHT CONDITIONS options:''' with this option you can decide to remove from processing status of SAFE the LIGHT Conditions status | ||
| + | *****'''Remove Weather LIGHT Conditions Status From Calculation of All Emergency Status:''' if unchecked the LIGHT conditions from Weather system will be not used to calculate the SAFE Status. Usefull if you want to open the dome with the light approaching the night time and do skyflat. For the Dawn flat you can decide to disable the LIGHT event using dedicated block | ||
| + | ****'''Default''': Use the default settings | ||
| + | ****'''OK''': Save changes and close the window | ||
| + | ****'''Cancel''': Discard changes and close the window | ||
==='''Various'''=== | ==='''Various'''=== | ||
Revision as of 17:45, 7 June 2021
These DragScript elements control the flow of execution through your script. You can use the DragScript Simulator to test how control will flow when the DragScript actions complete with OK, ERROR or TIMEOUT status, and when Emergency Suspend, Resume and Exit events happen.
Variables
DragScript has several variable types: counters (integers), string variables and decimal numbers. They must be declared with the Counter, String or Decimal Number actions before they can be used. You can set and change their values, and then make decisions to execute DragScript actions based on their value. For example, you may build a script that runs from zero to ten sequences based on the value of a counter variable you set at the start of the script.

Type
- Counter: Declare a counter (integer) variable and give it an initial value. You must declare a variable before using it

- Label: The name for this counter variable. There are no restrictions on length or legal characters, so just use something that makes sense for your control flow
- Init Value: Initial value for the counter. Must be an integer between -2,000,000,000 and +2,000,000,000
- OK: Save changes and close the window
- Cancel: Discard changes and close the window
- String: Declare a string variable and give it an initial value. You must declare a variable before using it

- Label: The name for this string variable
- Init Value: Initial value for the string
- OK: Save changes and close the window
- Cancel: Discard changes and close the window
- Decimal Number: Declare a decimal number variable and give it an initial value. You must declare a variable before using it

- Label: The name for this decimal number variable
- Init Value: Initial value for the decimal number - must be between the limits shown in the dialog box
- OK: Save changes and close the window
- Cancel: Discard changes and close the window
Manage
- Update Counter: Update the value of a counter variable:

- Counter: Select the counter to update from the drop-down list. Counter variables must be declared with a Counter DragScript action before they can be updated
- Update Type:
- Set to: If selected, set the counter variable to the value in the Update Value field
- Offset by: If selected, add the value in the Update Value field to the counter. The Update Value field can be negative or positive.
- Update Value: A negative or positive integer value to either set the counter variable to or offset the counter variable by
- OK: Save changes and close the window
- Cancel: Discard changes and close the window
- Update String: Update the value of a string variable:

- String: Select the string variable to update from the drop-down list
- Update Value: Enter the new value for the string variable
- OK: Save changes and close the window
- Cancel: Discard changes and close the window
- Update Decimal Number: Update the value of a decimal number

- Decimal Number: Select the decimal number variable to update from the drop-down list
- Update Type:
- Set to: Set the decimal number value to the number in the Update Value field
- Offset by: Add the +/- number in the Update Value field to the current value of the decimal number
- Update Value: Enter the new value for the decimal number variable
- OK: Save changes and close the window
- Cancel: Discard changes and close the window
- Update Decimal Number from Camera Temperature: Set the value of a decimal number from the temperature reported from Camera Driver:
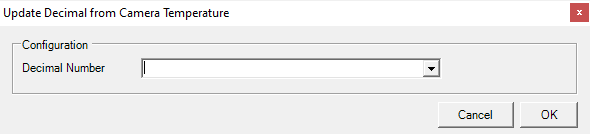

- Decimal Number: Select the decimal number variable to update from the drop-down list
- OK: Save changes and close the window
- Cancel: Discard changes and close the window
- Update Decimal Number from Observing Conditions: Set the value of a decimal number from the observing conditions returned from I/O cards via Viking or from an ASCOM Observing Conditions driver:

- Decimal Number: Select the decimal number variable to update from the drop-down list
- Observing Condition: Select the observing condition whose value should be placed into the decimal number. These values come from Viking, a companion product from Starkeeper.it or from an ASCOM Observing Conditions driver
- OK: Save changes and close the window
- Cancel: Discard changes and close the window
- Update Decimal Number from Focuser Temperature: Set the value of a decimal number from the temperature returned by the focuser or auto-focus system

- Decimal Number: Select the decimal number variable to update from the drop-down list
- OK: Save changes and close the window
- Cancel: Discard changes and close the window
- Update Decimal Number with Autofocus HFD: Set the value of a decimal number with the final HFD (Half Flux Diameter) value from the last autofocus operation

- Decimal Number: Select the decimal number variable to update from the drop-down list
- OK: Save changes and close the window
- Cancel: Discard changes and close the windowImportant Note! At this time only RoboFire LocalField, RoboStar, and FocusMax return the HFD value - if you use a different autofocus routine, the HFD is not available
- Update Decimal from Focuser Position: Set the value of a decimal number from the actual position returned by the RoboFire focuser
- Decimal Number: Select the decimal number variable to update from the drop-down list
- OK: Save changes and close the window
- Cancel: Discard changes and close the window
- Update Decimal from Solved PA: Set the value of a decimal number from the last solved PA returned by a Plate or Blind Solving action

- Decimal Number: Select the decimal number variable to update from the drop-down list
- OK: Save changes and close the window
- Cancel: Discard changes and close the window
- Update Decimal from Rotator PA: Set the value of a decimal number from the Rotator PA returned by Rotator driver

- Decimal Number: Select the decimal number variable to update from the drop-down list
- OK: Save changes and close the window
- Cancel: Discard changes and close the window
- Multiply Decimal Number: Multiply a decimal number variable for the value in another variable of type counter or decimal or by direct value, the result will be stored in replace of actual value

- Decimal Number: Select the decimal number variable to multiply and update
- Multiply by Decimal Variable: Select the decimal number variable to use for multiply
- Multiply by Counter Variable: Select the counter variable to use for multiply
- Multiply by Value: Select the direct value to use for multipy
- OK: Save changes and close the window
- Cancel: Discard changes and close the window
Jumps
Jumps are used to goto a specified block of the DragScript. You can jump to the Start, End or a named Block.

- Goto Start: Jump to the Start block of the script
- Goto Block: Jump to a named block in the script

- Block: Select the named from the drop-down list, or type in the name of a block
- OK: Save changes and close the window
- Cancel: Discard changes and close the window
- Goto End: Jump to the End block of the script
Repeats
Repeats are used to execute a DragScript block a specified number of times, or until a specific time, or until astronomical night ends.
Repeats must be placed inside a block (note: Script: is a special block that contains the entire script.
If the result of evaluating a Repeat is to repeat the block, control returns to the block statement that contains the repeat.

- Repeat Block for n Times: Repeat the containing block a specified number of times

- Times: Number of times to repeat this block
- OK: Save changes and close the window
- Cancel: Discard changes and close the window
- Repeat Current Block Until Time: Repeat the contained block until the specified time:

- Time: Repeat the current block until this time
- OK: Save changes and close the window
- Cancel: Discard changes and close the window
- Repeat Block Until Astronomical/Nautical/Civil Night End:

- Get Latitude and Longitude from Mount: Retrieve the current latitude and longitude from the connected mount, which must support this command. This location is used, along with the current date, to determine the time that astronomical/nautical/civil night ends
- Use the Latitude and Longitude indicated below: Specify your current latitude and longitude in the fields below. This location is used, along with the current date, to determine the time that astronomical/nautical/civil night ends
- Offset: Time in HH MM SS
- Offset Before: If selected, repeat the block until this amount of time before astronomical/nautical/civil night ends
- Offset After: If selected, repeat the block this amount of time after astronomical/nautical/civil night ends
- Default: Use the default settings
- OK: Save changes and close the window
- Cancel: Discard changes and close the window
Decisions
Decisions control the flow of your DragScript based on the results of an action (OK, ERROR, TIMEOUT), operating conditions (current time, date or target altitude), or the value of a variable.

Action Results:
Do the actions at the indent level created by the Decision block based on the results of the action preceding the decision
- IF OK: Do the actions following this statement if the result of the previous action was OK - meaning the action was successful
- IF ERROR: Do the actions following this statement if the result of the previous action was ERROR - meaning the action failed
- IF TIMEOUT: Do the actions following this statement if the result of the previous action was a TIMEOUT - meaning the action reached a specified timeout value without succeeding
- IF SKIPPED: Do the actions following this statement if the skipped status of the previuos action was SKIPPED - meaning the action not generate ERROR or finish OK just is SKIPPED because some constraints isnìt possible to match. At now only the Sequence Action use the SKIPPED status if time wait or time end or one of the constraints in azimuth, hour agle, alitute was thrown
Operating Conditions:
Do the actions at the indent level created by the Decision block based on the time, date or target altitude
- DO IF ALTITUDE: Do the actions if a target specified by RA and DEC coordinates has risen above or set below a specified altitude:

- RA Target J2000: RA coordinates of the object you want to reach the Reference Altitude in HH MM SS or HH MM SS.sss
- DEC Target J2000: DEC coordinates of the object you want to reach the Reference Altitude in DD MM SS or DD MM SS.sss
- Reference Altitude: Altitude to reach in degrees
- Do If Actual Altitude GREATER than or EQUAL (>=) to reference: Do the actions if the target has reached or risen above the reference altitude
- Do If Actual Altitude LOWER than or EQUAL (>=) to reference: Do the actions if the target has reached or set below the reference altitude
- RoboClip: load RA and DEC from RoboClip catalog
- Coords From Sequence: load RA and DEC from a sequence file
- Default: Use the default settings
- OK: Save changes and close the window
- Cancel: Discard changes and close the window
- DO IF ALTITUDE BETWEEN: Do the actions if the altitude of a target specified by RA and DEC coordinates is between the Start and End values

- RA Target J2000: RA coordinates of the object you want to reach the Reference Altitude in HH MM SS or HH MM SS.sss
- DEC Target J2000: DEC coordinates of the object you want to reach the Reference Altitude in DD MM SS or DD MM SS.sss
- Start and End: Do the actions if the specified target's altitude is greater than or equal to the Start value and less than or equal to the End value in decimal degrees
- RoboClip: load RA and DEC from RoboClip catalog
- Coords From Sequence: load RA and DEC from a sequence file
- Default: Use the default settings
- OK: Save changes and close the window
- Cancel: Discard changes and close the window
- DO IF AZIMUTH BETWEEN: Do the actions if the azimuth of a target specified by RA and DEC coordinates is between the Start and End values and the Altitude of the Target is above the minimum Altitude for slew set up in Voyager Mount setting (default is 0°)

- RA Target J2000: RA coordinates of the object you want to reach the Reference Altitude in HH MM SS or HH MM SS.sss
- DEC Target J2000: DEC coordinates of the object you want to reach the Reference Altitude in DD MM SS or DD MM SS.sss
- Start and End: Do the actions if the specified target's azimuth is greater than or equal to the Start value and less than or equal to the End value in decimal degrees. Also the Altitude of the target must be above the minimum for a slew like set tup in Voyager Mount setting (default is 0°)
- RoboClip: load RA and DEC from RoboClip catalog
- Coords From Sequence: load RA and DEC from a sequence file
- Default: Use the default settings
- OK: Save changes and close the window
- Cancel: Discard changes and close the window
- DO IF HA BETWEEN: Do the actions if the hour angle of the target (hours difference from the meridian) is between the specified start and end amounts
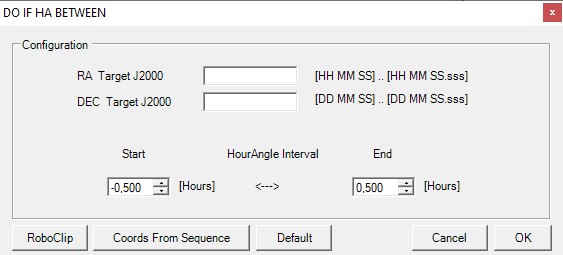
- RA Target J2000: RA coordinates of the object whose hour angle we are testing, in HH MM SS or HH MM SS.sss
- DEC Target J2000: DEC coordinates of the object whose hour angle we are testing, in DD MM SS or DD MM SS.sss
- Start and End: Do the actions if the specified target's HA (hour angle) is greater than or equal to the Start value and less than or equal to the End value in decimal hours. Note the values can be positive (after the meridian) or negative (before the meridian). The start to end can be both negative, both positive, or the start can be negative and the end can be positive. In all cases, the value must increase from start to end.
- RoboClip: load RA and DEC from RoboClip catalog
- Coords From Sequence: load RA and DEC from a sequence file
- Default: Use the default settings
- OK: Save changes and close the window
- Cancel: Discard changes and close the window

- DO IF TIME BETWEEN: Do the actions if the time is between the specified start and end times

- Start: Beginning time of interval within which to do the following actions
- End: End time of interval within which to do the following actions
- Default: Use the default settings
- OK: Save changes and close the window
- Cancel: Discard changes and close the window
- DO IF DATE BETWEEN: Do the actions at the indent level created by the DO statement if the date is between the start and end dates:

- Start: Start date of the interval
- End: End date of the interval
- Default: Use the default settings
- OK: Save changes and close the window
- Cancel: Discard changes and close the window
- DO IF SQM: Do the actions at the indent level created by the DO statement if the SQM value readed from control or Observing conditions is between the start and end dates:

- Reference Sky Quality: reference value of Sky Quality to check
- Do If Actual value GREATER than or EQUAL [>=] to reference: execute what is inside DO IF if the actual value >= that the reference value
- Do If Actual value LOWER than or EQUAL [<=] to reference: execute what is inside DO IF if the actual value <= that the reference value
- Default: use the default settings
- OK: Save changes and close the window
- Cancel: Discard changes and close the window
- DO IF FOCAL LENGTH: Do the actions at the indent level created by the DO statement if the FOCAL LENGTH readed from actual profile (Setup->Camera) is >=, <= or equal to reference value:

- Reference Focal Length: reference value of Telescope Focal Length to check
- Do If Focal Length GREATER than or EQUAL [>=] to reference: execute what is inside DO IF if the actual value >= that the reference value
- Do If Focal Length LOWER than or EQUAL [<=] to reference: execute what is inside DO IF if the actual value <= that the reference value
- Do If Focal Length EQUAL [=] to reference: execute what is inside DO IF if the actual value = that the reference value
- Default: use the default settings
- OK: Save changes and close the window
- Cancel: Discard changes and close the window
- DO IF DOME/ROOF OPEN: Do the actions at the indent level created by the DO statement if the DOME/ROOF is opened
- DO IF DOME/ROOF CLOSED: Do the actions at the indent level created by the DO statement if the DOME/ROOF is closed
Voyager Environment:
Do the actions at the indent level created by the Decision block based on the Voyager internal status
- DO IF SETUP CONNECTED: Do the actions if Voyager Setup is connected (from Startup menù or by DragScript connect block)
- DO IF SETUP DISCONNECTED: Do the actions if Voyager Setup is not connected (from Startup menù or by DragScript disconnect block)
Variable Check
Do the actions at the indent level created by the DO IF statement based on the value of a variable. Variables must be declared before they can be tested in a DO IF statement

- DO IF COUNTER VALUE: Check the value of a counter (integer) variable and do the following actions if the value of the counter meets the specified criteria:

- Label: Choose the counter variable to test from the drop-down list
- is Lower than: Do the following actions if the selected counter value is less than the number in the counter field
- is Lower than or Equal to: Do the following actions if the selected counter value is less than or equal to the number in the counter field
- is Equal to: Do the following actions if the selected counter value is equal to the number in the counter field
- is Greater or Equal to: Do the following actions if the selected counter value is greater than or equal to the number in the counter field
- is Greater than: Do the following actions if the selected counter value is greater than the number in the counter field
- is Between: Do the following actions if the selected counter value is between the values in the two counter fields (greater than or equal to the left value AND less than or equal to the right field)
- is Not Equal to: Do the following actions if the selected counter value is not equal to the number in the counter field
- OK: Save changes and close the window
- Cancel: Discard changes and close the window
- DO IF STRING VALUE: Do the actions at the indent level created by the DO IF statement if a string variable is equal to, not equal to, or contains a specified string:

- Label: Choose the string variable to test from the drop-down list
- is Equal to: Do the following actions if the selected string value is equal to the specified string
- is Not Equal to: Do the following actions if the selected string value is not equal to the specified string
- Contains: Do the following actions if the selected string value contains the specified string
- OK: Save changes and close the window
- Cancel: Discard changes and close the window
- DO IF DECIMAL VALUE: Do the actions at the indent level created by the DO IF statement if the value of the decimal number meets the specified criteria:

- Label: Choose the counter variable to test from the drop-down list
- is Lower than: Do the following actions if the selected decimal number value is less than the number in the decimal number field
- is Lower than or Equal to: Do the following actions if the selected decimal number value is less than or equal to the number in the decimal number field
- is Equal to: Do the following actions if the selected decimal number value is equal to the number in the counter field
- is Greater or Equal to: Do the following actions if the selected decimal number value is greater than or equal to the number in the decimal number field
- is Greater than: Do the following actions if the selected decimal number value is greater than the number in the decimal number field
- is Between: Do the following actions if the selected decimal number value is between the values in the two decimal number fields (greater than or equal to the left value AND less than or equal to the right field)
- is Not Equal to: Do the following actions if the selected decimal number value is not equal to the number in the decimal number field
- OK: Save changes and close the window
- Cancel: Discard changes and close the window
Events
DragScript execution can be suspended, terminated (exited) and resumed based on the occurrence of Emergency Exit, Emergency Suspend and Emergency Resume events.
The most common use of Events is together with a weather monitoring system, as configured in Weather Setup. You can specify at a detailed level which events should cause DragScript execution to SUSPEND (such as overcast clouds), EXIT (such as rain), or RESUME (such as clouds moving out so it becomes clear again).
In addition to weather events, you can raise Emergency Exit, Emergency Suspend and Emergency Resume events at any point in your DragScript.
When an Event is raised, control flow goes immediately to the appropriate block (Exit, Suspend or Resume) in the Events block of your DragScript. Create those blocks by dragging elements from the Events: Manage list.

Manage
See the DragScript Examples section to see how these blocks work in a DragScript.
- Emergency Exit: Drag this element to the Events block of your DragScript. Then drag the actions you wish to take place when an Emergency Exit event is raised. For example, stop tracking, stop guiding, park your mount, and close the observatory roof
- Emergency Suspend: Drag this element to the Events block of your DragScript. Then drag the actions you wish to take place when an Emergency Suspend event is raised. For example, stop tracking and stop guiding

- Wait Resume until absolute time: If the time specified in HH MM SS is reached without an Emergency Resume event being raised, perform the action selected from the radio buttons in this dialog window
- Wait Resume for a time interval of: If the time period specified in HH MM SS elapses without an Emergency Resume event being raised, perform the action selected from the radio buttons in this dialog window
- Wait Resume until end of Astronomical Night (to allow calculation mount must be connected to Voyager): If the end of Astronomical Night arrives without an Emergency Resume event being raised, perform the action selected from the radio buttons in this dialog window
- Wait Resume until end of Nautical Night (to allow calculation mount must be connected to Voyager): If the end of Nautical Night arrives without an Emergency Resume event being raised, perform the action selected from the radio buttons in this dialog window
- Wait Resume until end of Civil Night(to allow calculation mount must be connected to Voyager): If the end of Civil Night arrives without an Emergency Resume event being raised, perform the action selected from the radio buttons in this dialog window
- On Resume Timeout End DragScript: If the time specified above is reached without an Emergency Resume event occurring, end the DragScript
- On Resume Timeout Exec Emergency Exit Event: If the time specified above is reached without an Emergency Resume event occurring, raise an Emergency Exit event
- On Resume Timeout Restart DragScript: If the time specified above is reached without an Emergency Resume event occurring, Voyager will restart the DragScript form beginneng like a new running
- OK: Save changes and close the window
- Cancel: Discard changes and close the window
- Emergency Resume: Execute these actions when an Emergency Resume event is raised. For example, start tracking and start guiding
Raise
Raise an Emergency Exit, Suspend or Resume event
- Raise Emergency Exit Event: Raise the Emergency Exit event. Execution of the DragScript will go immediately to the Emergency Exit block in the Events block
- Raise Emergency Suspend Event: Raise the Emergency Suspend event. Execution of the DragScript will go immediately to the Emergency Suspend block in the Events block
- Raise Emergency Resume Event: Raise the Emergency Resume event. Execution of the DragScript will go immediately to the Emergency Resume block in the Events block
Remote
Block for management of Distributed Distributed Emergency
- Set Distributed Emergency Status: Update overriding the internal Distributed Emergency Status for the Voyager Client connected to the selected value
- Distributed Safe: Distributed Safe wait the night like configured and in the night wait to have a Safe condition from the Emergency Event System (in Voyager is Weather, Safety Monitor, Viking I/O). If night is recognized and safe condition is true DragScript will exit from this block with OK result. If timeout is reached waiting DragScript will exit from this block with a TIMEOUT result. In case of error during waiting DragScript will exit with ERROR result. Checking the exit of block user can decide if inform all the client of a SAFE condition using the SET DISTRIBUTED EMERGENCY STATUS or restart the Master DragScript to wait for better conditions (same night or next night is automatically decided from DragScript). This block is usually associated and work only if you using the Distributed Emergency plugin. Right and only place where to use is the Voyager MASTER of plugin where information is processed and emergency events checked.
- Important Note! Distributed Safe Cannot be used inside the Event Manager (Exit, Suspend, Resume)

- NIGHT Configuration: data necessary to calculate the start and end interval of the actual night
- Night DATA: data about location of observatory
- Latitude: Latitude of the Mount
- Longitude: Longitude of the Mount
- Night TYPE: type of night to calculate. Astronomical, Nautical or Civil
- Night START OFFSET: apply an offset to the time start of the night
- Offset Before: offset before the start in hours, minutes and seconds
- Offset After: offset after the start in hours, minutes and seconds
- Night END OFFSET: apply an offset to the time end of the night
- Offset Before: offset before the end in hours, minutes and seconds
- Offset After: offset after the end in hours, minutes and seconds
- EVENT CHECK options: with this option you can decide to remove from processing status of SAFE some kind of events that will be ignored (event in any case are disable during the wait safe action)
- Check Emergency Exit Status in SAFE status calculation: if unchecked the condition that throw an Emergency Status will be ignored in calculation of SAFE Staus . ATTENTION !! this is a way really dangerous for your setup .. use only if you want to wait safe in particular condition , particular timing and for particular tasks
- Check Emergency SUSPEND Status in SAFE status calculation: if unchecked the condition that throw an Emergency Status will be ignored in calculation of SAFE Staus . ATTENTION !! this could be a way really dangerous for your setup .. use only if you want to wait safe in particular condition , particular timing and for particular tasks.
- LIGHT CONDITIONS options: with this option you can decide to remove from processing status of SAFE the LIGHT Conditions status
- Remove Weather LIGHT Conditions Status From Calculation of All Emergency Status: if unchecked the LIGHT conditions from Weather system will be not used to calculate the SAFE Status. Usefull if you want to open the dome with the light approaching the night time and do skyflat. For the Dawn flat you can decide to disable the LIGHT event using dedicated block
- Default: Use the default settings
- OK: Save changes and close the window
- Cancel: Discard changes and close the window
- Night DATA: data about location of observatory
- Important Note! Distributed Safe Cannot be used inside the Event Manager (Exit, Suspend, Resume)


Various
- Resume from Block: Resume execution starting with the specified block. This can only be placed in the Emergency Resume block in the Events block

- Block: Choose the block where execution should resume from the drop-down list
- OK: Save changes and close the window
- Cancel: Discard changes and close the window
- Disable Events: Disable event processing. Emergency Exit, Suspend and Resume events will be ignored
- Enable Events: Enable event processing. Emergency Exit, Suspend and Resume events will be recognized and handled
- Disable Exit Event: Disable event processing. Emergency Exit only event will be ignored
- Enable Exit Event: Enable event processing. Emergency Exit event will be recognized and handled
- Disable Suspend Event: Disable event processing. Emergency Suspend and Resume only events will be ignored
- Enable Suspend Event: Enable event processing. Emergency Suspend and Resume only events will be recognized and handled
- Disable Weather Light Event: Disable event processing of Light conditions coming from Weather System. Status of Light will be not used to processing the Emergency Exit and/or Emergency Suspend or Emergency Resume events (Work only if you have a weather system configured in Voyager)
- Enable Weather Light Event: Enable event processing of Light conditions coming from Weather System. Status of Light will be used to processing the Emergency Exit and/or Emergency Suspend or Emergency Resume events (Work only if you have a weather system configured in Voyager)
Block
The Block element creates a new block in your DragScript. Drag and Drop it on a DragScript element that creates a new indent level, e.g. Script, DO IF, IF, Emergency Exit, Emergency Suspend, or Emergency Resume.

- Label: Give your block a name. This name can be referenced by other script elements such as jumps and resumes
- OK: Save changes and close the window
- Cancel: Discard changes and close the window
Remark
The Remark element adds a non-executable comment to your script for documentation purposes

- Remark: Enter a comment that will appear in your script
- OK: Save changes and close the window
- Cancel: Discard changes and close the window
Flow
Flow Control are useful for changin flow of execution during DragScript
![]()
- Exit Block: exit the current block container and execute the first following useful instruction
- must be used inside a BLOCK container
- cannot be used directly under the SCRIPT default block or EVENTS default block
- if nested inside more than one BLOCK container DragScript Engine will exit from the first BLOCK container parent
- Restart DragScript: The Restart DragScript element allow script to be restart from beginning, all the variable and status will be resetted