FAQ
Post your questions in the Voyager Forum at https://forum.starkeeper.it We monitor that forum and will add the answers here if appropriate.
4K Monitor Resolution from Local or Remote Desktop
I have some font size problem on 4K monitor resolution, font is scaled to small and cannot show correctly Voyager Windows?
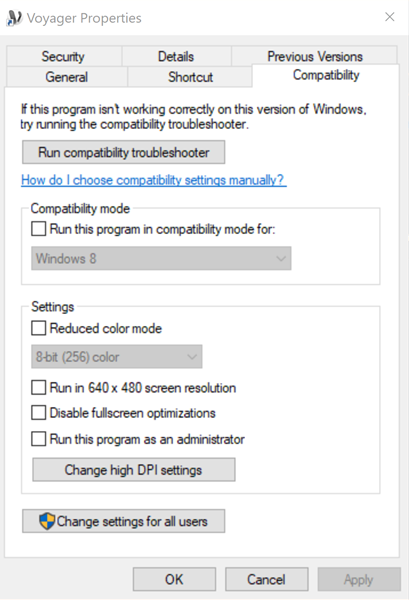
- There is a compatibility tab in the windows properties for the Voyager application. On this tab is a button labelled “Change high DPI settings”. I then checked the box for “Use this setting to fix scaling problems for this program instead of the one in settings” and for “Use the DPI that’s set for my main display when:” I selected “I signed into Windows”. I think that means if I sign in locally on the observatory PC with a 1920x1080 monitor it uses this DPI and if I sign in remotely with my laptop and 4K display it uses this DPI.


Artificial Intelligence (AI) in Voyager
- What is the benefit to users of the AI automata inside of Voyager?
- Voyager uses AI technology to improve focus, star recognition , equation calculation for VCurve, statistical calculations, and decisions for how to handle exceptions generated by the watchdog timers. Watchdogs are timers that oversee all requests to external hardware and software and recover from soft errors. The bottom line is that the advanced AI technology inside of Voyager contributes significantly to Voyager's exceptional reliability.
AstroPhysics Mounts and APCC
- What is the best way to connect to APCC from Voyager?
- Short answer courtesy of Voyager user Bill Long: I run Voyager in admin mode. I just open APCC first in admin mode, connect the ASCOM driver to APCC, then connect via Voyager. Works fine.
- I tried this but still having problems connecting to APCC from Voyager
- In setup for APCC, in the lower-left corner, you’ll need to uncheck the two boxes in the AP V2 Driver section labeled “auto connect” and “auto config”. This will allow Voyager to start the driver first without APCC interfering with other startup functions.
AutoFocus
- LocalField autofocus fails with an out-of-memory error [For version older than 2.2.1b]
- This problem was solved in Voyager version 2.2.1c and newer
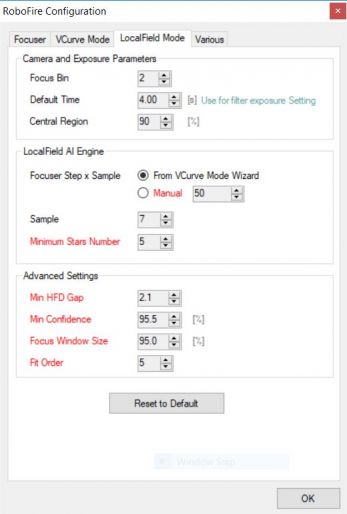
- Try using a smaller ROI or binning 2x2 instead of 1x1. The image is managed in memory using a Microsoft memory object that does not do garbage collection, so depending on what other programs are running and possibly using this memory, you may run out if your camera creates large images with each shot. NOTE: Be sure to set the binning for LocalField autofocus in the correct spot for your camera:
- If your camera does not have filters, use the Focus Bin setting - it's in Setup -> AutoFocus -> Robofire Configuration -> LocalField Mode:
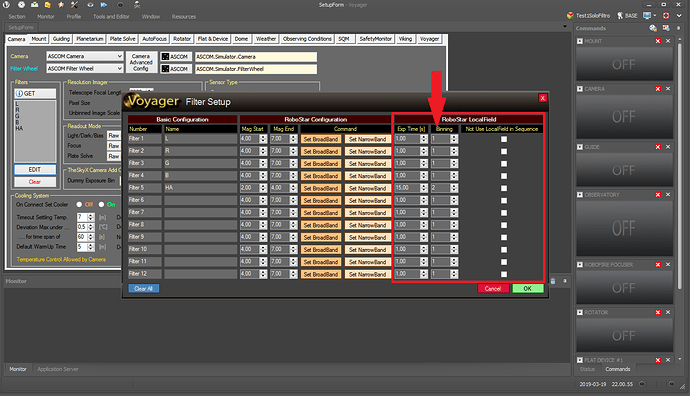
- If your camera does have filters, its in the per-filter settings dialog, which is in Setup -> Camera, then click the EDIT button in the Filters panel:


- How do I request an autofocus while a sequence or DragScript is running?
- Click the Monitor tab, then click AutoFocus. Choose the filter for autofocus. The current exposure will finish, then an autofocus will be performed, and then the sequence or DragScript will resume.
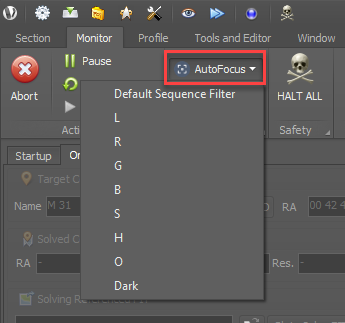
- How do I request an autofocus while a sequence or DragScript is running?

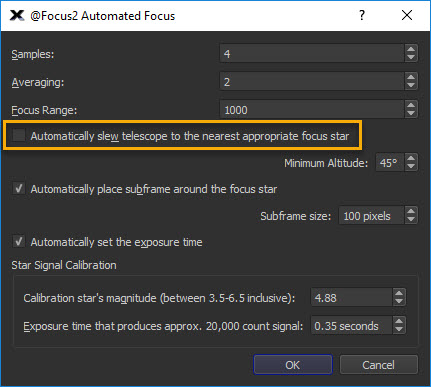
- TheSkyX @Focus2 slews to a Focus Star but doesn't return to my target.
- Choose Voyager RoboStar in your Sequence setup, Focus tab. Voyager will choose a focus star, call TheSkyX @Focus2 which does the autofocus, and then Voyager will slew back to your target
- Be sure to uncheck "Automatically slew telescope to the nearest appropriate focus star" in TheSkyX @Focus2
- Does Voyager implement Temperature Compensation (move the focuser a predetermined amount based on ambient temperature)?
- No, Voyager does not implement temperature compensation. Even the author of FocusMax says that temperature compensation gives inconsistent results and he decided not to use it. We want your images to have sharp focus. Voyager's goal is reliable imaging automation and unfortunately temperature compensation is unreliable. If you still want to use temperature compensation, you can find some focuser drivers that implement it for you in the driver software.
- No, Voyager does not implement temperature compensation. Even the author of FocusMax says that temperature compensation gives inconsistent results and he decided not to use it. We want your images to have sharp focus. Voyager's goal is reliable imaging automation and unfortunately temperature compensation is unreliable. If you still want to use temperature compensation, you can find some focuser drivers that implement it for you in the driver software.

Cameras
- Can Voyager use my FLI Camera?
- You can connect to an FLI camera using TheSkyX, Maxim DL, or the ASCOM driver written by Hartmut Bornemann in the Yahoo! FLI Imaging Systems group at:https://groups.yahoo.com/neo/groups/FLI_Imaging_Systems/files/Hartmut%20Bornemann/
- There is a checkbox in his driver labelled “Can Fast Readout." This must be unchecked. If it is checked, Voyager will not be able to consistently change the readout mode. (thanks to Bill Long for the tip)

- Can Voyager use my SBIG camera?
- You can connect to your SBIG camera using TheSkyX or Maxim DL. There is no native support in Voyager for SBIG cameras as of Voyager 2.1.4. We need access to a camera to test a native driver. This may happen in the future but we don't have any firm as of this writing (June 2019)
- I get an Out of Memory Error when trying to take exposures with my Camera using the ASCOM driver
- Voyager runs as a 32-bit application so has access to 4GB no matter how much RAM is installed on your PC. Reboot your PC and only run the other applications you need.
- Downloads from my camera are hanging
- Check your USB cable lengths. The maximum length specified for USB3 is 3 meters - longer than that and you may have problems.
- For ASI cameras, try reducing the download speed in the ASCOM driver
- Can Voyager support Gain and Offset for my ZWO ASI CMOS camera?
- As of Voyager 2.1.6b, an ASI Camera native driver is available as a choice in Camera setup. Use this driver and you can set Gain and Offset individually for each Sequence Element.
- You cannot set Gain or Offset using the ASI ASCOM driver, you must use the ASI Camera native driver.
- Does Voyager add GAIN and OFFSET keywords to my image file FITS headers?
- As of Voyager 2.1.6b, if you use the ASI Camera native driver, the GAIN and OFFSET keywords will be set in the image file FITS headers.
- As of Voyager 2.1.6b, if you use the ASI Camera native driver, the GAIN and OFFSET keywords will be set in the image file FITS headers.
Cooling
- Why did Voyager put "NoCooling" in the file name saved by my Sequence?
- This happens when the Sequence's “Cooling” checkbox on the Cooling tab is unchecked. This means you have cooling on in your camera but Voyager's Sequence is not managing it. You may have started cooling from the Voyager command box or from the camera control, extrernal to Voyager. It is thus possible that the camera has been cooled, but it will say NoCooling because Voyager is not managing the temperature. If there’s an error in cooling you might see the text "UNK" in your file name.
Connection / Startup
- I get a red error message when I click Connect in the Startup workspace - Voyager can't connect to third party software such as TheSkyX, Maxim DL, PHD2, etc.
- Ensure Voyager is running as administrator. Start Voyager before all other programs. Let Voyager start the other programs it needs. They will inherit the proper mode from Windows when Voyager starts them.
- If you still have an error, check your antivirus software to make sure it is not preventing Voyager from communicating with other programs.
- If the inter-program communication is via TCP/IP ports, check that Voyager and the third party program are allowed to access ports in the Windows firewall, or any other firewall you may be running
- I get a red error message when I click Connect in the Startup workspace - Voyager can't connect to my hardware
- Ensure Voyager is running as administrator. Check that your hardware is powered up and configured properly in Voyager and any driver software used to connect to it.
- Ensure the COM port has not changed - sometimes Windows assigns a different COM port and your hardware driver will not be able to connect to your gear.
- For camera connection problems, try applying the Slow Polling flag in Camera Setup. Some camera drivers can't handle requests spaced too closely together
- For mount connection problems, try applying the Slow Polling flag in Mount Setup. Some mount drivers can't handle requests spaced too closely together
- Voyager closes after trying to connect to other software or hardware
- Voyager will only close if a driver had a critical failure at the Windows kernel level that cannot be handled. Please activate the ASCOM log and report to the driver developers.
- Voyager has problems connecting to my ASCOM device
- See above suggestions
- Make sure the version of ASCOM you have installed is the correct one for your driver
- If your driver accepts only one connection (a serial error when you try to connect from Voyager would indicate this) you can connect only one app. If you want connect more than one app you must use an ASCOM hub.
Voyager implements standard ASCOM.
Dome
- I have the HiTec Roll-Off-Roof controller. I am getting "The requested operation is not permitted at this time" errors. What should I do?
- These errors have been seen when using the ASCOM driver as standard. Try the ASCOM Dome ConnectionLess Interface, which seems to eliminate these errors
- Voyager started taking images before the dome had finished rotating
- Voyager will slave to the dome when starting a sequence only if you check the box Slave on Sequence Start in Setup -> Dome:

- If you don't do a specific command to slave the dome in Voyager, you'll see the message "Slave is unlock from user" in the monitor window
- This is because some drivers don't report slave status to Voyager
- If you create a DragScript to manage all night imaging remember to put a slave on block in the script if you do other mount operations before starting a sequence.
- Also remember to slave off and park the dome at the end of the script
- I use VIking to control my Dome (or Roll-Off Roof). How do I connect it to Voyager's Dome controls?
- Voyager's Dome controls are only for ASCOM drivers. To use Viking from Voyager, build a DragScript and use the Viking actions to read and write to Viking's relays, switches and controls.
- This video explains how to do this: https://vimeo.com/331171731
- How do I make sure Voyager doesn't move my scope if I have a Roll Off Roof and the roof is closed?
- Go to SetupForm/Dome and you will see a tick box: “Abort GoTo actions if Dome mode is Roll off Roof and the Shutter is closed” A tick there will stop any clash between scope and roof. (Courtesy of Graham on our forum)
- How can I get slaving to work with my MaxDome ASCOM driver?
- Use Voyager RoboSync to slave the dome.
- Use Voyager RoboSync to slave the dome.

DSLR Support
- Can I use my DSLR camera (Canon, Nikon) with Voyager?
- Voyager supports camera connection via ASCOM drivers, Maxim DL, or TheSkyX
- We strongly recommend using Maxim DL or TheSkyX with DSLR's as their camera support has been widely used
- There is an open source ASCOM.DSLR driver that may work for you. It can connect via the Canon or Nikon SDK's, or for Canon cameras, it can also connect via O'telescope's Backyard EOS.
- We cannot help you if this doesn't work, but if you want to try using the ASCOM.DSLR driver, we wrote a Wiki page on how to set it up
Editing a DragScript
- I can't get Drag and Drop to work in the DragScript Editor (perhaps with a remote desktop connection such as VNC, TeamViewer, etc)
- You can only drop DragScript elements where the mouse pointer shape changes to an arrow with a little rectangle attached when you hover over the desired drop location.
- On Windows 10, the mouse pointer will not change shape if there is no mouse connected to the remote PC. To enable the mouse pointer shape changing with no mouse connected:
- Right click the Windows button on the remote PC's desktop (not on your local PC)
- Click Settings
- Type "Mouse Keys" in the search box and select "Turn Mouse Keys On or Off"
- Turn Mouse Keys on

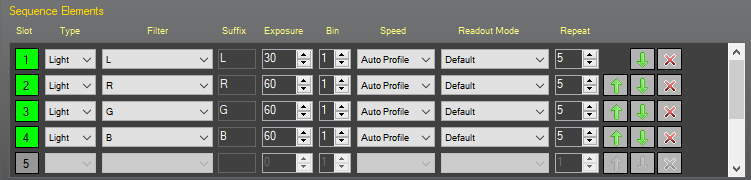
- Target name
- Type of exposure: Light, Dark, or Bias
- Suffix: whatever you type in the "Suffix" field. Filter names are used here.
- Exposure length
- Binning level
- Sensor temperature
- Sequence number: a sequential number generated automatically when Voyager takes a new image
- Date: YYYYMMDD
- Time: HHMMSS
- MS: millisecond portion of the time the image was taken
- Position Angle
- Position relative to Meridian: E = East or W = West
- File type: FIT for a FITS file
Filenames
- Can I use my own filenames for images taken with Voyager?
- Sequences: You can add something to the image filenames created by a sequence by typing it into the Suffix field - in this example, the filter name is used
- Other: With the Camera -> Expose action in a DragScript, you can specify the filename however you like
- Sequences: You can add something to the image filenames created by a sequence by typing it into the Suffix field - in this example, the filter name is used
- What do the fields mean in the default image filenames saved by Sequences?

Filters
- How can I have Voyager use Filter Offsets (automatically change focus position when switching filters with a filter wheel)?
- Set this up in the ASCOM driver for your filter wheel, or in TheSkyX or Maxim DL if you use them for your Camera control
Flats
- How can I take flats without the variable exposure feature of Auto Flats?
- There are at least two ways to do this. Use the Camera -> Expose option in a DragScript. You can enter your desired exposure length and choose Flat as your exposure type. Or, enter your desired exposure length in Auto Flats for the minimum, maximum, and initial exposure times. Set the desired ADU to your mid-range (usually 32767) and 100% as your error tolerance.
- My Auto Flats never finish, they keep looping trying to find the proper exposure time but it is always outside the allowed error tolerance
- Try using a larger ROI - with a camera with a large number of pixels, the mean ADU of the default small ROI can change quite a bit. Also, look at the deviation in percent reported in the Monitor window. Increase your allowed error tolerance if necessary. You can also change the ROI to "no" and Voyager will determine exposure length based on the entire image, but this takes a little longer.
Guiding
- What's the difference between RoboGuide and Native Guide controls?
- If you use RoboGuide, Voyager will choose a guide star using the parameters you set in RoboGuide Advanced
- If you use Native Guide Control, Voyager will let your guiding software (PHD2, Maxim DL, TheSkyX) choose the guide star
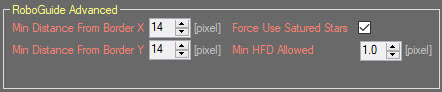
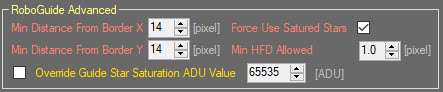
- Why does RoboGuide choose saturated guide stars?
- This happens if you check Force Use Saturated Stars in the RoboGuide Advanced section of Guiding setup. This can be useful at long focal lengths where only a few guide stars are available. Sometimes a saturated star is the best choice for guiding.
- If you use a CMOS camera, check with a viewer to see what ADU value returned for a saturated star. Put this value in the Override Guide Star Saturation ADU Value box and uncheck Force Use Saturated Stars and Voyager's AI will choose guide stars below this value
- You can read the ADU value of a guide star inside of PHD2 if you use that for guiding


Licensing
- What's the difference between "Demo" and "Trial" modes?
- The Voyager download installs in Demo mode. This is a perpetual, full functionality version of Voyager that times out after 60 minutes. Trial mode is full functionality with no session time limit, but limited to 45 days from the time you start the trial (which can be a later date than installation).
- How do I get a license for my second or third PC's?
- Install the download on your second or third PC. Copy the serial number, which is unique to that PC, and email it to Leo or use the form at https://voyagerastro.com/contact-us/
- Can I install the Free Trial download on multiple computers?
- Yes. It will install in "Demo" mode which is full functionality with a 60 minute session timeout. You can start the 45 day free trial at any time by clicking the Activate Trial button on the startup splash screen.
- Do I need to install Voyager to get a serial number before buying a license?
- Yes. Each installation of Voyager has a unique serial number that is generated when you install it. Find your serial number by running Voyager, clicking the Resource menu, then the License option

- Copy the serial number from the License window and enter it in the Serial Number field of the license purchase form
Meridian Flips
- How do I set up Voyager to manage meridian flips?
- Determine how far past the meridian your scope can slew without a pier crash. Let's say this is 30 minutes. Choose a value less than this, default is 10 minutes, and put that number in the "Do Flip after Mount Passing Meridian By" field in Mount Setup. If you want Voyager to finish the current exposure before doing the flip, allow enough time for your longest exposures to complete. E.g. if your longest exposure is 10 minutes in this example, Voyager would do the meridian flip no later than 20 minutes past the meridian, which would be OK with a 30 minute max for your equipment.
- We don't recommend using zero (0) for the Do Flip after Mount Passing Meridian By" number, because this requires precise synchronization of the time settings in your PC and mount and the lat/long position of your site, and you must choose the "ASCOM - Read LST from Driver" in Mount Setup
- Make sure your mount driver does not also do an automatic meridian flip when it is just tracking past the meridian
- Choose Manage from Meridian Flip Mode in the Meridian Flip tab of the Sequence definition.
- Run your sequences. When your scope crosses the meridian plus the number of minutes you specified in "Do Flip after Mount Passing Meridian By" minutes, Voyager will wait until the current exposure finishes, then perform the meridian flip before starting the next one.
- For a more thorough explanation, read the GEM Meridian Flip Manager section of mount setup, the Meridian Flip tab of the Sequence documentation, and the Meridian Flip Status LED explanation in the Status Window section
- Why does Voyager start another exposure when the Orange status indicator is flashing indicating a meridian flip is needed?
- The orange status indicator means the meridian has been crossed. The meridian flip won't happen until the "Do Flip after Mount Passing Meridian By" minutes have passed and the exposure underway at that time has finished.
- My time zone is a partial hour different from UTC (like Australian Central Time which is UTC+9:30) and my meridian flips are happening 30 minutes late (or early).
- This has been fixed in Voyager 2.1.7m and later, please upgrade
Mosaics
- Does Voyager have a Framing and Mosaic Manager?
- Not as of June 2019, although one is being worked on: https://forum.voyagerastro.com/t/framing-mosaic-maker-manager/419
- How can I make a Mosaic with Voyager without a Framing and Mosaic Manager?
- A mosaic is just a set of adjacent images. There are many free and paid tools that will let you plan a Mosaic, including the one that will be integrated with Voyager:
- http://www.skycrumbles.net/mosaic-maker/
- Just run the tool to plan your mosaic and then copy and paste the coordinates for each panel into a Sequence in Voyager. You can use a Research & Survey sequence to shoot multiple targets with a single sequence.
- A mosaic is just a set of adjacent images. There are many free and paid tools that will let you plan a Mosaic, including the one that will be integrated with Voyager:
PHD2
- I am new to PHD2, how should I get started?
- There are many online tutorials on using PHD2 so we won’t try to recreate them here, but here’s one approach when setting up a new system with PHD2. Create an equipment profile for the connected gear. Start with the PHD2 defaults, then click the Brain icon and make sure your camera’s Pixel Size (on the Camera tab) and Focal Length (on the Guiding tab) are correct. Start taking guide images with PHD2. Hold Shift and click the Guide button to start a calibration run. If you haven’t already created a dark library, you will be prompted to do it. Follow the instructions and PHD2 will create a dark library. Once you have a successful calibration, PHD2 should start guiding automatically. Go to the Tools menu and select the Guiding Assistant. Follow the instructions to run it. It says to let it run at least 2 minutes, until the RMS values settle down. On the PHD2 Yahoo! group, they usually advise to run it for 15 to 20 minutes. However long you run it, when you stop it, it will give you suggestions to improve your guiding algorithm parameters. Accept them. Nine times out of ten, you will have “good enough” guiding at this point to take images.
Plate Solving
- What happens during a sequence if, after autofocus, plate solving on return to target fails, e.g. due to clouds?
- Voyager will try focusing three times with three different stars if you use RoboStar, or on the same field if you use LocalField. If plate solving to position to the focus star fails, Voyager will try blind solving if a blind solver is configured. Otherwise, the focus is aborted and an emergency fast goto is done back to the target.
- If you use guiding and it failed due to clouds, Voyager will try to calibrate the guider three times and for each calibration re-try, it will try to acquire a guide star three times. (note - Voyager does not use stored calibration values)
- If all guide calibration tries fail, the sequence is aborted with an Error status and the actions set in the "On Error" tab are taken.
- If you don't use guiding, the sequence will continue with the normal goto used to position to the target - meaning goto without plate solving, not precision pointing.
- Autofocus will be tried again when scheduled, and also plate solving will be tried three times to goto the focus star.
- After three failed tries to goto a focus star, plate solving to find the focus star is disabled until the first good autofocus. All failure counters are reset if autofocus is successful.
- Voyager's goal is to not stop any time - just not use guiding if it is not available due to clouds.
- If you have a cloud sensor, you can manage the actions taken on cloudiness using DragScript Emergency Suspend, Resume and Exit events
Session
- What is the relationship between the Target Coordinates in the OnTheFly workspace and the Sequence defined on that page?
- The target coordinates in the OnTheFly panel are used by by the Actions - the things outlined in yellow below. The Actions are simple things like autofocus or precision pointing (slew, plate solve, correct). If you previously defined coordinates with the Target Coordinates search box, the Solved Coordinates plate solve box, or the Solving Referenced FIT box, you will be asked if you want to use those coordinates when you create a new sequence. But if you create a sequence first, without coordinates, then go back to OnTheFly, new coordinates entered, searched or solved do not change the sequence coordinates. The assumption is that you might want to do something "On The Fly" with different coordinates, and you don't want to change your sequence coordinates.

Slewing and Meridian Flips
- Why does Voyager sometimes stop my mount from slewing when both Voyager and an external program are connected and I initiate a slew from the external program (e.g., Cartes du Ciel)
- Voyager has a safety system to stop your mount if it will pass the meridian and Voyager is not doing anything at that time. There's a flag in the Mount Setup tab, under Safety, that controls this behavior. Please read that section of the Wiki for more information
- Note on TheSkyX Conversion Between J2000 and JNow
- As of Voyager 2.1.2b, Voyager will double check Conversion between J2000> JNow and JNow> J2000 in case there is a glitch in the telescope data received from TheSkyX. Calculation will automatically switch from conversion by TSX to conversion by ASCOM / Voyager internals if needed
Starting Third Party Programs
- I am unable to start a third party program from Voyager (e.g. PHD2, Cartes du Ciel, TheSkyX)
- Make sure the checkbox allowing Voyager to start the third party program is checked in Setup (e.g. "Try Start Exe On Connect")
- Make sure exceptions are added to any firewall / antivirus / antimalware software you are running to allow Voyager and the third party program to connect
- If Voyager is successfully starting the third party program but you are getting an error, you may need to increase the delay time in Setup on the Voyager tab, under the External PROCESS Starting box. Try a larger number and see if that gives the third party program enough time to start so Voyager can connect.
Startup Problems
- When I try to start Voyager, the startup splash screen is stuck on the message "Sound Preload"
- This is rare but it can happen if Voyager was closed abruptly at the OS level, corrupting information about the layout and position of controls and windows in Voyager.
- Navigate to these folders in File Explorer - substitute your OS Login username for <username>.
- C:\Users\<username>\AppData\Local\Leonardo_Orazi
- C:\Users\<username>\AppData\Roaming\Leonardo_Orazi
- Look in the Leonardo_Orazi folders and you should find one or more directories with names like "VOyager2.exe.xxxxxxxxxxxxxxxxxxxxxxxxxx" or similar name where the long string of "x's" are other characters. You may only find the Leonardo_Orazi folder in one of these parent directories.
- Remove all the directories inside the Leonardo_Orazi folders and restart Voyager.
- If you are not comfortable doing this please allow us to help you with a Teamviewer session - email or use the support link on top page at https://software.starkeeper.it/
- Navigate to these folders in File Explorer - substitute your OS Login username for <username>.
TheSkyX and Voyager
- Why do I get "The Index is Out of Range: Error 733" when connecting to TheSkyX?
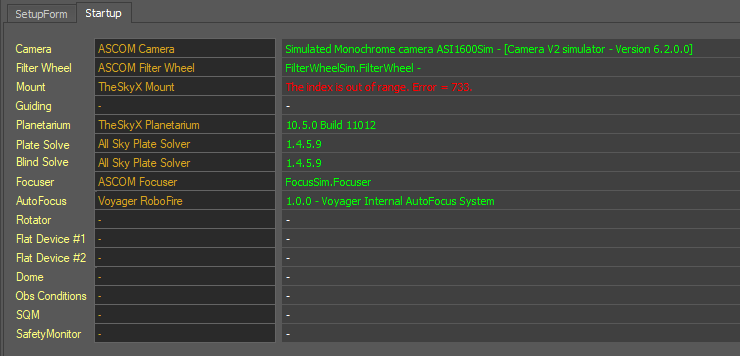
- Voyager and TheSkyX cannot communicate. The most likely problem is that TheSkyX and Voyager are running in different modes (administrator or user). Let Voyager start TheSkyX - it will do so when you click Connect in Voyager and TheSkyX will inherit the correct mode. Or, if you start TheSkyX manually, make sure it is running in the same mode as Voyager. We recommend and only support administrator mode because connection problems can happen with some software and drivers if Voyager runs in User mode.
- This sequence should work:

1) Check that Voyager will run as Administrator. (Right click the Voyager icon or Voyager2.exe file, click Properties, click Compatibility tab, make sure Run this program as an Administrator box is checked, click OK)

2) Check that TheSkyX can connect to a mount. In TheSkyX (not Voyager), click Connect to Telescope. We want to make sure that independently of Voyager, TheSkyX can connect to the telescope. It could be a Simulator, we just want it to be able to connect successfully.
3) Close programs and reboot your PC so we are sure there are no TheSkyX processes running
4) Start Voyager
5) In Voyager Setup -> Mount tab, choose TheSkyX from the Mount drop-down (we want to try connecting natively to TheSkyX, not via ASCOM)
6) In Voyager Startup, click Connect
If there are errors connecting to TheSkyX and the mount, it might be a firewall or antivirus preventing the programs from talking. But let's see if this basic sequence works.
- Why do I get a Connect Error -> SiteLongitude and "Your ASCoM driver can't give the Site Longitude info. Meridian Flip can't be managed from Voyager !!" error when connecting to Paramount's ASCOM driver for TheSkyX?
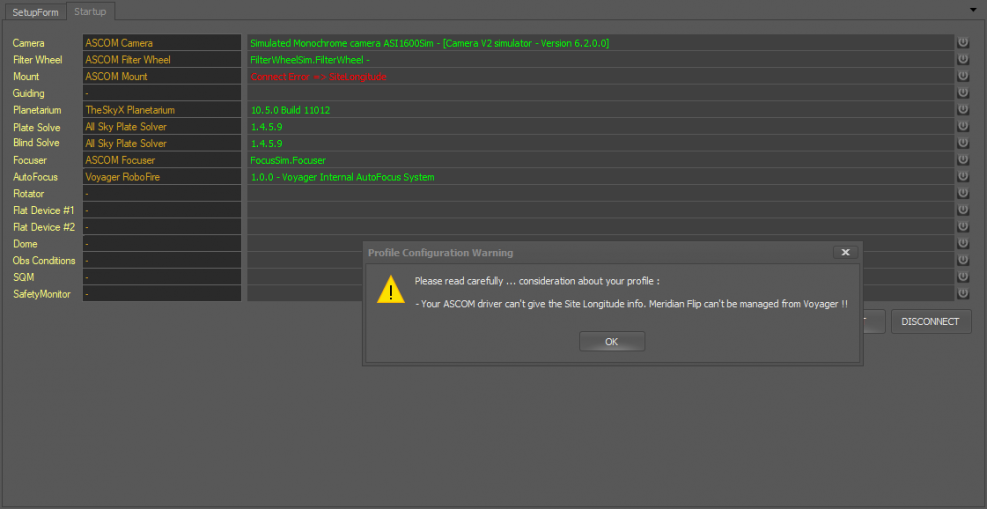
- This is a symptom of the same problem as the previous one - Voyager and TheSkyX can't communicate.
- The most likely problem is that TheSkyX and Voyager are running in different modes (administrator or user). Let Voyager start TheSkyX - it will do so when you click Connect in Voyager and TheSkyX will inherit the correct mode. Or, if you start TheSkyX manually, make sure it is running in the same mode as Voyager. We recommend and only support administrator mode because connection problems can happen with some software and drivers if Voyager runs in User mode.
- To run a program as administrator, right click the .exe file and select Properties. From the Compatibility tab of the Properties dialog, check the Run as Administrator box.
- It is also possible that your firewall or anti-virus software is preventing Voyager from connecting. Check your firewall and anti-virus and make sure it is not blocking this connection.

Setting up Application Server and Internal Web Server
- How can I set up the Application server and Internal Web Server in Voyager ?

- Box Application Server
- flag on "Activate it on start"
- flag on "Not logging heartbeat"
- flag on "Allow dashboard service"
- select the image quality for dashboard (more quality mean more bigger data to transfer on the internet/network) default is medium
- Box Web Server
- flag on "Activate it on start"
- use default 80 port if you don't have another web server or service using port 80, change port to 8080 or similar free port if this is not true
- Close Voyager
- Restart Voyager
- Say yes on private and public network flag when Operating System asks for your firewall allowance (don't say no or close it or web server and application server cannot work) and you must do it manually from control panel
- to know at which IP address your PC could answer you need to check in the Application server monitor, you’ll found a list of IP address if application server is turned on, see the attached image.f you have switch on also the Web Server please contact one of this IP with the browser: http://localhost (if you are on the same pc) http://localhost:pppp/ (if you are on the same pc and use different port than 80) http://xxx.xxx.xxx.xxx (if you are on the network) http://xxx.xxx.xxx.xxx:pppp (if you are on the network and use different port than 80) Which IP dependes on your networking, someone can be only local, someone can be closed by your firewall/router, someone can change if you are on local olnly or in DHCP environment. If your pc have a hostname use it, better solution: http://hostname (if you are on the same pc) http://hostname:pppp/ (if you are on the same pc and use different port than 80)
Copy Voyager Data between different PC
- How can I move voyager data between two different PC ?
Its possible to move data information about Voyager (profiles, sequences,autofocus setting, FIT Data) between two PC without lost any data. Just copy the folder "Voyager" that you can found in "Documents" folder of your PC. Paste it in a USB pen drive or in LAN shared folder. In the new PC install Voyager (if not was done), open at least 1 time, close it, copy the "Voyager" folder in USB inside the "Documents" folder of the new PC. Open Voyager in new PC. Thats all.
Using DragScript to create Parametric Dark (or DarkFlat)
- How can I realize autoamtically Dark with different time also for DarkFlat ?
Its possible to use the DragScript and the exposure block in conjunction with the decimal variables feature in Voyager to create a simple DragScript that create parametric Dark (in terms of exposure time) really fast. Look at this script:

This DragScript take a series of 10 dark starting from 0 to 2 seconds with increment between dark of 0.2 second.
10 dark at 0s
10 dark at 0.2s
10 dark at 0.4s
10 dark at 0.6s
…
…
10 dark at 1.8s
10 dark at 2s
Editing the repeat times and the initial value of darktime variable and the DO IF control value you are able to create your own parametric dark …