Difference between revisions of "Manager Window"
Voyager>Leonardo (→Data) |
m (1 revision imported) |
(No difference)
| |
Revision as of 18:27, 11 October 2020
Where to access to RoboClip
You can access to RoboClip manager window from:
- Voyager Main Window Icon on top
- Voyager Main Menù , page Tools and Editors
- OntheFly section with RoboClip button
- Sequence Editor with RoboClip button
- Research and Survey Edito with RoboClip button
- DragScript Editor in blocks allowed to choose coordinates RA and DEC with RoboClip button
- RoboTarget manager with RoboClip button
The manager window will be the same for each access point used:

Windows manager are organized in 3 different parts:
- Target List
- Data
- Command
Target List
This area show the list of all targets saved in RoboClip Database, default order is last created or importe on top. Actual order is reported on the area caption
Data
This area allow user to add new target and delete or modify the one selected
- Target : name to assign to target
- RA J2000: coordinate of RA in J2000 in text format HH MM SS.SSS
- DEC J2000: coordiante of DEC in J2000 in text format DD MM SS.SS
- P.A. : position angle to apply to FOV targeting (degree format 0-360°)
- Group : text of group to assign to target, targets with the same text in group can be fitlered togheter
- Note : free memo text note user like
- Is Virtual FOV Mosaic : True if the Target ia mosaic reaiza with Virtual FOV, if true also will be reported the dimension in columns and rows
- Sesame : search using http://cds.u-strasbg.fr/cgi-bin/Sesame
- Voyager : search using planetarium configured in Voyager (planetarium must be connected in Voyager to obtain data)
- New : prepare data area to add new target
- Save : save the data area (new or modify target)
- Delete : delete the selected target
- Cancel : resume the data in database and remove field modified and not saved
- Show Tiles : if the Target is a mosaic realized with Virtual FOV , pressing this button a new window with the list of the tiles will be opened.
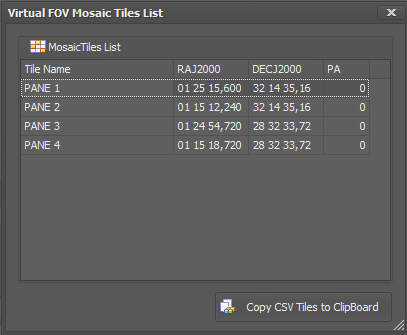
- Tile Name : name of the tile
- RAJ2000 : RA coord of the center of the Tile
- DECJ2000 : DEC coord of the center of the Tile
- PA : Position Angle of the Tile
- Copy CSV Tiles to ClipBoard : copy the list of the tiles in CSV format to ClipBoard, can be imported in RoboClip using dedicated import

The 3 button near the RA and DEC field allow to paste data inside this fields, you can copy single RA or DEC from web or another application or in another place of Voyager where a copy button is ready to use and paste in the RA and DEC field of the Data area. Also you can copy RA and DEC togheter like in https://telescopius.com/ website and paste in just one click
Command
List of commands available in RoboClip Command Area:
- Import : you can import data from CSV file format or Clipboard data in one click, also a massive import of Targets. Possible source at current version of RoboClip are:
- Voyager Research and Survey CSV file log.csv
- Telescopius.com Deep Sky Object / Observing List CSV file
- Telescopius.com Single/Mosaic CSV Panels from Clipboard
- TheSkyX Mosaic Grid from Clipboard
- Cartes du Ciel Mosaic File Format
- Astroplanner to Voyager Allan's Format CSV file example.csv
- Voyager Virtual FOV Mosaic CSV from Clipboard
- Filter Target : filter data by target name (or part of target name) written in text field
- Filter Group: filter data by Group name (or part of Group name) written in text field
- Filter Note : filter data by Note text (or part of Note text) written in text field
- Order by Date Modified : order data in target list by Data modified descendent
- Order by Target Name: order data by target name
- Order by RA Desc: order data by RA descendent
- Order by RA Asc: order data by RA ascendent
- Order by Group and Target : order data by group name and target name
- Delete ALL : remove all targets from database
- Reload Data / Reset Filters : remove data filters and reload all data from database
- Use Selected Target : send back to the original call point the RA/DEC and target name info selected in the target list (same thing happen if user double click on a row in the target list
[[Category:All]