Mount Setup
Color Coding
Throughout the Setup workspace, Voyager uses color to indicate the following:
- Black: A normal setting
- Gold or Yellow: Use caution when changing as things may not work well or as expected
- Red: Use extreme care when changing this setting - the wrong value can damage your equipment or the imaging session may fail
Mount Selection
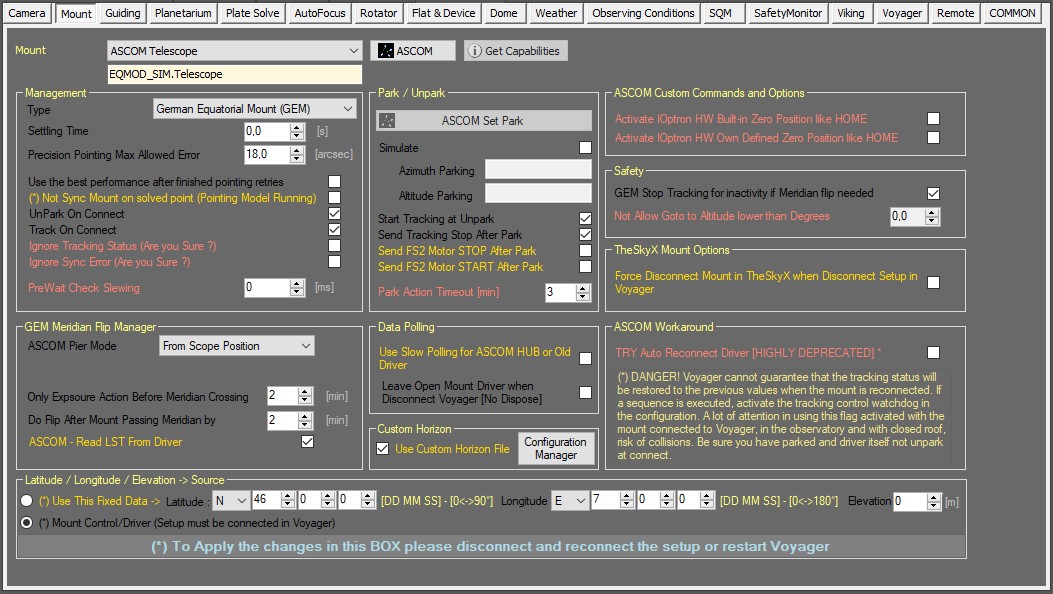
Click the Mount button in the Setup workspace to display the Mount Setup window:
- Mount: Choose the driver for your mount from this drop-down list. Options include TheSkyX, TheSky6, ASCOM, and Array Virtual Mount. Available configuration options may vary depending on the capabilities of the selected mount driver.
- ASCOM: If an ASCOM Telescope is chosen, click the ASCOM button to bring up the ASCOM chooser, and select your mount from the available choices.
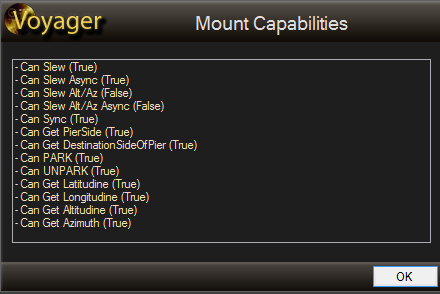
- Get Capabilities: If an ASCOM Telescope is chosen and setup is connected in Voyager, click this button retrieve the ASCOM properties of the mount to determine what is enabled or disabled
TheSkyX and Voyager
Voyager can connect to TheSkyX using its native API to control your mount. You can also connect using Paramount's ASCOM driver that controls TheSkyX, but we recommend connecting directly to take advantage of TheSkyX's native API.
If you get a connection error when attempting to connect to TheSkyX, read this Important Note:
Management
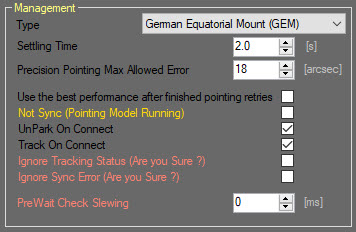
The Management panel of the Mount setup workspace contains basic configuration information about your mount:
- Type: Select from the available types, German Equatorial Mount (GEM) or Fork Mount
- Settling Time: Amount of time in seconds to wait after moving the mount before continuing with the next action
- Precision Pointing Max Allowed Error: Maximum allowed error distance in arc-seconds when performing a precision pointing action
- Use the best performance after finished pointing retries: Precision pointing will be done up to three times in an attempt to achieve an error less than the Precision Pointing Max Allowed Error. If the error is still larger than the max allowed, if this setting is not checked, precision pointing will end with an ERROR condition. If this setting is checked, the error will be accepted and precision pointing ends with an OK status.
- Not Sync (Pointing Model Running): Do not send sync commands to the mount after a precision pointing action. You may prefer this choice if your mount is maintaining its own pointing model and you do not wish to add more sync points to it. In this case, Voyager will use offsets to move the mount to fix errors found during the precision pointing operation. Some mounts that maintain their own pointing model may need you to set a flag in the mount's software to allow Voyager to add new points to the model to refine pointing precision. Consult your mount's documentation to determine if this is the case.
- UnPark on Connect: Issue an UnPark command after connecting the mount
- Track on Connect: Issue a command to begin sidereal tracking after connecting the mount
- Ignore Tracking Status (Are you Sure?): Do not take any actions (such as aborting a sequence) if the tracking status from the mount is unavailable or gives an unexpected result. For the Astro Electronic FS2 motor control system this is needed due to a lack of some basic ASCOM commands. If you have an FS2 system please read the "Important Note!" below before using this setting
- Ignore Sync Error (Are you sure?): Ignore the Sync Error during closed loop precision pointing action. This flag is dedicated to the Astro Electronic FS2 system. Voyager checks if the mount's position after Sync matches the expected value, or has too large a misalignment, in which case a red error message is displayed in the log. Normally this would cause an abort of the currently running action. You can bypass this error (at your own risk) and continue the actions. This is only for use with the Astro Electronic FS2 mount control system Please read the "Important Note!" below before using this setting
- PreWait Check Slewing: The number of milliseconds that Voyager should wait before checking via ASCOM commands to see if the mount is slewing or has finished slewing. Some ASCOM drivers do not correctly report the mount's slewing status - there is a delay between the mount starting or stopping slewing and the status reported via ASCOM. This can cause problems as Voyager will think the mount is slewing when it is not, or vice-versa. If this is the case with your ASCOM driver, you can set a prewait delay here so Voyager gets a stable reading from the ASCOM driver. The default of 0 ms means Voyager will not wait to check status.
GEM Meridian Flip Manager
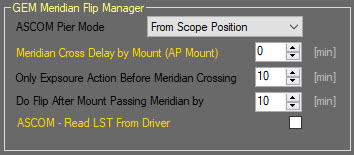
The GEM Meridian Flip Manager section of the Mount Setup workspace is where you configure information used to automatically manage meridian flips:
- ASCOM Pier Mode: Select how Voyager should determine the orientation of your mount relative to the meridian (East or West). Options are:
- From Scope Position: Determine if the mount is on the East of West side of the pier based on the current telescope RA and DEC relative to the meridian. Use this option if you control your mount via planetarium software such as TheSkyX. If you control your mount using planetarium software such as TheSkyX or TheSky6, please use the ASCOM Pier Mode "From Scope Position" and absolutely don't use the planetarium software to move the mount during a Sequence or execution of a DragScript. If you do this, you may lose the meridian flip feature in Voyager with possible damage to your setup.
- ASCOM Normal: The mount is connected via ASCOM and correctly reports East or West orientation
- ASCOM Inverted: The mount is connected via ASCOM and Voyager should invert the reported orientation - i.e., use East if the ASCOM driver reports West, and West if the driver reports East
Meridian Cross Delay by Mount (AP Mount): NO MORE AVAILABLE in the latest releases of Voyager !!!- Only Exposure Action Before Meridian Crossing: During a sequence Voyager can slew the mount (do a goto) for various purposes, such as to find a focus star or to re-target after a guiding error. This setting prevents Voyager from performing a slew (goto operation) of the mount for this number of minutes before the target crosses the meridian. Normal operation will continue, exposures and guiding will be done; but if Voyager needs to slew the mount for focusing or re-targeting, the slew will not happen and the sequence will continue to run. If an emergency goto for re-alignment is needed, Voyager puts the Sequence in standby until the mount has passed the meridian by the number of minutes designated in "Do Flip After Mount Passing Meridian By." At that time, Voyager will perform a goto to do the meridian flip and resume the sequence. This is done to avoid the critical zone around meridian flip time, and wait until the mount is at a position where a goto is sure to not trigger the meridian flip.
- Do Flip After Mount Passing Meridian by: Time in minutes to wait after the mount passes the meridian before performing the meridian flip. If an exposure is running, by default the exposure will not be terminated and this means the meridian flip will be further delayed. In the sequence setup dialog there is an optional flag to force the meridian flip a given time after the meridian is reached. If set, this will abort the exposure and start a goto and meridian flip action. Whether or not you use this flag depends on your mount and pier mechanical characteristics. Most mounts allow some minutes of tracking after the meridian without generating a pier collision.
- ASCOM - Read LST from Driver: If this box is checked, use the Local Sidereal Time reported by the ASCOM driver and not what is calculated from the PC. Usually with newer drivers, the PC and mount time are sync'd by the driver. Older mounts may not have this facility and the meridian flip time calculated by Voyager may be different from the time calculated by your mount. This can cause a damaging pier collision. If you are not sure, please check this flag, so Voyager and your mount are using the same LST.
Park/Unpark
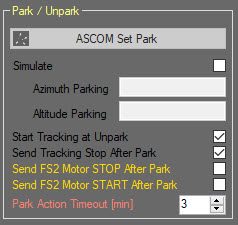
The Park/Unpark section of the Mount Setup workspace is where you can configure your mount's behavior relative to parking.
- ASCOM Set Park: If the mount is connected via ASCOM and the driver supports the Set Park function, click this button to set the parking position: Note: Unlike most of Setup, your mount must be connected for this to work. Click the ASCOM Set Park button and a window will pop up asking you to move the mount with the hand controller, or a virtual hand controller, to the desired parking position. Follow the prompts and Voyager will send the Set Park Position command to the ASCOM connected mount.
- Simulate: Check this box and Voyager will simulate a Park command whenever a Park action is performed within Voyager. The mount will be slewed to the position designated in the next two fields, Azimuth Parking and Altitude Parking
- Azimuth Parking: Azimuth position used when parking if the Simulate checkbox is checked
- Altitude Parking: Altitude position used when parking if the Simulate checkbox is checked
- Start Tracking at Unpark: If checked, start sidereal tracking after an Unpark action is performed.
- Send Tracking Stop after Park: If checked, stop tracking after a Park action is performed
- Send FS2 Motor STOP After Park: reserved to FS2 system
- Send FS2 Motor START After Park: reserved to FS2 system
- Park Action Timeout (min): If a Park action has not successfully completed after this many minutes, consider the action as having failed
Safety
The Safety section of the Mount Setup workspace is where you configure a safety feature relative to management of meridian flips:
- GEM Stop Tracking for inactivity if Meridian flip needed: if a sequence is running the meridian flip can be done by Voyager, but if you have no actions running and just Voyager connected to your equipment without your supervision a pier collison can happen if the mount is tracking. If set, this flag recognize that no actions are running in Voyager and stops the mount tracking (if tracking is on) when the mount reach the meridian crossing point for the actual position. Please check this flag for your setup safety.
- Not Allow Goto to Altitude lower than Degrees: An error will be raised and the action will stop if a command is given to slew to a position whose altitude is less than the value in the spinner control.
Data Polling
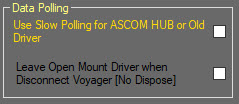
The Data Polling section of the Mount Setup workspace is where you specify behaviors regarding the connection to your mount:
- Use Slow Polling for ASCOM HUB or Old Driver: If checked, Voyager will wait longer between sending commands or status requests to the mount driver. This is helpful for some slower devices that need more time to process a command and have limited ability to buffer incoming commands
- Leave Open Mount Driver when Disconnect Voyager (No Dispose): If checked, Voyager will not force the ASCOM driver to be released if another program is using it, e.g. APCC from AstroPhysics or the ScopeDome LS controller
iOptron Home Options
If you have an iOptron mount that has a built-in Home position, either user-defined or factory-defined, you can tell Voyager to use either of those (but not both) positions when issuing a command to Home the mount:
- Activate iOptron HW Built-in Zero Position like HOME: If checked, Voyager will use the default built-in Zero position to Home the mount when the HOME button in the Command Window is clicked
- Activate iOptron HW Own Defined Zero Position like HOME: If checked, Voyager will use the user-defined Zero position to Home the mount when the HOME button in the Command Window is clicked
TheSkyX Mount Options
If you using TheSkyX like mount control you can decide if lock the disconnection of the mount in TheSkyX to the disconnection of setup in Voyager or not, depends if you have other application running connected to TheSkyX for other needed external task:
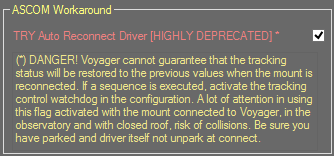
ASCOM Workaround
HIGHLY DEPRECATED: if check Voyager use this workaround to create a new ASCOM instance of the mount driver in case of Driver crash and disappear and try to reconnect the mount without abort Sequence. Actually driver of some mounts running in LAN not check for the integrity of the socket connection and in case of disconnect or failure of LAN crash at first call of methods or crash itself. Voyager already handle this event without check this flag and exit from sequence, user using DragScript can decide to reconnect and restart. For who doesn't want to stop the sequence its possible to use this flag to do an immediate restore but this is highly deprecated.
Latitude / Longitude Position Override
If your mount driver doesn't report information about Latitude and Longitude or if you want to override the driver info you can input the location latitude and longitude directly here ion Voyager. Data from mount about this 2 values will be ignored.
Custom Horizon
Manage here azimuth and altitude table data to create your custom horizon.
Viking Slew Safety Lock System integration
If you using Viking like companion of Voyager you can activate the slew safety lock system to lock mount slewing if a defined input in Viking have a defined status.
Usually this is used for not allow a slew of the mount when the roof is closed (mount position and height doesn't allow slew without colliding with the roof).

