Difference between revisions of "DragScript Examples"
| (7 intermediate revisions by the same user not shown) | |||
| Line 79: | Line 79: | ||
===Calibration FIT=== | ===Calibration FIT=== | ||
| − | The Calibration FIT that comes preloaded with Voyager has Italian block names. You can download one with English block names here: | + | The Calibration FIT that comes preloaded with Voyager has Italian block names. You can download one with English block names here: [http://www.starkeeper.it/filewiki/calibrationfit.zip CalibrationFIT.zip] |
This preloaded DragScript is an example of building a calibration library of bias frames and dark frames with three different exposure lengths, 300, 900 and 1200 seconds: | This preloaded DragScript is an example of building a calibration library of bias frames and dark frames with three different exposure lengths, 300, 900 and 1200 seconds: | ||
| Line 105: | Line 105: | ||
The second [[DragScript Examples#Preloaded Scripts|pre-loaded script]] that comes with Voyager is the "Multi-Sequence Robot." This is a shorter, simpler version of the "[[DragScript Examples#All Night Imaging|All Night Imaging]]" script documented below. | The second [[DragScript Examples#Preloaded Scripts|pre-loaded script]] that comes with Voyager is the "Multi-Sequence Robot." This is a shorter, simpler version of the "[[DragScript Examples#All Night Imaging|All Night Imaging]]" script documented below. | ||
| − | The version that currently ships with Voyager is commented in Italian. You can download a version with English comments here: [ | + | The version that currently ships with Voyager is commented in Italian. You can download a version with English comments here: [http://www.starkeeper.it/filewiki/Multi-Sequence-Robot-English.zip MultiSequenceRobot.zip] |
This script demonstrates waiting until astronomical night, blind solving the mount's position, running two sequences, and shutting down. | This script demonstrates waiting until astronomical night, blind solving the mount's position, running two sequences, and shutting down. | ||
| Line 142: | Line 142: | ||
| − | Here's the full script, which you can also download here: [ | + | Here's the full script, which you can also download here: [https://www.starkeeper.it/filewiki/Multi-Sequence-Robot-English.zip Multi-Sequence-Robot-English.zip] |
[[File:Multi-sequence-robot.png]]<br /> | [[File:Multi-sequence-robot.png]]<br /> | ||
| Line 155: | Line 155: | ||
You could also just build a script using the parts of this script that are relevant to your situation and goals. | You could also just build a script using the parts of this script that are relevant to your situation and goals. | ||
| − | '''You can download the sample script here and edit it to suit your purposes''': [ | + | '''You can download the sample script here and edit it to suit your purposes''': [https://www.starkeeper.it/filewiki/starttoshutdown.zip StartToShutDown.zip] |
We will look at the script in sections as it is rather long, primarily because we have seven nearly identical sections to run up to seven sequences in a single night | We will look at the script in sections as it is rather long, primarily because we have seven nearly identical sections to run up to seven sequences in a single night | ||
| Line 239: | Line 239: | ||
===Full Script=== | ===Full Script=== | ||
| − | For reference, here is the full script, which you can download from: | + | For reference, here is the full script, which you can download from: [https://www.starkeeper.it/filewiki/StartToShutdown.zip StartToShutdown.zip] |
| + | |||
| + | |||
[[File:Sts-full-script.png]] | [[File:Sts-full-script.png]] | ||
| + | |||
| + | |||
| + | ==Perpetual Script H24/7Days== | ||
| + | This DragScript is rather extensive and designed to automate your Observatory day after day, you will need only to manage the Sequences to run. | ||
| + | |||
| + | Emergency Suspend, Resume and Exit events are handled. It is assumed that a weather monitoring device is attached and [[Weather Setup]] has been filled out. | ||
| + | |||
| + | Signals from the weather monitoring device trigger the Emergency Events. The [[Weather Setup]] window gives complete control over which weather conditions cause which events. | ||
| + | |||
| + | You could also just build a script using the parts of this script that are relevant to your situation and goals. | ||
| + | |||
| + | A Wait Safe is called to wait for night and safe conditions, after an atomic operation to prepare observatory to run, events will be enabled and the sequence started. | ||
| + | |||
| + | At finish of night there is also a call to skyflat sna if all work fine a restart from begin of the dragscript will return to wait safe for the next coming night. | ||
| + | |||
| + | A call to VIking for I/O cards are used to check mount/parking/roof status. | ||
| + | |||
| + | Customize the script in the way that match your observatory HW/SW. | ||
| + | |||
| + | '''You can download the sample script here and edit it to suit your purposes''': [https://www.starkeeper.it/filewiki/perpetualscript.zip PerpetualScript.zip] | ||
[[Category:DragScript]] | [[Category:DragScript]] | ||
Latest revision as of 20:45, 6 August 2022
Sample DragScripts
DragScript can be used to automate your imaging from startup to shutdown.
It can also be used to automate a single exposure, or image sequences of one or more targets.
It offers great flexibility, which is powerful, but can leave you wondering where to start.
We will post some sample DragScripts here, with comments, to help "prime the pump" of ideas on how to leverage this tool.
We have opened a dedicated section in our forum dedicated to Sample Dragscripts:
https://forum.starkeeper.it/t/please-post-here-your-dragscript/1243
We welcome your contributions to expand this library for the community.
Simple DragScripts
Here are a couple of simple DragScripts to get you started.
Multiple Targets
Multitargeting is very easy with a simple Voyager DragScript. You don't need a huge script, just a few lines, no code to write. Just drag and drop as many Sequence actions as you need from Session node of the DragScript Editor Elements window and drop them on the Script block:
1   - 	Start: Events At Start are ENABLE
2   - 	Script
3   - 		Sequence: Start 21:30:00 [hh:mm:ss] - End 01:10:00 [hh:mm:ss] - C:\Users\leonardo\Documents\Voyager\ConfigSequence\M100L.s2q
4   - 		Sequence: Start 01:10:00 [hh:mm:ss] - End 03:45:00 [hh:mm:ss] - C:\Users\leonardo\Documents\Voyager\ConfigSequence\LBN438_Col.s2q
5   - 		Sequence: Start 03:45:00 [hh:mm:ss] - End 05:50:00 [hh:mm:ss] - C:\Users\leonardo\Documents\Voyager\ConfigSequence\NGC2170_L.s2q
6   - 	End
7   - 	Events
Double click each Sequence action and set the start and end times or altitudes. Then load the script into Voyager's DragScript tab and run it.
Multiple Targets with Slot Time and Error Management
Now let's add slot time and error management to our Multiple Targets script.
With a couple of additions, our DragScript will retry a Sequence until a time we specify if there are any errors (e.g. Guiding fails) encountered during the running of that Sequence.
- Drag and drop to add a Block element before each Sequence action. Give each Block a unique name - just double-click the block and type your name into the window that pops up. We use TARGET A, TARGET B and TARGET C.
- After each Sequence action, we add a test IF OK. This tests the results of the Sequence, and executes the actions indented under that IF OK statement if the Sequence ended with OK.
- Drag a Goto Block action onto each OK statement. Double-click the Goto Block action and set the target of the Goto to be the block label of the next block.
- Drag a Repeat Current Block Until Time action onto each Block. Set the time to the latest time at which you want the Sequence to run.
1   - 	Start: Events At Start are ENABLE
2   - 	Script
3   - 		Block: TARGET A
4   - 			Sequence: Start 21:30:00 [hh:mm:ss] - End 01:10:00 [hh:mm:ss] - C:\Users\leonardo\Documents\Voyager\ConfigSequence\M100L.s2q
5   - 				IF OK
6   - 					Goto Block: TARGET B
7   - 			Repeat Current Block Until Time: 01:10:00
8   - 		Block: TARGET B
9   - 			Sequence: Start 01:10:00 [hh:mm:ss] - End 03:45:00 [hh:mm:ss] - C:\Users\leonardo\Documents\Voyager\ConfigSequence\LBN438_Col.s2q
10  - 				IF OK
11  - 					Goto Block: TARGET C
12  - 			Repeat Current Block Until Time: 03:45:00
13  - 		Block: TARGET C
14  - 			Sequence: Start 03:45:00 [hh:mm:ss] - End 05:50:00 [hh:mm:ss] - C:\Users\leonardo\Documents\Voyager\ConfigSequence\NGC2170_L.s2q
15  - 				IF OK
16  - 					Goto End
17  - 			Repeat Current Block Until Time: 05:50:00
18  - 	End
19  - 	Events
Error Management is useful if you have trouble with setup or passing clouds and you don't have a weather system, or similar problems. Voyager will restart the sequence for you until the time you asked. Usually the best practice is to set the repeat until time equal to the Sequence finish time.
Other nights just change the target and timing if needed, and use Save As to save the DragScript with a new name.
Best practice is to add your opening night and closing night blocks. You can use the precompiled “Multi Sequence Robot” script built into the editor as a reference.
And remember, with your Voyager license you have a built-in help call with the developer to guide you in creating your first DragScripts.
Preloaded Scripts
Voyager includes two scripts that can be accessed from the command bar:
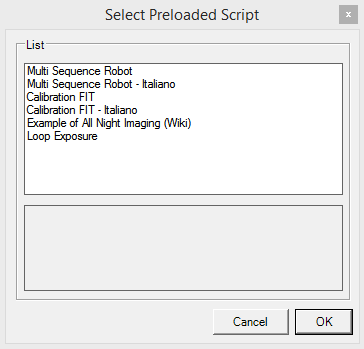
Click the icon that looks like three blocks to bring up the Select Preloaded Script menu:
Let's first examine the Calibration FIT script, which is a short script to take calibration frames.
Calibration FIT
The Calibration FIT that comes preloaded with Voyager has Italian block names. You can download one with English block names here: CalibrationFIT.zip
This preloaded DragScript is an example of building a calibration library of bias frames and dark frames with three different exposure lengths, 300, 900 and 1200 seconds:
- Every script includes a Start, Script, End and Events element. In this script, Events are enabled in the Start element. However, note that the Events element at the last line is empty. This means that even though events are enabled, they are not handled. The All Night Imaging script below includes examples of handling events. The first block inside the Script tag is labeled CALIBRATION FITS. In your example script, the names may be in Italian. You can double click the Block tag in the editor and change them to match the English ones here, or leave them as-is. Block names, like CALIBRATION FITS, can be the target of Goto and Resume statements. Control flows to the block named in those statements.
- Blocks can be nested, as you see here. The CALIBRATION FITS block contains two inner blocks, labelled COOLDOWN and EXPOSURE. Inside the EXPOSURE block, there are four more blocks labelled BIAS, DARK 300s, DARK 900s, and DARK 1200s. The COOLDOWN block contains a Cool Down statement, which will use the camera's built-in firmware to cool the camera to -25C. It will use Sync cooling, meaning that control will not proceed from this statement until the camera reaches -25C, or an ERROR or TIMEOUT status is raised. If the Cool Down statement completes with an OK status, the Goto Block: EXPOSURE transfers control to that block. Otherwise, control flows to the Repeat Block statement, which tries the cool down again, up to three times total
- The EXPOSURE bock is where the calibration frames are taken. Each of the four inner blocks contains one Expose statement. The information in each Expose statement tells us which filter was chosen, the exposure length in seconds, the binning level, the frame size, the frame type (Bias or Dark), and the filename The last statement in the EXPOSURE block says to Repeat Current Block Until Time 06:00:00. The line drawn upwards from the Repeat statement ties into the Block: EXPOSURE statement, so you can tell that the EXPOSURE block is the one that will be repeated. Each Expose statement takes a single frame, and the series of four exposures will be repeated until 6AM local time.
- The last block, WARMUP, completes the script with a warm-up of the camera
Loop Exposure
The Loop Exposure that comes with Voyager take a series of exposure in a loop with an interval of 1 second between each (plus time to download and save it on disk).
Coming with a default of 2s in bin2 half frame, user can modify this setting and the interval time to his needed.
Number or repeats on loop are 200, always customizable.
Used with a small framing ROI and fast mode can be useful for doing manual focus togheter with the Voyager FIT Viewer service and focuser command widget commands
Multi-Sequence Robot
The second pre-loaded script that comes with Voyager is the "Multi-Sequence Robot." This is a shorter, simpler version of the "All Night Imaging" script documented below.
The version that currently ships with Voyager is commented in Italian. You can download a version with English comments here: MultiSequenceRobot.zip
This script demonstrates waiting until astronomical night, blind solving the mount's position, running two sequences, and shutting down.
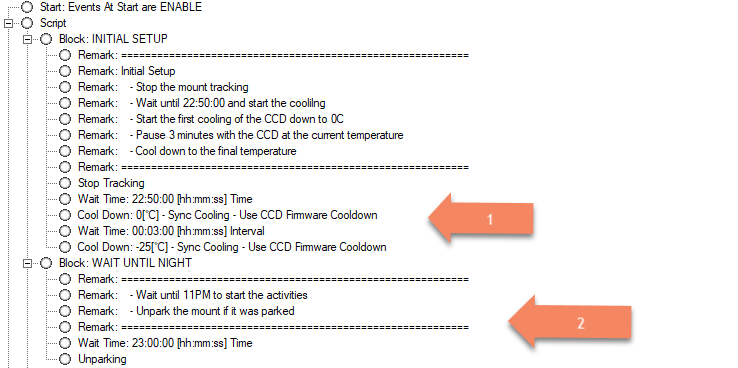
Initial Setup and Wait Until Night
- Stop the mount from tracking. Wait until 22:50 local time, then start cooling the CCD camera. Do the cooling in two steps - first to 0C, wait 3 minutes, and then continue cooling to -25C. The 3 minute pause is to prevent frost forming from too rapid cooling.
- Wait until 23:00 local time and unpark the mount
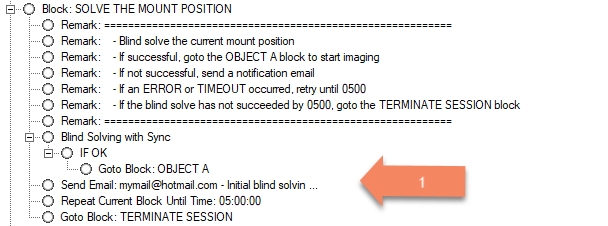
Solve the Mount Position
- Perform a Blind Solve operation with Sync - if the mount has been star-aligned and not moved since that time, this should establish the initial mount position so subsequent goto's work better. If the Blind Solve is successful, jump to the OBJECT A block to begin imaging. If the Blind Solve ends with an ERROR or TIMEOUT, try again. The Repeat Current Block statement will keep trying to blind solve until 0500 local time. This could help if, e.g., it was not dark enough for a good Blind Solve, or the view was temporarily obscured by clouds. If the operation has still not succeeded at 0500, goto the Terminate Session block
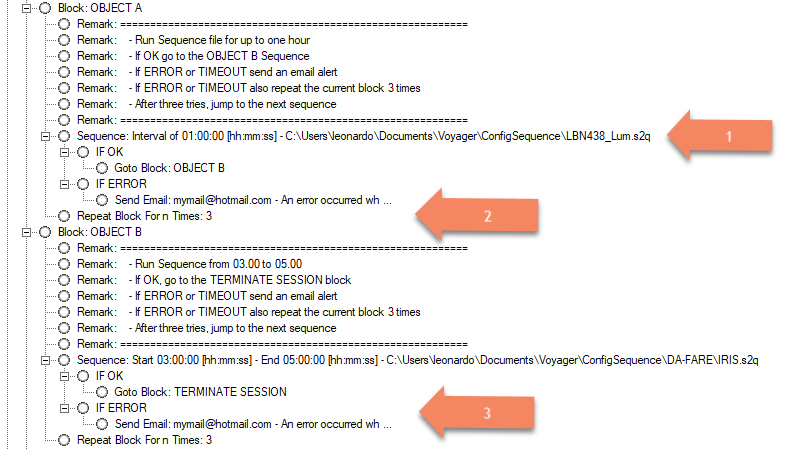
Run the Imaging Sequences
- Run the imaging sequence file LBN438_Lum.s2q. The sequence was defined and saved with the OnTheFly Sequence Configuration window. Start running the sequence immediately, and end it after one hour has elapsed. To change the start and end times and other options for running the sequence, double-click the Sequence: command in the DragScript editor and adjust the parameters, which are documented in the DragScript Actions section
- If the sequence completes successfully, jump to the OBJECT B block to start imaging our second object. If there is an error or timeout, send an email notification and try again, up to three times. Note that since we set a one hour interval for this sequence, it could run up to three hours if the ERROR or TIMEOUT occurs near the end of the one hour interval. Use an absolute end time if you want to make sure the sequence does not run past a given time
- The OBJECT B block follows very similar logic to OBJECT A, but with absolute start and end times of 03:00 and 05:00 specified. If this block is entered before 03:00, execution will pause until 03:00 is reached. If the block is entered after 05:00, the sequence will not be executed
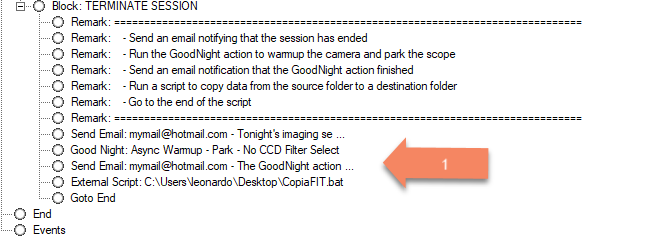
Terminate Session
- Send an email notification the the imaging session completed. Run the GoodNight action to warmup the camera and park the mount. Finally, run a script to copy the images taken in this session to a remote folder.
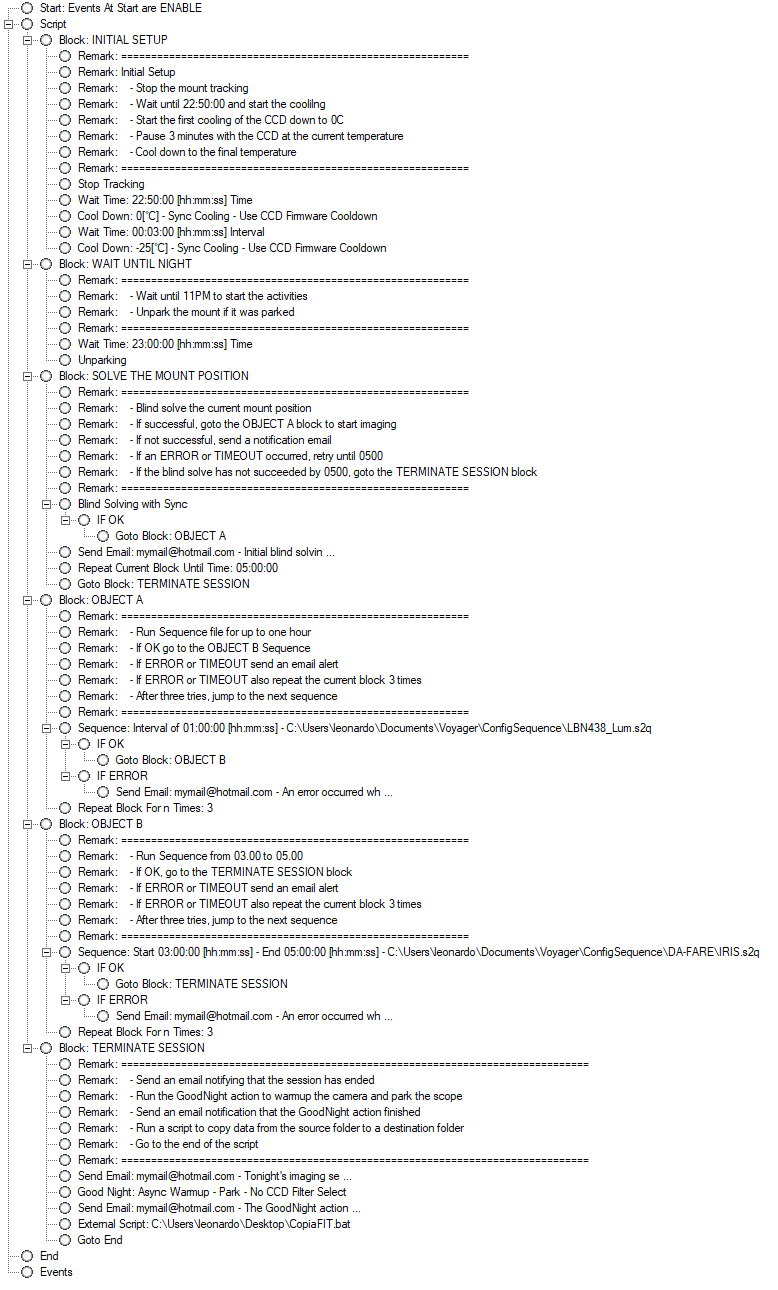
That's it! At a minimum, you will need to edit the Send Email actions to use your email address and SMTP server information, and edit the Sequence actions to load the sequences for the images you want to take. It's also likely that you will want to edit the start and stop times throughout the script.
Here's the full script, which you can also download here: Multi-Sequence-Robot-English.zip
All Night Imaging
This DragScript is rather extensive and designed to automate your imaging from startup to shutdown, including running from one to seven image-taking sequences.
Emergency Suspend, Resume and Exit events are handled. It is assumed that a weather monitoring device is attached and Weather Setup has been filled out.
Signals from the weather monitoring device trigger the Emergency Events. The Weather Setup window gives complete control over which weather conditions cause which events.
You could also just build a script using the parts of this script that are relevant to your situation and goals.
You can download the sample script here and edit it to suit your purposes: StartToShutDown.zip
We will look at the script in sections as it is rather long, primarily because we have seven nearly identical sections to run up to seven sequences in a single night
Connect Setup and Cool the Camera
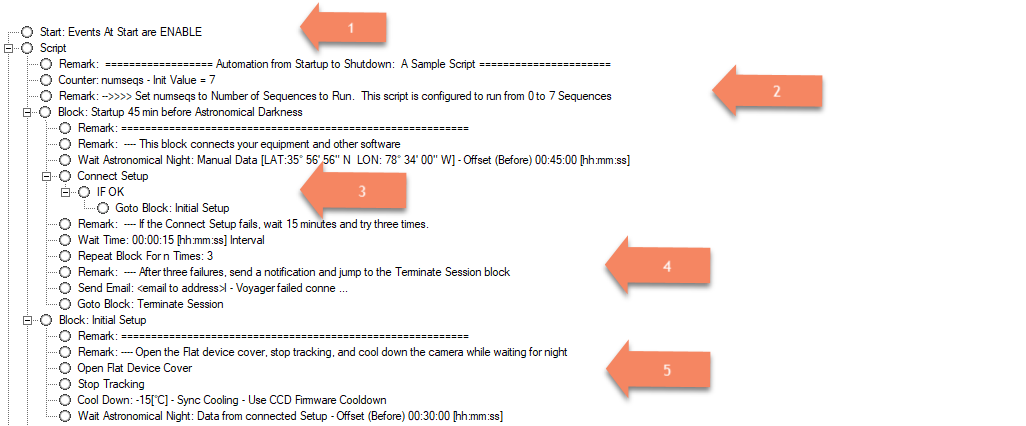
- At the start of the script we make sure Emergency Events are enabled
- We use a Counter variable to control how many of the seven sequence blocks defined in this script will execute. Edit the Counter block to the number of sequences you want to run with this DragScript.
- Wait until 45 minutes before Astronomical Night and then connect the setup. If the connect action was OK, jump to the Initial Setup block. If it failed or timed out, fall through to the Wait Time 00:00:15 action. Wait 15 seconds and then try to connect again.
- If this fails three times, send an email notification and jump to the Terminate Session block
- The Initial Setup block has actions to open our Flip Flat device, which covers the scope when it is closed, stop tracking to make sure we don't track into a pier crash, and cool down the camera's sensor to -15C. Then wait until 30 minutes before Astronomical Night to proceed to the next block
Blind Solve and Sync
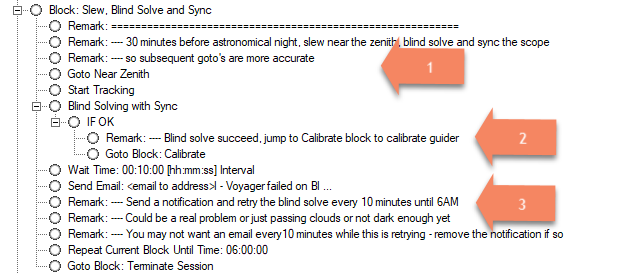
- Slew the mount to position overhead with a Goto Near Zenith action. Start the mount tracking and perform a Blind Solve with Sync action.
- If OK, jump to the next block where we calibrate the guider. If not, wait 10 minutes and try again.
- Keep trying all night. This example sends a notification every time this fails, which would be a lot of notifications if it went on for hours, so you may choose a different strategy here such as leaving out the notification or giving up sooner. If we are still trying at 6AM, give up and jump to the Terminate Session block.
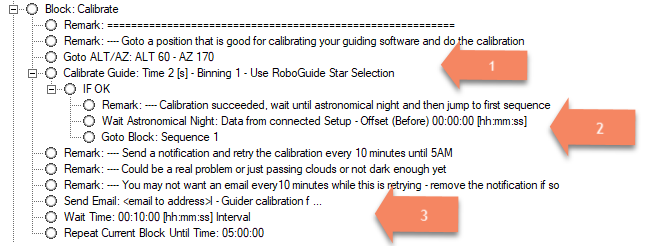
Calibrate Guider
- Slew the mount to an appropriate position for your guiding software to calibrate the guider. For my latitude, this is East of the meridian and at 60 degrees. Command the guider to do the calibration
- If the calibration suceeded (IF OK), wait until Astronomical Night and then jump to the block that runs the first sequence, Sequence 1
- If the calibration failed, wait 10 minutes and try again. Keep trying until 5AM. This example sends a notification every time the calibration fails, which would be a lot of emails if it ran all night. You may choose a different notification strategy, or give up sooner and jump to the Terminate Session block after a shorter time
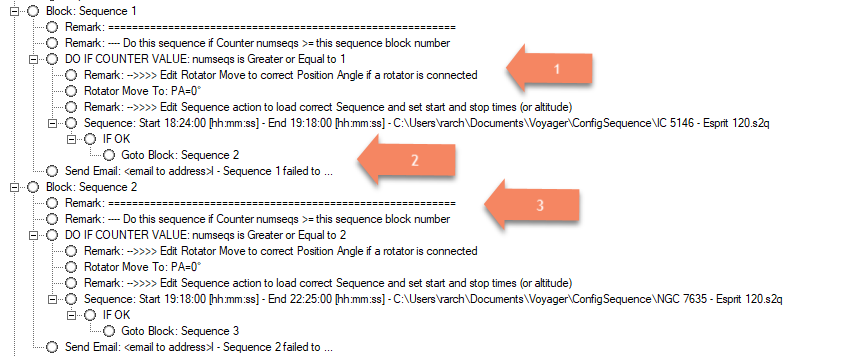
Run a Sequence
- Check the counter variable "numseqs" we set at the start of the script, which determines how many of the sequence blocks are run. If numseqs >= the number of this sequence block, proceed. We have a rotator so the first command rotates to the specified position angle for this sequence. This rotation will probably be done inside the sequence at some point in the future. You should edit the Rotator Move To command for each sequence before running the script
- Execute the sequence. If the actual time is >= the start time or <= the end time, run the sequence. You should edit the Sequence command to specify the correct sequence file and start and end times before running the script
- When the sequence finishes, if it returned OK, jump to the next sequence block. Reaching the end time results in an "OK" status. If there was an error or timeout, send a notification and then continue to the next block to try the next sequence
This same series of events and tests is repeated in this script for seven sequence blocks. I chose seven because that's typically the most targets I image in a night. You can adjust the script to have more or less to suit your own requirements.
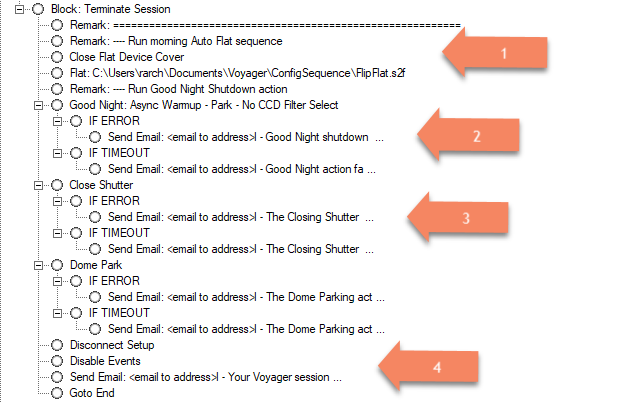
Terminate Session
- Close the flip-flat and run the dawn flat taking sequence
- Run the Good Night action to park the scope and warm the camera. Send a notification if it fails
- Close the shutter or roof and park the dome. Send a notification if either one fails
- Disconnect the equipment, disable events, and send a notification that our session completed successfully. Hooray!
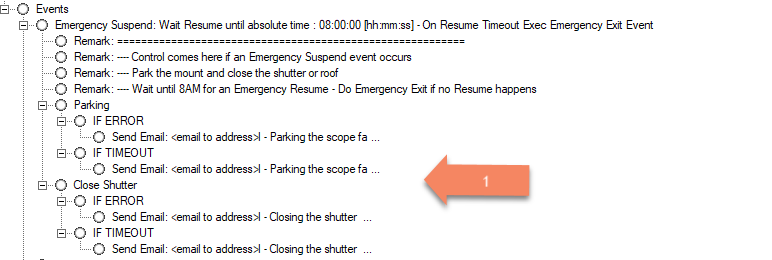
Emergency Suspend
- Control comes here when an Emergency Suspend event occurs. Park the scope and close the shutter / roof. If either action results in an error or timeout, send a notification. If you don't have an observatory, and a suspend operation is not a threat to your equipment (e.g. light cloudiness), you may decide to just stop tracking here and wait. Note
Emergency Resume
- Control comes here when an Emergency Resume event occurs. Start tracking again and then the DragScript engine will automatically jump to the spot that was executing when the Emergency Suspend event happened. For example, if a sequence was running, control will return to that sequence. If the end time of that sequence has passed since the Emergency Suspend event, execution of the sequence completes with an OK status and the next action in the DragScript is executed
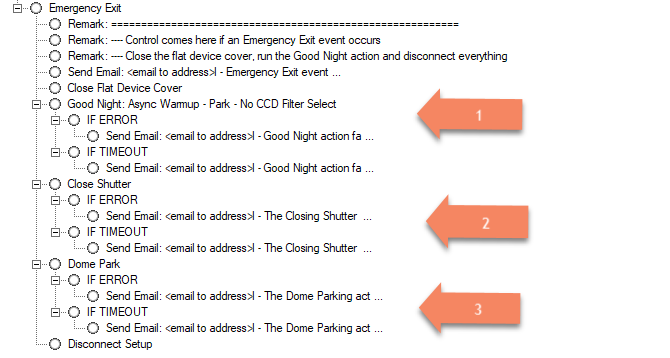
Emergency Exit
- Send a notification that we are executing an Emergency Exit event as this could be a serious issue so we want to make sure the notification goes out first. Close the flip-flat to cover the scope and run the Good NIght action to park the scope and warm up the camera
- Close the shutter or roof. If the close action fails, send a notification
- Park the dome and send a notification if the parking fails. Disconnect the equipment and software. The script implicitly ends after the last action in an Emergency Exit, you cannot do a jump to some other line of the script
Full Script
For reference, here is the full script, which you can download from: StartToShutdown.zip
Perpetual Script H24/7Days
This DragScript is rather extensive and designed to automate your Observatory day after day, you will need only to manage the Sequences to run.
Emergency Suspend, Resume and Exit events are handled. It is assumed that a weather monitoring device is attached and Weather Setup has been filled out.
Signals from the weather monitoring device trigger the Emergency Events. The Weather Setup window gives complete control over which weather conditions cause which events.
You could also just build a script using the parts of this script that are relevant to your situation and goals.
A Wait Safe is called to wait for night and safe conditions, after an atomic operation to prepare observatory to run, events will be enabled and the sequence started.
At finish of night there is also a call to skyflat sna if all work fine a restart from begin of the dragscript will return to wait safe for the next coming night.
A call to VIking for I/O cards are used to check mount/parking/roof status.
Customize the script in the way that match your observatory HW/SW.
You can download the sample script here and edit it to suit your purposes: PerpetualScript.zip

