Difference between revisions of "Rotator Setup"
| (13 intermediate revisions by 2 users not shown) | |||
| Line 18: | Line 18: | ||
[[File:Rotator-choice-1.jpg]] | [[File:Rotator-choice-1.jpg]] | ||
| − | *The options are None for no rotator | + | *The options are None for no rotator |
| + | *ASCOM Rotator for a rotator controlled via an ASCOM driver. | ||
| + | *RCOS TCC Rotator for RCOS hardware | ||
*Click the ASCOM button to choose the ASCOM driver for your rotator | *Click the ASCOM button to choose the ASCOM driver for your rotator | ||
| Line 24: | Line 26: | ||
==Sync Management== | ==Sync Management== | ||
| − | For sync we talk about synchronize the position angle of the rotator to the position angle | + | For sync we talk about synchronize the position angle of the rotator to the Equator position angle (or the arbitray angle). Voyager can manage Rotator Sync based on the driver capabilities: |
- (A) Driver without Sync (like ones with ASCOM Interface V2) | - (A) Driver without Sync (like ones with ASCOM Interface V2) | ||
| Line 45: | Line 47: | ||
[[File:Rotator-workaround.jpg]] | [[File:Rotator-workaround.jpg]] | ||
| − | *Wait Time After Rotator FInished Move: Check the box and enter the delay time in seconds if your rotator requires Voyager to delay the next action after the rotator move finishes. This can be helpful if your rotator returns from the "Move" command before it actually finishes the rotation, or if a delay is required after the move completes to allow vibrations to settle down. Some rotator drivers report rotation is finished before the rotator has actually stopped. This can cause elongated stars if the next exposure starts immediately | + | *'''Wait Time After Rotator FInished Move''': Check the box and enter the delay time in seconds if your rotator requires Voyager to delay the next action after the rotator move finishes. This can be helpful if your rotator returns from the "Move" command before it actually finishes the rotation, or if a delay is required after the move completes to allow vibrations to settle down. Some rotator drivers report rotation is finished before the rotator has actually stopped. This can cause elongated stars if the next exposure starts immediately |
| + | *'''Reverse:''' activate the reverse calculation of rotation, useful if during Sky PA point the calculate angle not converge to the sky PA requested. This flag can be applied if your driver support the reverse ASCOM option. Changing to this flag need to disconnect and reconnect the setup in Voyager to apply the change. | ||
| + | {{Note|In case of Reverse do not use the ASCOM Driver flag but the flag in Voyager because this flag will override the ASCOM settings flag.}} | ||
| + | |||
| + | * '''Wait Before Starting Movements Check Loop:''' if you flag this check VOyager will wait the milliseconds indicated in Interval before starting to read status of movements of the rotator from the driver. Useful for rotator having driver slow to starting catch information about the moving status. We suggest to use if you experience starting of other actions after a rotation request and the rotation is not yet finished.<br /> | ||
| + | |||
| + | == Optec Perseus Facility == | ||
| + | This box allow you to select the ASCOM driver to manage the Optec Perseus system (multi camera selector): | ||
| + | |||
| + | [[File:Optecset.png]] | ||
| + | |||
| + | |||
| + | == RCOS Rotator == | ||
| + | RCOS rotator driver is not a real ASCOM driver but a COM interface with same named methods and properties. | ||
| + | |||
| + | Please be sure to use the version 1.5.26 of RCOS Telescope Command Center to allow Voyager to connect and manage the rotator. | ||
| + | |||
| + | |||
| + | [[File:Immagineefefef.png]] | ||
| + | |||
| + | |||
| + | Press the ASCOM button to select the driver to use. You must have installed the Optec Persesus Driver. | ||
| − | |||
==Other Setup Pages== | ==Other Setup Pages== | ||
<categorytree mode="pages" depth="1">Setup</categorytree> | <categorytree mode="pages" depth="1">Setup</categorytree> | ||
| − | + | ||
[[Category:Setup]] | [[Category:Setup]] | ||
[[Category:All]] | [[Category:All]] | ||
[[Category:Manual|Hg]] | [[Category:Manual|Hg]] | ||
Latest revision as of 17:54, 9 January 2024
Color Coding
Throughout the Setup workspace, Voyager uses color to indicate the following:
- Black: A normal setting
- Gold or Yellow: Use caution when changing as things may not work well or as expected
- Red: Use extreme care when changing this setting - the wrong value can damage your equipment or the imaging session may fail
Rotator Setup Workspace
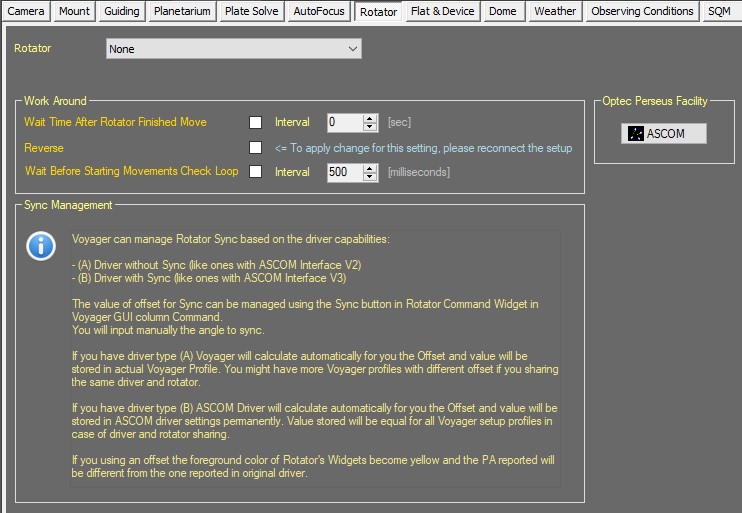
Click the Rotator button in the Setup workspace to display the Rotator Setup window:
Rotator Choice
Select your rotator from the drop-down list at the top of the Rotator Setup window:
- The options are None for no rotator
- ASCOM Rotator for a rotator controlled via an ASCOM driver.
- RCOS TCC Rotator for RCOS hardware
- Click the ASCOM button to choose the ASCOM driver for your rotator
Sync Management
For sync we talk about synchronize the position angle of the rotator to the Equator position angle (or the arbitray angle). Voyager can manage Rotator Sync based on the driver capabilities:
- (A) Driver without Sync (like ones with ASCOM Interface V2)
- (B) Driver with Sync (like ones with ASCOM Interface V3)
The value of offset for Sync can be managed using the Sync button in Rotator Command Widget in Voyager GUI column Command.
You will input manually the angle to sync.
If you have driver type (A) Voyager will calculate automatically for you the Offset and value will be stored in actual Voyager Profile. You might have more Voyager profiles with different offset if you sharing the same driver and rotator.
If you have driver type (B) ASCOM Driver will calculate automatically for you the Offset and value will be stored in ASCOM driver settings permanently. Value stored will be equal for all Voyager setup profiles in case of driver and rotator sharing.
Rotator Workaround
The Rotator Workaround panel of the Rotator Setup workspace contains a workaround for rotators that require a delay after finishing the move and before resuming exposures:
- Wait Time After Rotator FInished Move: Check the box and enter the delay time in seconds if your rotator requires Voyager to delay the next action after the rotator move finishes. This can be helpful if your rotator returns from the "Move" command before it actually finishes the rotation, or if a delay is required after the move completes to allow vibrations to settle down. Some rotator drivers report rotation is finished before the rotator has actually stopped. This can cause elongated stars if the next exposure starts immediately
- Reverse: activate the reverse calculation of rotation, useful if during Sky PA point the calculate angle not converge to the sky PA requested. This flag can be applied if your driver support the reverse ASCOM option. Changing to this flag need to disconnect and reconnect the setup in Voyager to apply the change.
- Wait Before Starting Movements Check Loop: if you flag this check VOyager will wait the milliseconds indicated in Interval before starting to read status of movements of the rotator from the driver. Useful for rotator having driver slow to starting catch information about the moving status. We suggest to use if you experience starting of other actions after a rotation request and the rotation is not yet finished.
Optec Perseus Facility
This box allow you to select the ASCOM driver to manage the Optec Perseus system (multi camera selector):
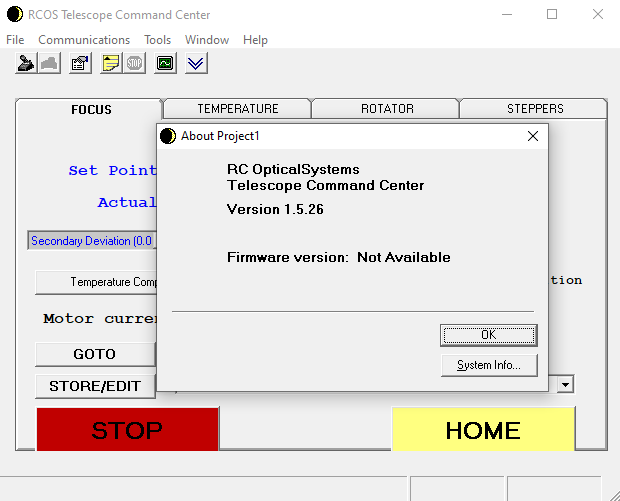
RCOS Rotator
RCOS rotator driver is not a real ASCOM driver but a COM interface with same named methods and properties.
Please be sure to use the version 1.5.26 of RCOS Telescope Command Center to allow Voyager to connect and manage the rotator.
Press the ASCOM button to select the driver to use. You must have installed the Optec Persesus Driver.


