Difference between revisions of "Guiding Setup"
| Line 36: | Line 36: | ||
{{Note|To ensure Voyager can start PHD2 process and run, you must install PHD2 in default directory (not choose different folder during PHD2 setup)}}<br> | {{Note|To ensure Voyager can start PHD2 process and run, you must install PHD2 in default directory (not choose different folder during PHD2 setup)}}<br> | ||
{{Note|if you receive a timeout error in communications with PHD2 server you can increase the timeout JSON-RPC Command time but better to understand if the server in PHD2 is enabled and running and not other kind of issues are happening. Check also in Operative System firewall to have answer yest to enable firewall rule for allow external application to connect PHD2 server (window showed first time you run PHD2 server). At last check the antivirus or Windows Defender is lock the communication to and from PHD2.)}}<br /> | {{Note|if you receive a timeout error in communications with PHD2 server you can increase the timeout JSON-RPC Command time but better to understand if the server in PHD2 is enabled and running and not other kind of issues are happening. Check also in Operative System firewall to have answer yest to enable firewall rule for allow external application to connect PHD2 server (window showed first time you run PHD2 server). At last check the antivirus or Windows Defender is lock the communication to and from PHD2.)}}<br /> | ||
| + | |||
| + | == PHD2 Profile Selection == | ||
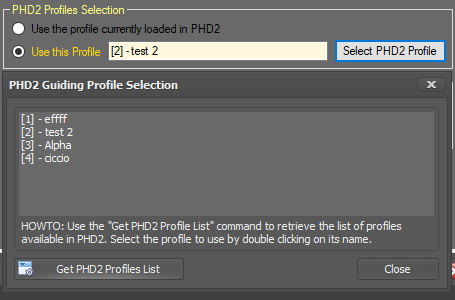
| + | In the PHD2 Profile Selection panel of the Guiding Setup workspace you can configure optional a PHD2 guiding profile, Voyager will load for you when you will connect the setup: | ||
| + | [[File:Immaginewefweg.png]] | ||
| + | |||
| + | * '''Use the profile currently loaded in PHD2''': not profile Selection in PHD2, Voyager will use the Profile of PHD2 currently loaded | ||
| + | * '''Use the profile:''' Voyager will load the profile with ID and name in the readonly text field when you will connect the Setup. | ||
| + | * '''Select PHD2 Profile''': will opened a form for select the PHD2 profile to use. The form for selection of PHD2 Profile interact with PHD2 application, so PHD2 must be opened or Voyager will try to open it for you: | ||
| + | ** '''Profile List''': list of profile when retrieved from PHD2 application in <code>[ID] - Name</code> format | ||
| + | ** '''Get PHD2 Profile List:''' Voyager will try to open PHD2 and retrieve the list of configured profiles | ||
| + | ** '''Close:''' form will be closed | ||
==Guiding Setting== | ==Guiding Setting== | ||
Revision as of 18:29, 5 April 2021
Color Coding
Throughout the Setup workspace, Voyager uses color to indicate the following:
- Black: A normal setting
- Gold or Yellow: Use caution when changing as things may not work well or as expected
- Red: Use extreme care when changing this setting - the wrong value can damage your equipment or the imaging session may fail
Guiding Setup Workspace
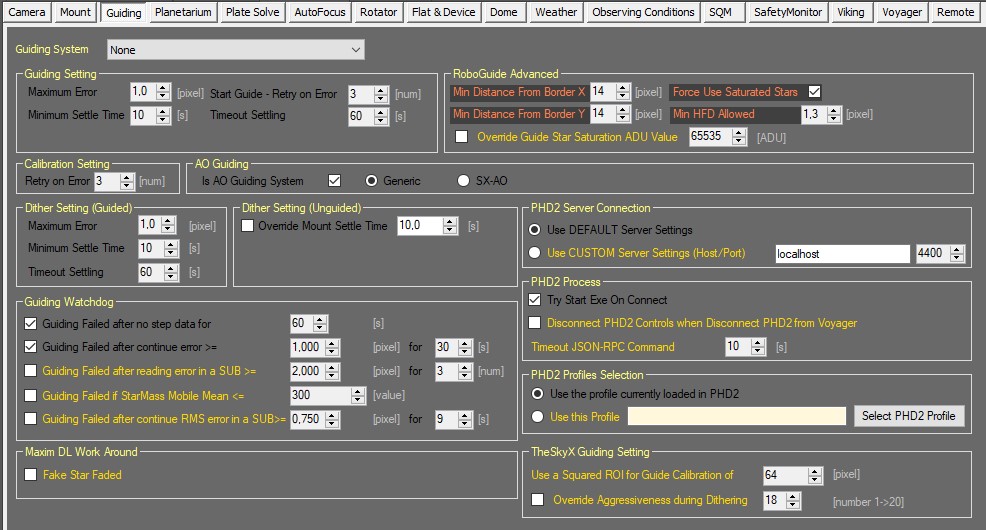
Click the Guiding button in the Setup workspace to display the Guiding Setup window:
Guiding System Selection
From the Guiding System drop-down box at the top of the screen, select your Guiding System: None, PHD2, MaximDL or TheSkyX
PHD2 Process
In the PHD2 Process panel of the Guiding Setup workspace you can configure how Voyager connects to and disconnects from PHD2:
- Try Start Exe On Connect: If checked, Voyager will try to start PHD2.exe when connecting equipment and software
- Disconnect PHD2 Controls when Disconnect PHD2 from Voyager: If checked, when Voyager disconnects from PHD2 it will first send a command to PHD2 to disconnect all gear (typically mount and guide camera)
- Timeout JSON-RPC Command: timeout for communcation answers between Voyager and PHD2 server in JSON-RPC Protocol. Voyager talk with PHD2 using this protocol and the PHD2 server. Default is 10second.
PHD2 Profile Selection
In the PHD2 Profile Selection panel of the Guiding Setup workspace you can configure optional a PHD2 guiding profile, Voyager will load for you when you will connect the setup:

- Use the profile currently loaded in PHD2: not profile Selection in PHD2, Voyager will use the Profile of PHD2 currently loaded
- Use the profile: Voyager will load the profile with ID and name in the readonly text field when you will connect the Setup.
- Select PHD2 Profile: will opened a form for select the PHD2 profile to use. The form for selection of PHD2 Profile interact with PHD2 application, so PHD2 must be opened or Voyager will try to open it for you:
- Profile List: list of profile when retrieved from PHD2 application in
[ID] - Nameformat - Get PHD2 Profile List: Voyager will try to open PHD2 and retrieve the list of configured profiles
- Close: form will be closed
- Profile List: list of profile when retrieved from PHD2 application in
Guiding Setting
The Guiding Setting panel of the Guiding Setup workspace contains some basic error, settling, retry and timeout settings:
- Maximum Error: The maximum allowable guiding error, in pixels. If the guiding error exceeds this number, a guiding error is assumed
- Minimum Settle Time: The shortest time, in seconds, to wait for the Guider to settle after starting or resuming guiding
- Start Guide - Retry on Error: The number of times to retry starting or resuming guiding. After this number of retries, guiding is considered to have failed
- Timeout Settling: The maximum time to wait, in seconds, for guiding to settle after starting or resuming guiding. After this time a guiding error is assumed
AO Guiding
The AO Guiding panel of the Guiding Setup workspace contains parameters pertaining to Adaptive Optics (AO) guiding systems
- Is AO Guiding System: If checked, the guider in this configuration is an Adaptive Optics (AO) system
- Generic / SX-AO: If "Is AO Guiding System" is checked, this radio button specified whether the AO is a Starlight Xpress (SX) or a generic system
Dither Setting
The Dither Setting panel of the Guiding Setup workspace specifies parameters for dithering. Dithering is optionally done by the guiding system between a specified number of exposures in order to shift the image center slightly so hot pixels do not appear in the same location in all your images. By dithering, when sub-exposures are stacked by your image processing software, hot pixels can be largely eliminated as statistical outliers. The amount maximum of dithering during sequence must be choosed directly in Sequence setting. The Dither Setting here is related to settling of dithering operations.
- Maximum Error: The maximum amount, in pixels, to obtain after issuing a dither command before checking if guiding has settled. A value greater than this restart the Settle Time.
- Minimum Settle Time: The shortest time, in seconds, to wait after issuing a dither command before checking if guiding has settled
- Timeout Settling: The maximum time, in seconds, to wait for guiding to settle after issuing a dither command . If guiding has not settled by this time, a guiding error will be assumed
RoboGuide Advanced
The RoboGuide Advanced panel of the Guiding Setup workspace contains configuration options for the RoboGuide guiding function:
- Min Distance From Border X: If RoboGuide is selecting a guide-star, maintain at least this distance in pixels from the X-axis borders
- Min Distance From Border Y: If RoboGuide is selecting a guide-star, maintain at least this distance in pixels from the Y-axis borders
- Force Use Saturated Stars: If this box is checked, RoboGuide will use saturated stars as guide stars. If unchecked, RoboGuide will not choose a saturated star as a guide star. This can be useful at long focal lengths where you can find only a few stars and the best is saturated
- Min HFD Allowed: If RoboGuide is selecting a guide star, use stars with HFD (Half Flux Diameter) at least this big as measured in pixels
- Override Guide Star Saturation ADU Value: If checked, use the specified ADU value to determine which stars are saturated and should not be used for guide stars. By setting this to less than the maximum ADU value of your guide camera, you can force Voyager to choose dimmer guide stars that might improve your guiding
Guiding Watchdog
The Guiding Watchdog panel of the Guiding Setup workspace specifies parameters that determine if a guiding operation has failed.
- Guiding Failed after no step data for: If checked, if the guiding system does not report any movement for the specified number of seconds, the guiding operation has failed
- Guiding Failed after continue error >=: If checked, if the guiding system reports errors of greater than or equal to the first value in pixels, for the second value of seconds, the guiding operation has failed
- Guiding Failed after reading error in a SUB >=: If checked, if the guiding system reports errors of greater than or equal to the first value in pixels, for the second value of sub-exposures, the guiding operation has failed
- Guiding Failed if StarMass Mobile Mean <=: If checked, if the guiding system reports that the StarMass's moving average is less than or equal to this value, the guiding operation has failed
- Guiding Failed after continue RMS error in a SUB >=: If checked, if the guiding system reports RMS errors of greater than or equal to the first value in pixels, for the second value of seconds, the guiding operation has failed
Choosing Guiding Watchdog values that are correct for your configuration is an excellent way to monitor how your imaging session is progressing.
TheSkyX Guiding Setting
TheSkyX Guiding Setting panel of the Guiding Setup workspace contains a configuration parameter that applies if you are using TheSkyX for guiding:
- Use a Squared ROI for Guide Calibration of: When calibrating the guider and guiding using TheSkyX, tell it to use a ROI (Region of Interest) of this number of pixels squared.
- Override Aggressiveness during Dithering: If checked, use the value in the spinner box, a number between 1 and 20, to override the aggressiveness setting for dithering by TheSkyX. This was introduced to solve a problem with guided dithering using TheSkyX. See https://forum.starkeeper.it/t/voyager-daily-build-2-2-1a-for-tsx-users-changed-to-2-2-1b/918/20 for details.
MaximDL Work Around
The MaximDL Work Around panel of the Guiding Setup workspace contains configuration information if guiding is done via MaximDL:
- Fake Star Faded: Maxim shows in some versions a fake star faded message but the guide star is normally in the ROI. This is a workaround to try to avoid this message and continue guiding.


