Difference between revisions of "Main Window"
Voyager>Leonardo |
m (1 revision imported) |
Latest revision as of 17:27, 11 October 2020
Main Window Areas
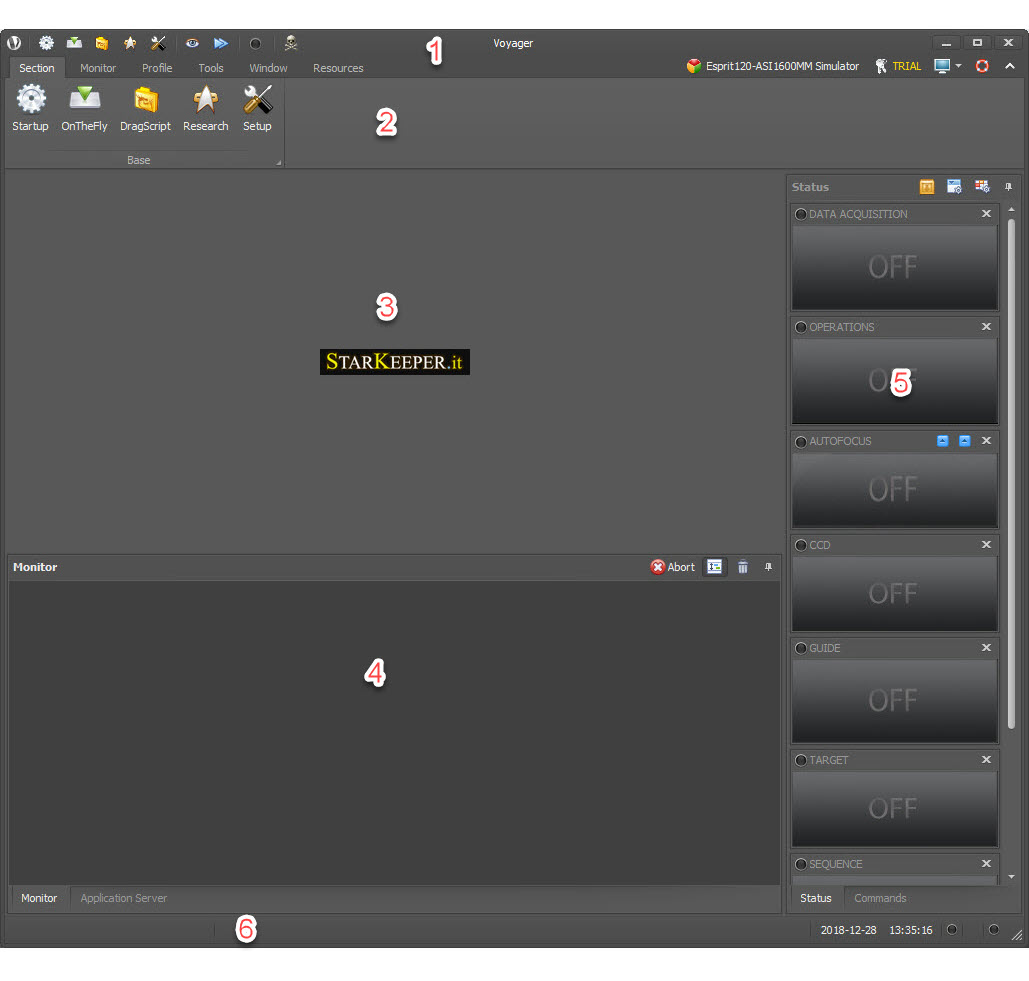
When you start Voyager, the main window appears (this one has a profile already loaded - yours won't show the "Esprit-ASI1600MM-Simulator" text that mine is showing):
There are six main areas in the main window
- Command Bar: Directly open the most frequently used workspaces
- Main Menu Ribbon: Voyager's main menu
- Workspace: Setup, Startup, OnTheFly, DragScript and Research windows
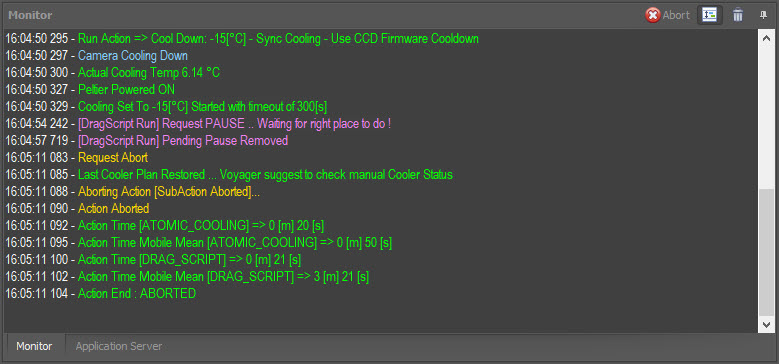
- Monitor: A running time-stamped, color-coded log of Voyager's actions and status information
- Status: The Status Window and Command Window widgets
- Status Bar: Status and version number for connected equipment and software
Window Arrangement
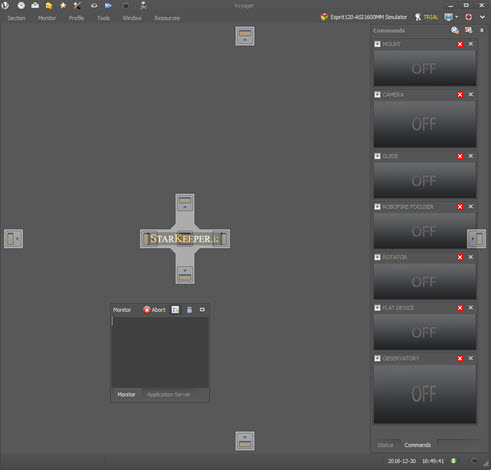
Voyager's windows can be re-arranged to suit your taste. Click on the title bar of a window and start to drag it, and the window location chooser overlay appears:
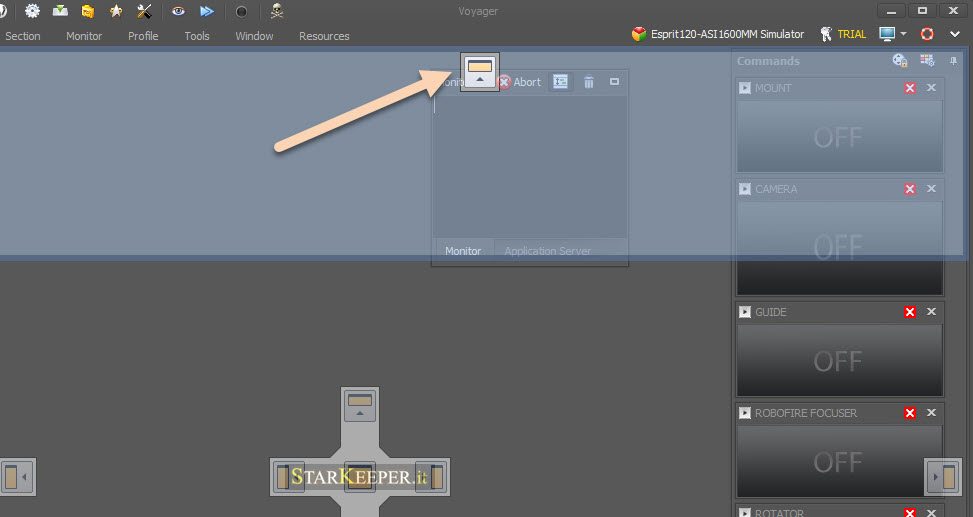
Continuing to hold the left mouse button down, drag the window over any of the "new location" icons, as indicated by the arrow in the screen capture below. A blue shadow region will appear, showing the new location of the window. Release the mouse button to place the window in its new location.
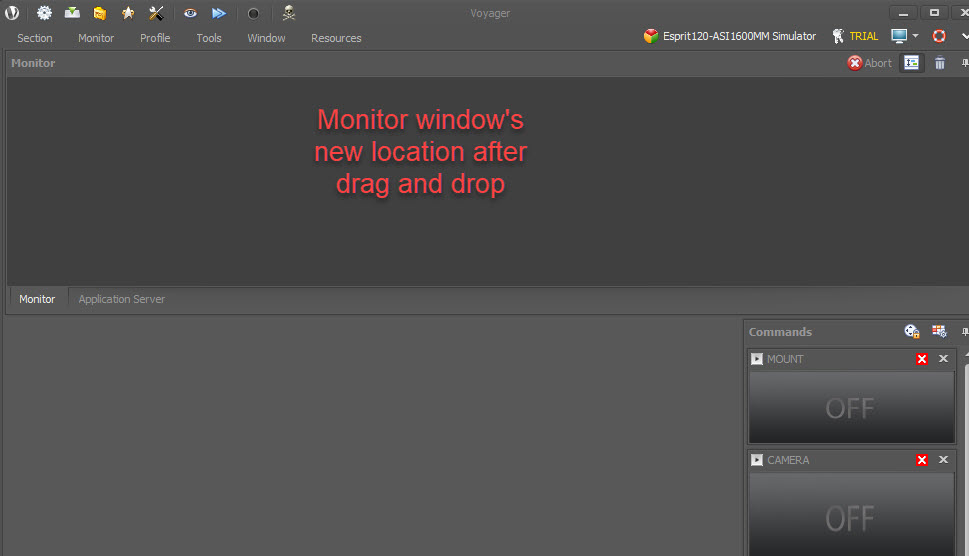
Release the mouse button in this example, and this is the new position of the Monitor window:
To return the default window configuration, click Window in the Main Menu and then click the Reset Layout button:
Main Menu
The Main Menu uses the modern Windows "Ribbon" style. There are six main ribbons - we will cover each one in detail next:
Section
- Section: Select the Startup, OnTheFly, DragScript, Research or Mosaic and Setup workspaces
- Startup: Connect to your equipment and other software - you have to define a profile first
- OnTheFly: Issue commands in real time to do things such as take a picture, perform autofocus, or plate solve an image
- DragScript: Load, run or stop a script to automate your session
- Research & Survey or Mosaic: Load, run or stop a script to perform deep sky mosaic (also create with Voyager VirtualFOV facilities), research and survey sequences, e.g. to look for exoplanets, supernovae or asteroids
- Setup: Define a profile - equipment, software and parameters of your imaging system
- Custom Array Observatory: Issue commands and load run or stop session for the Custom Array of telescope managed by Voyager in Master-Slave mode (up to 4 telescopes)
When you click on any of these icons, a tab will be created below the ribbon containing that workspace. You can have multiple tabs active and click between them to make changes in each workspace. For example, you may change the definition of a sequence in the OnTheFly workspace, then execute a DragScript that runs that sequence in the DragScript workspace.
Monitor
- Monitor: Monitor and control a running Sequence or DragScript
- This area will be greyed out when you start Voyager. Once you have connected your equipment in the Startup section, and are executing a Sequence or DragScript, most of the controls in the button will be active.
- Abort: Immediately stop the running DragScript or OnTheFly action
- Pause: Pause the running DragScript or Sequence - this requests a pause, and Voyager will execute the Pause when it is safe to do so. For example, it may wait until the camera cooling cycle is complete before pausing.
- Remove Pause: Remove a request to pause - if you request a pause that can't be performed immediately, you can remove your request here
- Resume: Continue a Paused operation
- AutoFocus: If a running Sequence allows it, perform an Autofocus action at the next possible time with either the default filter for the Sequence or the filter selected from the drop-down.
- Reset: Remove the injected request (if there's one pending) to run an Autofocus
- HALT ALL: Immediately halt any running operation or DragScript - Emergency stop.
- Clear: Clears the contents of the Monitor window
- Font Size: Change the font size of the text in the Monitor window. Make smaller to fit more information in the visible portion of the window, or larger to make it easier to read. Click Default to return the font size to the default value.
Profile
- Profile: Load, save and clone equipment configuration profiles. Profiles are saved by default to the Profile folder as shown in Installation#Voyager_Folders
- Open: Load a saved profile and make it active - note: you must Disconnect Equipment before you can Open a new profile
- Save: Save the settings of the active profile
- Save As: Save the settings of the active profile under a new file name
- New: Create a new, empty profile
- Clone: Select an existing profile and load it under a new name
- Reset: Resets statistics kept on a per-profile basis. These statistics help Voyager determine how long on average an action takes to perform
Tools and Editor
As of Voyager 2.0.14e (daily build) and 2.1.0 (stable), you can edit sequences while actions are running. You can invoke the sequence and flat sequence editor from this menu to do this.
A running sequence will use the sequence that was defined at the time it started running. You can edit a sequence while it is running, but the changes will not take effect until you stop and restart the sequence.
- Tools: Access the Sequence and Flat Sequence Editors, DragScript editor, Meteo (Weather) simulator, calculate sequence durations and manage the wrong focus star list:
- Sequence Editor: Open the Sequence editor - note, as of Voyager 2.0.14e (daily build) and 2.1.0 (stable) you no longer need to have equipment connected to use the Sequence editor
- Flat Sequence Editor: Open the Flat Sequence editor- note, as of Voyager 2.0.14e (daily build) and 2.1.0 (stable) you no longer need to have equipment connected to use the Flat Sequence editor
- Array Sequence Editor: Open the Custom Array Sequence editor, Sequence editor dedicated to the Array System
- DragScript Editor: Open the DragScript editor
- DragScript ITA: Open the Italian language version of the DragScript editor
- Meteo Simulator: Creates a file that contains information similar to the weather status information obtained from an AAGCloudWatcher or Boltwood Clarity II weather station. Voyager can suspend, terminate or resume actions based on weather status. The Meteo simulator lets you test these actions without waiting for the real weather to change
- Web Dashboard BETA: Open the interna webpage of the web dashboard if the local Voyager webserver is configured and enabled, or open the legacy online Voyager web dashboard under Starkeeper.it website (internet connection in the last case is needed)
- FIT Viewer: Open then Voyager FIT Viewer Application (distinct application)
- RoboClip:Open the RoboClip Editor/Viewer
- Sequence Duration Calculator: load a sequence and this tool will provide an estimate of how long that sequence will take to run to completion
- Wrong Focus Stars: Click to bring up the Robofocus Wrong Focus Stars manager, where you can maintain a list of focus stars that Voyager should not use. For example, if a focus star is too bright or dim, or behind an obstruction, you may want to list it here so Voyager will not attempt to use it in the future
Multi Instance
- Multi Instance: open another Voyager instance if allowed, create a shortcut in desktop for each instance, create a shortcut in desktop for the FITViewer dedicated to the instance
- Voyager Instance:
- Start Instance#2: start Instance#2 of Voyager on the same PC
- Start Instance#3: start Instance#3 of Voyager on the same PC
- Start Instance#4: start Instance#4 of Voyager on the same PC
- Voyager Desktop ShortCut:
- Create Instance#2: create shortcut on the desktop for start the Instance#2 of Voyager on the same PC
- Create Instance#3: create shortcut on the desktop for start the Instance#3 of Voyager on the same PC
- Create Instance#4: create shortcut on the desktop for start the Instance#4 of Voyager on the same PC
- FITViewer Desktop ShortCut:
- Create Instance#2: create shortcut on the desktop for start the Instance#2 of FITViewer on the same PC
- Create Instance#3: create shortcut on the desktop for start the Instance#3 of FITViewer on the same PC
- Create Instance#4: create shortcut on the desktop for start the Instance#4 of FITViewer on the same PC
Window
- Window: Make the Voyager window stay on top, be transparent, or reset the layout
- Always OnTop on Connect: The Voyager window stays on top while equipment is being connected
- Always OnTop: The Voyager window is always on top
- Transparent: The Voyager window is transparent so you can see what's beneath it
- Reset Layout: Resets the window layout to defaults - you must close and restart Voyager for this to take effect
Resources
- Resources: Links to tutorials, help files, Voyager websites, and the Licensing Manager
- Voyager "Unofficial" Wiki: Links to this Wiki
- Online Video Tutorials: Links to video tutorials in various languages https://software.starkeeper.it/voyager-video-list/
- Help File: Loads the PDF file of the user guide in Italian
- Getting Started: Links to the Quick Start section of this Wiki
- Application Server and API Manual : PDF manual of Application Server embedded in Voyager and related API for integration with third parts applications. Some more info under NDA available.
- Voyager Forum: The forum at https://forum.starkeeper.it/
- Voyager Website: The main website for voyager at https://software.starkeeper.it/
- Voyager Facebook Page: Voyager's Facebook page at https://www.facebook.com/voyagersw
- About: The opening splash screen - includes your unique Voyager installation serial number
- Change Log: Release notes in both Italian and English
- Acknowledgements: People who have helped with development, installation, sound and testing of Voyager
- Support: if a mail client is configured on your PC this will be opened with the support mail selected, you can get support also writing directly to voyagerastro@gmail.com
- License: License file management page where you can see what type of license you have installed, if and when it expires, when your current support and update period expires, and your unique Voyager installation serial number. There are also buttons here to buy a license and install a license file.
Command Bar
At the very top of the Voyager window you will find the Command Bar:
In addition to the usual Windows controls to minimize, maximize and close the application, on the upper left you will find the Command Bar icons. By clicking these, you can directly open the most frequently used windows of the Voyager application.
- Gear icon: Startup
- Inverted green triangle on a white rectangle: OnTheFly
- Yellow folder: DragScript
- Star badge: Research & Survey
- Wrench and screwdriver: Setup
- SC Observatory Logo: Custom Array Observatory
- Eye: Status widgets
- Blue triangles: Commands
- Voyager logo blu borded: Webdashboard
- FIT Viewer Icon: FIT Viewer
- Orange label: RoboClip
- Voyager Status: Green = idle; Blue = Running
- Skull and crossbones: Halt all scripts and/or commands immediately! Emergency stop.
Monitor Window
The Monitor window is at the lower left of the main Voyager window. It displays a time-stamped, color-coded running log of actions performed by Voyager. The same log is written in a text file on disk in Installation#Voyager_Folders
Messages are color-coded as follows:
- Green: Action or status, normal operation
- Yellow: Warning - does not require user intervention but might be worth watching. Voyager will continue to operate as directed by the operator, configuration, script or sequence. Examples: 1) Operator requests that Voyager abort the running DragScript. Voyager monitor log has a yellow message indicating "Request Abort," (as seen above), and then completes the request as shown by the other monitor log messages. 2) Voyager is carrying out a pointing operation. It slews to the target and performs a plate solve. If the error is beyond the specified margin, a yellow message in the monitor log indicates this, but if the number of pointing retries has not been exceeded, Voyager will slew again based on the error and then do the plate solve operation.
- Purple: Events and/or DragScript run operations
- Red: A serious error action that will be aborted, such as a blind solve failing indicating Voyager is unable to verify where the telescope is pointing
- Cyan: Starting of a SubAction in a container Action
- Orange: Emergency events from Weather control or Viking I/O server
- Gray: Debug information with low level significance
Application Server
Voyager contains an Application Server that listens to a TCP/IP port and accepts JSON RPC commands. At this time, the protocol is not published and the Application Server is not being used in the Base commercial license. It is being used with a custom license by the SC Observatory to orchestrate imaging by an array of four scopes with remote actions. In the future this application server will be used for additional advanced features. The Application Server window provides a log of Application Server traffic when it is running.
Status Bar
There is a status bar at the bottom of the main window:
The left side of the status bar contains icons indicating the status of the connected hardware and software. Hover your mouse over an icon to get additional information about that component, including its name the software version number if available.
The icons represent your connected equipment as follows:
- Camera control
- Filter Wheel control
- Mount control
- Guiding control
- Planetarium control
- Plate solving control
- Blind solving control
- Autofocus control
- Focuser control
- Rotator control
- Flat device control
- Dome control
- Observing Conditions
- SQM
- Safety Monitor
In the example shown here, no Observing Conditions or SQM driver are connected, so those icon areas are blank.
While a script or sequence is running, messages appear in the middle of the status bar corresponding to the current operation:
Some additional information is found on the right side of the status bar. Hover your mouse over the "LED" light controls for additional status information related to those controls:
- Local date
- Local time
- Weather status
- Viking Client connection status
- Safety Monitor status: Off = not configured, Red = UnSafe, Green = Safe
- Application Server connection status
Application Server
The Application Server tab, right next to the Monitor tab, opens the application server message window. Voyager's custom licensed version contains an Application Server allowing external control of Voyager operations. This server is not currently active in the Base license version of Voyager.
