Difference between revisions of "FIT Viewer"
| Line 55: | Line 55: | ||
**'''AutoOpen Options:''' | **'''AutoOpen Options:''' | ||
***'''NOT Open Plate Solve File Created During Sequence''': If checked, images taken during a Sequence to perform plate solving are not opened in the FIT Viewer | ***'''NOT Open Plate Solve File Created During Sequence''': If checked, images taken during a Sequence to perform plate solving are not opened in the FIT Viewer | ||
| + | **'''AutoSave Options:''' | ||
***'''Save a JPG File of Last AutoOpened FIT in folder''': If checked, save the STF stretch in JPG format of the last FIT opened automatically by the Viewer. You can select the folder in which to save the JPG. The fixed name is <code>LastSTFAutoOpenImage.jpg</code> | ***'''Save a JPG File of Last AutoOpened FIT in folder''': If checked, save the STF stretch in JPG format of the last FIT opened automatically by the Viewer. You can select the folder in which to save the JPG. The fixed name is <code>LastSTFAutoOpenImage.jpg</code> | ||
| + | ****'''Save a TXT Metadata File of Last AutoOpened FIT in folder''': If checked save a TXT file with lines reporting data about some FIT Headers info | ||
| + | ****'''Save File Only if FIT name includes''': If checked save of JPG/TXT files will be filtered (only if the name fit the filter) | ||
*'''Rendering''' | *'''Rendering''' | ||
**'''High Quality Image Resize:''' Click the button to turn this option on or off. | **'''High Quality Image Resize:''' Click the button to turn this option on or off. | ||
Latest revision as of 16:19, 23 April 2022
Starting with Version 2.1.3, Voyager includes a FIT viewer that displays images after they have been downloaded from your camera.
The FIT Viewer is a native 64bit application that are able to manage all the memory and resources of you PC without 4GB limitations.
FIT Viewer Setup
The FIT Viewer is installed automatically along with Voyager. It communicates with Voyager via the Application Server inside of Voyager, so that must be enabled to use the FIT Viewer.
You only need to do this once unless you change to a new profile.
To enable the Application Server, open Voyager's Setup workspace and click the Voyager button.
If the Activate on Start box in the Application Server panel is not checked, check it, shut down Voyager, and restart Voyager.
To start the FIT Viewer, click the FIT Viewer button in the Tools and Editor ribbon menu:
The FIT Viewer runs in its own window so you can view a full size image without having to share screen space with Voyager itself.
In keeping with Voyager's "Reliability is First Priority" theme, it runs in its own process space, so you can view your images, change the screen stretch, etc., with no interference to Voyager's core job - acquiring images.
FIT Viewer Settings
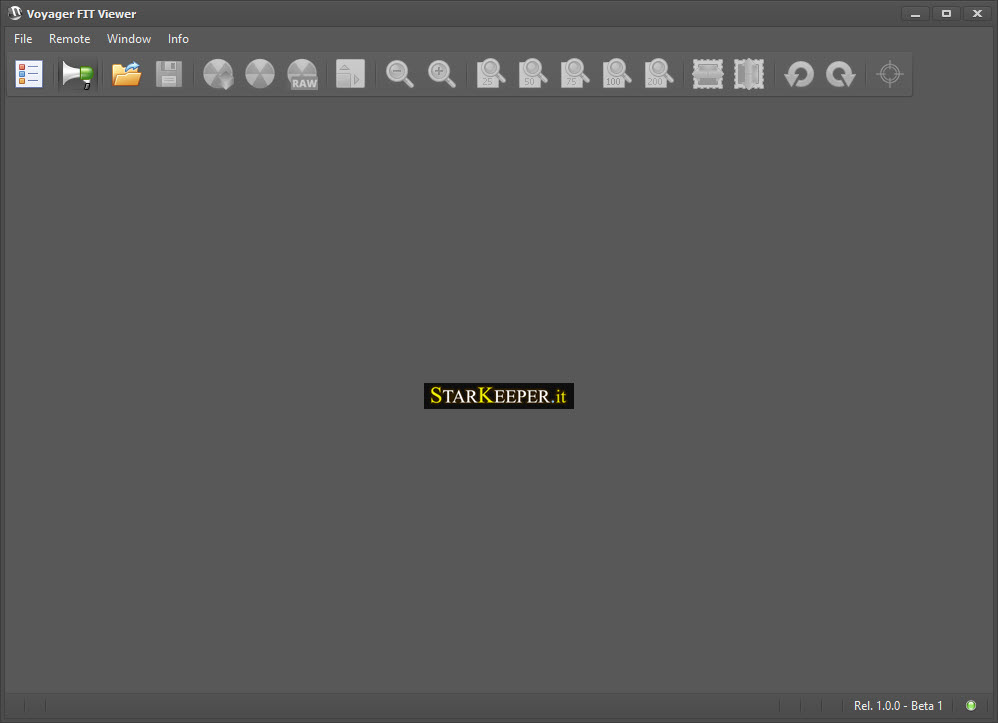
The FIT Viewer comes up in its own Window:
The FIT Viewer communicates with Voyager via port 5950 by default. The Windows firewall software may ask you to allow Voyager to communicate with the Viewer - accept this to continue.
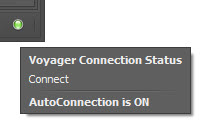
At the lower right corner you will find an "LED" that will be Green if the FIT Viewer is connected to Voyager, and Red if AutoConnect is on and the Viewer is not connected to Voyager. It is Gray if AutoConnect is off. Hover your mouse over the LED to see connection and AutoConnect status:
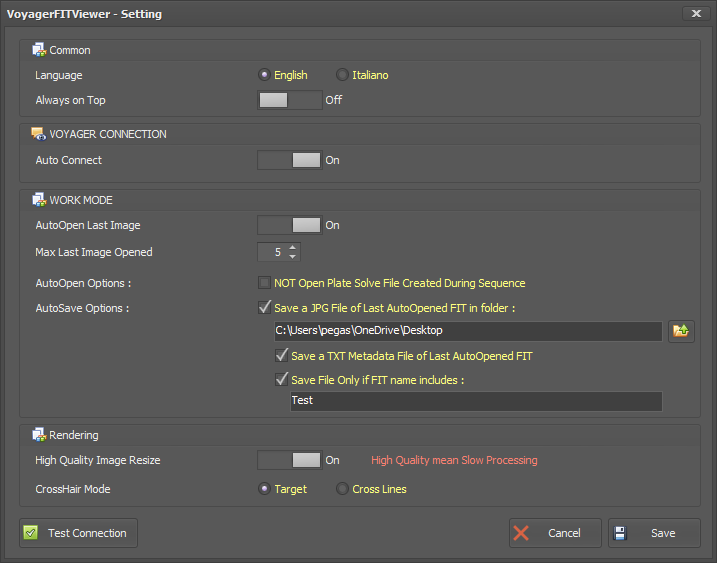
Click Settings from the File menu to examine the FIT Viewer settings panel:
- Common
- Language: Click English or Italiano to choose the interface language used by the FIT Viewer
- Always on Top: On to have the FITViewer window always on top to the other on Desktop, Off to use like a normal window overlay
- Voyager Connection - this section specifies how the FIT Viewer communicates with Voyager
- Auto Connect: Click the button to choose On, the default and recommended setting, or Off. If you choose Off here, you must manually connect to Voyager using the Remote -> Connect menu selection
- Work Mode - this section specifies how images are opened by the FIT Viewer
- AutoOpen Last Image: Click the button to choose On, the default and recommended setting, or Off
- On: The last image downloaded by Voyager from your camera is automatically displayed by the FIT Viewer
- Off: The last image downloaded by Voyager is not automatically displayed. You must open an image manually using the Folder open icon on the toolbar
- Max Last Image Opened: Specify the maximum number of images to automatically keep open in tabs in the FIT Viewer. In this example, the last five images downloaded to Voyager will be displayed in FIT Viewer tabs. The maximum number of images you can have open is limited by available memory. Astrophotography images can be rather large, so you should experiment if you want to keep more images available in tabs. You can always open images later using the folder open icon. NOTE: this only applies to images opened automatically after being downloaded to Voyager. You can open as many images manually as you wish, and you must close them manually as well.
- AutoOpen Options:
- NOT Open Plate Solve File Created During Sequence: If checked, images taken during a Sequence to perform plate solving are not opened in the FIT Viewer
- AutoSave Options:
- Save a JPG File of Last AutoOpened FIT in folder: If checked, save the STF stretch in JPG format of the last FIT opened automatically by the Viewer. You can select the folder in which to save the JPG. The fixed name is
LastSTFAutoOpenImage.jpg- Save a TXT Metadata File of Last AutoOpened FIT in folder: If checked save a TXT file with lines reporting data about some FIT Headers info
- Save File Only if FIT name includes: If checked save of JPG/TXT files will be filtered (only if the name fit the filter)
- Save a JPG File of Last AutoOpened FIT in folder: If checked, save the STF stretch in JPG format of the last FIT opened automatically by the Viewer. You can select the folder in which to save the JPG. The fixed name is
- AutoOpen Last Image: Click the button to choose On, the default and recommended setting, or Off
- Rendering
- High Quality Image Resize: Click the button to turn this option on or off.
- Off: The default and recommended setting is off. The slower, higher quality image resize is not used. We only recommend the high quality resize option if you are using the FIT Viewer to resize and save a changed image for later use
- On: A slower running, higher quality processing is used to resize images. Only recommended if you wish to save the resized image for future use
- CrossHair Mode: Click Target for circular crosshair icon or Cross Lines for a precise centering purpose crosshair icon
- High Quality Image Resize: Click the button to turn this option on or off.
- Test Connection: Click this button to test the connection to Voyager. If the connection fails, check in Voyager to make sure the Application Server is enabled, and that you have restarted Voyager since enabling it. If it still fails to connect, it is likely that your Windows or third party software firewall is blocking the connection attempt. Enabling Voyager in that software should fix the problem.
Window Arrangement
The FIT Viewer has the same controls available for rearranging the elements of the screen to suit your taste. For example, you could move the list of open files from a tab to its own separate area at the left or bottom of the screen.
See the Window Arrangement section of the Wiki to understand how to drag and drop areas of the FIT Viewer screen - it works the same way as with Voyager.
Using the FIT Viewer
With the default settings, whenever a new image is downloaded to Voyager it will be opened in the FIT Viewer. The most recent X images will be available in tabs, where X is the "Max Last Image Opened" value in the File -> Settings dialog.
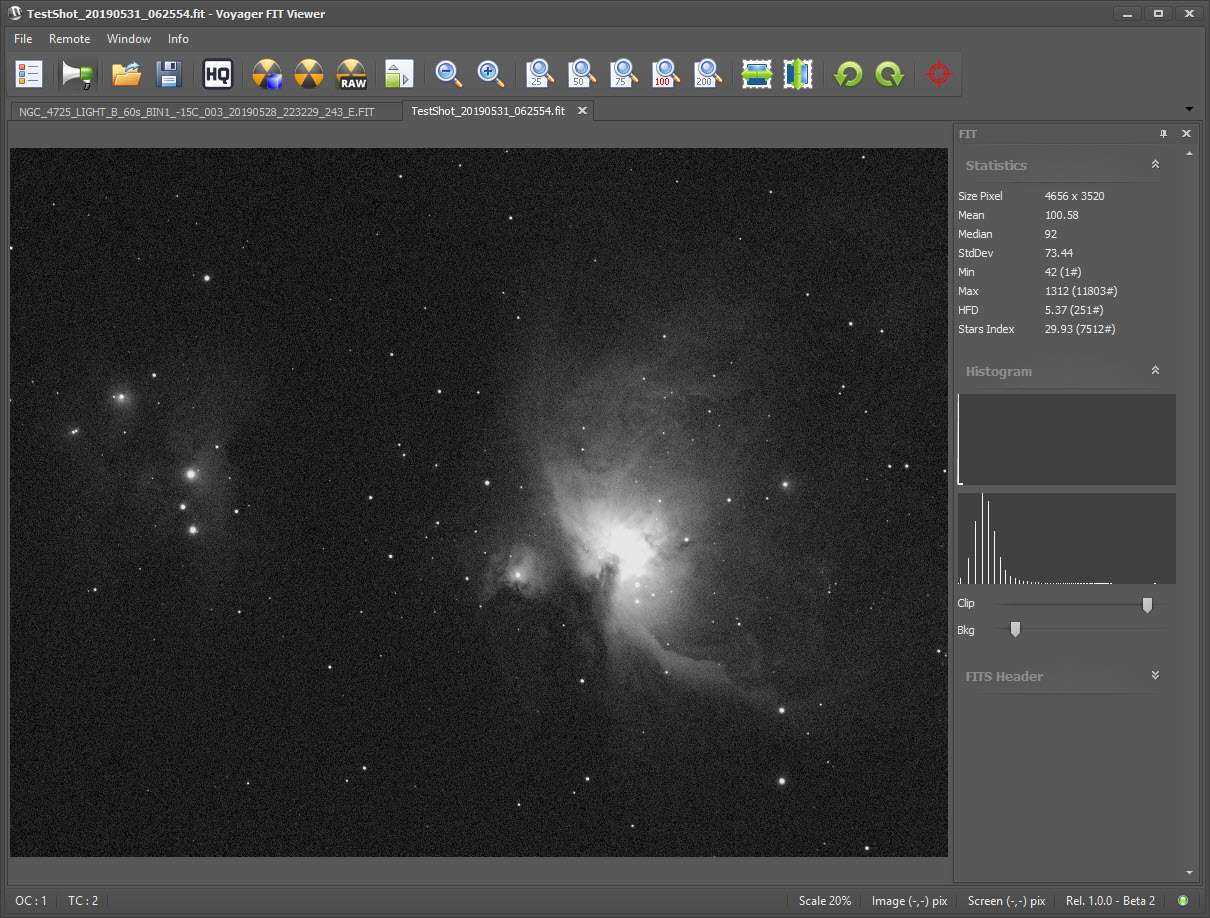
Once an image is open in the FIT Viewer, toolbar icons are un-grayed and available to manipulate the image. To the right of the image you will find Image Statistics, an image Histogram display with adjustment sliders, and a FIT Header listing.
FIT Viewer Menu
The FIT Viewer menu is near the top left of the FIT Viewer window.
It contains the following choices:
- File:
- Setting: Open the FIT Viewer Setting dialog
- Exit: Exit the FIT Viewer program
- Remote:
- AutoConnect: Select to toggle AutoConnect on or off. A checkmark is displayed next to AutoConnect if it is On. Determines whether the FIT Viewer will automatically attempt to connect to Voyager when started. If the connection cannot be made within 15 seconds, AutoConnect times out and you can use the viewer manually. This setting is On by default and that is the recommended setting for using the FIT Viewer to see images as they are downloaded to Voyager.
- Connect: If AutoConnect is Off and the FIT Viewer is not currently connected to Voyager, this option is available. Click to connect to Voyager
- Disconnect: If AutoConnect is Off and the FIT Viewer is currently connected to Voyager, this option is available. Click to disconnect from Voyager
- Window:
- Close all Windows: Close all open image tabs
- Info:
- About: Displays the Viewer version number
FIT Viewer Toolbar
The FIT Viewer Toolbar has the following controls

- Opens a tab containing a listing of the open files. Double click an entry to open that tab and view that image
- Toggles on or off the automatic downloading of files newly received by Voyager
- Open a FIT file directly from your disk
- Save a modified FIT file back to disk. Any changes made to that FIT file will be saved in the new file, so use a new filename and don't overwrite your original file unless that is your intention
- Toggle between High Quality image resize mode (slower) and fast mode. HQ mode is best for Bayered (one shot color, raw) images but turn HQ off for best performance and mono images
- Apply a screen stretch to the open FIT image using the algorithm documented for PixInsight(tm)'s default auto stretch
- Apply a screen stretch using a slightly darker background than the previous control (#5)
- Show the raw, unstretched image
- Adjust the zoom factor so the image fits the available window space
- Zoom out
- Zoom in
- Adjust the zoom factor to 25% of full size
- Adjust the zoom factor to 50% of full size
- Adjust the zoom factor to 75% of full size
- Adjust the zoom factor to 100% of full size
- Adjust the zoom factor to 200% of full size
- Flip the image horizontally
- Flip the image vertically
- Rotate the image counter-clockwise 90 degrees
- Rotate the image clockwise 90 degrees
- Place the red target icon in the middle of the image
- PixInsight is a trademark of Pleiades Astro LLC https://pixinsight.com
FIT Viewer Status Bar
At the bottom of the FIT Viewer window you will see this status bar:
- OC: The count of images opened automatically after they were downloaded by Voyager
- TC: The total count of open images included those opened automatically and opened manually
- Scale: The current zoom factor of the displayed image
- Image (-,-) pix: X,Y coordinate value of the mouse cursor relative to the image itself. Top left corner is 0,0
- Screen (-,-) pix: X,Y coordinate value of the mouse cursor relative to the displayed image window on the screen. Top left corner is 0,0
- Rel: Version number
- LED:
- Green = AutoConnect is on and FIT Viewer is connected to Voyager
- Red = AutoConnect is on and FIT Viewer is NOT connected to Voyager
- Gray = AutoConnect is off
Pan and Zooming Your Image
Mouse Wheel Zoom: In addition to the Zoom controls described in the previous section, you can change the zoom level with the mouse wheel.
Panning with the Mouse: If the image is zoomed in so less that 100% is showing, you can left click and drag with the mouse to pan the image
Zoom to a Selection with the Mouse: Right click on an image and drag to define a rectangle. The contents of that rectangle will zoom to fill the window
Zoom to Mouse Click: Double click on the image and it will center where you clicked and zoom in on that area of the image
FIT Viewer Window List
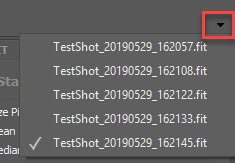
Click the small down arrow at the far right of the bar containing tabs for each open window and a list of all open tabs appears. Click the one you wish to view.
If more tabs are open than can be shown in the available space, right and left arrow icons appear. Click them to scroll through the open tabs.
FIT Viewer File List
![]() Click the icon on the far left of the toolbar to open a tab with the list of open image files
Click the icon on the far left of the toolbar to open a tab with the list of open image files
- Double-click any item in the list to open the tab containing that image and view it
- Click the heading of any column to sort the list by that column
The columns contain the following information:
- No: An icon indicating the origin of the image - the V icon if it came from Voyager, a folder icon if from a manual file open. Also the image number, a sequential integer corresponding to the order in which the image was opened
- TimeInfo: The time at which the image was opened. This will roughly correspond to the time the image was downloaded to Voyager if it was opened automatically after download
- FileName: The name of the file on disk holding the image
- Filter: The filter used to take the image, from the FITS header
- Exp: Exposure length of the image in seconds, from the FITS header
- Sequence: Number of the Sequence that was used to take the image if it was taken with a Sequence run
- HFD: Average half-flux diameter of the stars found in the image
- Stars Index: This is value of the number of predicted stars divided by the number of stars used for computing the HFD. This index goes lower as the sky conditions get worse, and goes higher as they improve
- Sequence: Target name from the Sequence used to take this image, if it was taken with a Sequence run
- Path: Folder containing the image file
At the bottom of the file list there are buttons to manage the list and view the most recent image added to the list:
- Clear list: Empties the list (but does not close all the open windows)
- Restore List Order: Puts the list back in the original order, showing the most recently opened image first
- Select Last Image: Selects the image most recently opened or downloaded from Voyager
- Show Last Image: Shows the image most recently opened or downloaded from Voyager
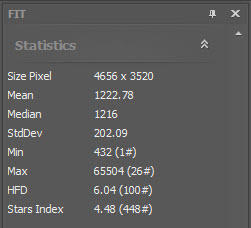
Image Statistics
Image Statistics are displayed on the top right side of the FIT Viewer.
Note: You can click the double-up arrow icon to "roll-up" this window and then click it again to open it
- Size Pixel: Image size in pixels, width x height
- Mean: Mean ADU value of the pixels in the image (average brightness of your raw data)
- Median: Median ADU value of the pixels in the image
- StdDev: Standard Deviation of the ADU value of the pixels in your image
- Min: ADU value of the dimmest pixel in your image, and in ()'s, the number of pixels with that value
- Max: ADU value of the brightest pixel in your image, and in ()'s, the number of pixels with that value
- HFD: The average HFD (Half Flux Diameter) of the stars in your image
- Stars Index: The stars index is the number of predicted stars divided by the number of stars used in the HFD calculation. Voyager's AI predicts the number of stars (the number in parentheses). As sky conditions improve, this number gets larger. As sky conditions get worse, this number gets lower
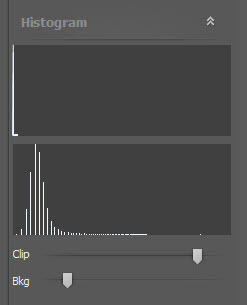
Histogram
Input and output histograms and controls are displayed on the middle right of the FIT Viewer window:
- Top window: shows the histogram of the raw image file currently displayed in the viewer
- Lower window: shows the histogram of the stretched image based on the currently applied stretch
- Clip: Click and drag this slider control to the left to clip more of the brighter pixels in your image. Notice that the image looks dimmer when you drag left, and brighter when you drag right.
- Bkg: Click and drag this slider control to the left to clip more of the dimmer pixels in your image.
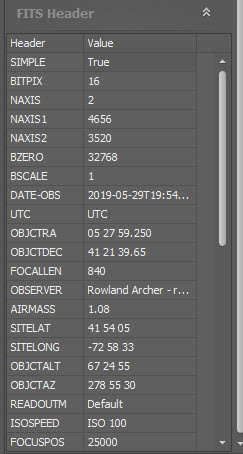
FITS Header
A table showing the values in the image's FITS header is displayed on the bottom right of the FIT Viewer:
The actual content of this window depends on your image. FITS header values are not 100% standard and your camera driver is likely to insert different values from the ones you see here.
Use the scroll bar on the right to move the table up and down and see all the header values.


