Observing Conditions Setup
Revision as of 16:24, 23 April 2022 by Leonardo (talk | contribs) (→Observing Conditions Setup Workspace)
Observing Conditions Setup
You can connect an Observing Conditions monitor to Voyager and display status of things like temperature, humidity, cloud cover, etc. Open Weather Map is supported via ASCOM, as well as any other device accessible via an ASCOM driver, or a device connected to Viking.
Observing Conditions are displayed in the Observing Conditions widget in the status window, and can be tested with the Update Decimal Number from Observing Conditions DragScript action.
Color Coding
Throughout the Setup workspace, Voyager uses color to indicate the following:
- Black: A normal setting
- Gold or Yellow: Use caution when changing as things may not work well or as expected
- Red: Use extreme care when changing this setting - the wrong value can damage your equipment or the imaging session may fail
Observing Conditions Setup Workspace
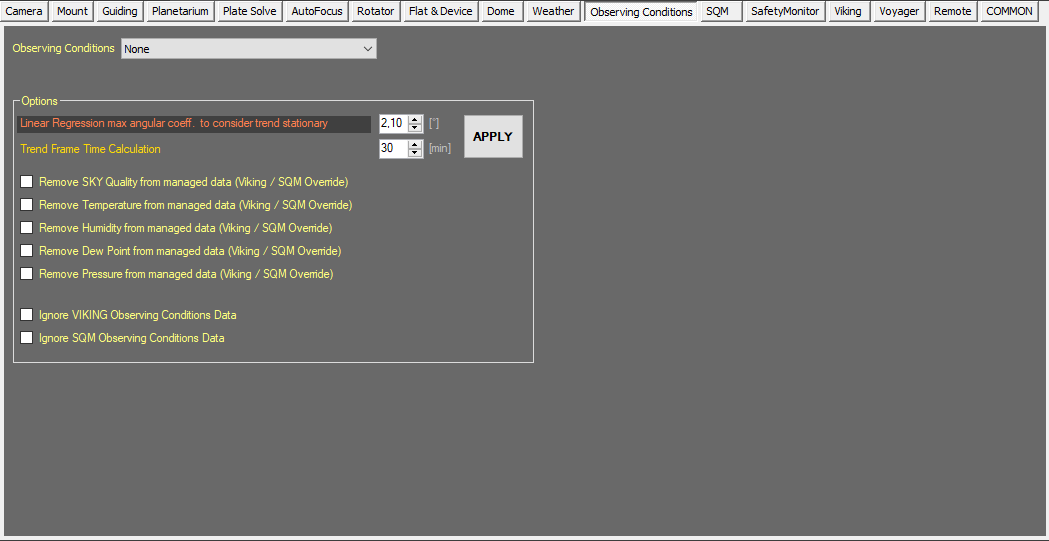
The Observing Conditions setup worksapce is where you select and configure an observing conditions monitoring device:
- Observing Conditions: Select your observing conditions monitoring device from the drop-down list:
- None: No observing conditions monitor is connected
- VIKING Observing Conditions Client: The observing conditions monitor is connected to Viking
- ASCOM Observing Conditions: An ASCOM driver is used to connect to the observing conditions monitor
- Options:
- Linear Regression max angular coeff. to consider trend stationary: The Observing Conditions status widget displays the current value and a trend indicator. This coefficient value controls whether the trend is shown as stable, increasing or decreasing. Change with caution - you can miss observing condition changes if you set this incorrectly
- Trend Frame Time Calculation: Sets the time frame in minutes for the moving average calculation of observing condition trends
- Remove Temperature from managed data (Viking / SQM Override): If checked, delete the temperature data returned from the Observing Conditions monitor - use the value from the Viking /SQM sensor instead
- Remove SKY Quality from managed data (Viking / SQM Override): If checked, delete the Sky Quality data returned from the Observing Conditions monitor - use the value from the Viking /SQM sensor instead
- Remove Humidity from managed data (Viking / SQM Override): If checked, delete the humidity data returned from the Observing Conditions monitor - use the value from the Viking /SQM sensor instead
- Remove Dev Point from managed data (Viking / SQM Override): If checked, delete the Dev Point data returned from the Observing Conditions monitor - use the value from the Viking /SQM sensor instead
- Remove Pressure from managed data (Viking / SQM Override): If checked, delete the Pressure data returned from the Observing Conditions monitor - use the value from the Viking /SQM sensor instead
- Ignore VIKING Observing Conditions Data: If checked, observing conditions data coming from VIKING will not override the Observing Conditions Data of main control
- Ignore SQM Observing Conditions Data: If checked, observing conditions data coming from SQM control will not override the Observing Conditions Data of main control
- Options:
Other Setup Pages
▼ Setup

